Audi A6 Typ 4G: Balance Weight, Removing And Installing
 Caution
This procedure contains mandatory replaceable parts.
Refer to component overview and parts catalog prior to
starting procedure.
Mandatory Replacement Parts
- Bolts - Vibration damper to brake caliper.
Depending on the model there are two balance weights
installed in each front brake caliper.
Removing
- Remove the dust cap if equipped.
- Remove the bolt -1-.
- Remove the vibration damper -2-
from the brake caliper -3-.
Installing
- Clean the brake caliper around the balance weight.
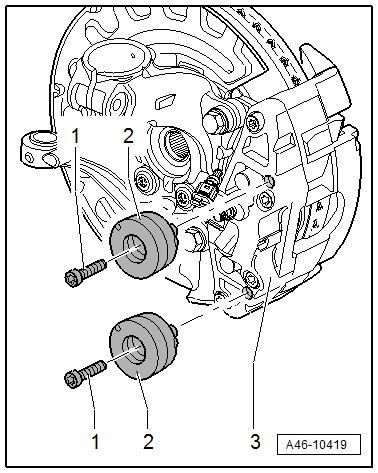
- Install the damper -2- in the
brake caliper.
- Install the new bolts -1- and tighten -item 1-.
- Replace the existing protective cap.
READ NEXT:
Brake Pads, Removing and Installing, Steel Brakes, 1LA/1LJ
Special tools and workshop equipment
required
Torque Wrench 1331 5-50Nm -VAG1331-
Piston Resetting Tool -T10145-
Lithium grease. Refer t
Brake Caliper, Removing and Installing, Steel Brakes, 1LA/1LJ
Special tools and workshop equipment
required
Torque Wrench 1332 40-200Nm -VAG1332-
Caution
This procedure contains mandatory
Brake Caliper, Replacing, Steel Brakes, 1LA/1LJ/1LF/1LL/1LU and Ceramic
Brakes, LN/1LW
Special tools and workshop equipment
required
Torque Wrench 1332 40-200Nm -VAG1332-
Brake Pedal Actuator -VA
SEE MORE:
C-Pillar-Trim Panel, Removing and Installing, Sedan
Special tools and workshop equipment
required
Pry Lever -80-200-
Omega Clip Tool -T40280-
Removing
WARNING
Follow all Safety Precautions when working with
pyrotechnic components. Refer to
→ Chapter "Pyrotechnic Components Saf
Overview - Front Axle Speed Sensor
1 - Wheel Bearing Housing
2 - Bolt
9 Nm
3 - Speed Sensor
Right Front ABS Wheel Speed Sensor -G45-/Left Front ABS Wheel Speed
Sensor -G47-
Removing and installing. Refer to
→ Chapter "Right/Left Front ABS Wheel Speed Se

