Audi A6 Typ 4G (2011–2018) Workshop Manual / Body / Body Interior / Interior Trim / Component Location Overview - Roof Trim Panel
Audi A6 Typ 4G: Component Location Overview - Roof Trim Panel
Component Location Overview - Roof Trim Panel, Sedan
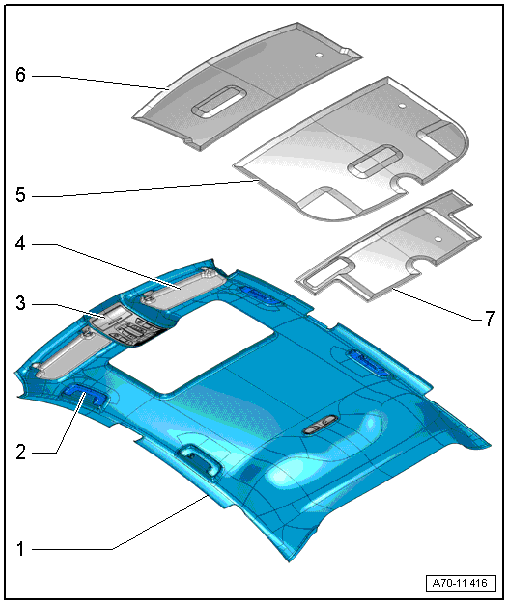
1 - Headliner
For vehicles:
- Without a sunroof
- With sunroof/Panorama sunroof
- Overview. Refer to → Chapter "Overview - Headliner, Sedan".
 Caution
- The headliner bends easily.
- Replace the headliner if it is bent.
2 - Roof Grab Handle
- Removing and installing. Refer to → Chapter "Roof Grab Handle, Removing and Installing".
3 - Interior/Front Reading Lamp
- Removing and installing. Refer to → Electrical Equipment; Rep. Gr.96; Controls; Front Interior Lamp/Reading Lamp, Removing and Installing.
4 - Sun Visor
- Overview. Refer to → Chapter "Overview - Sun Visors".
5 - Rear Roof Reinforcement
- For vehicles without a sunroof
- Installing. Refer to → Chapter "Roof Reinforcement, Attaching to Body, Sedan without Sunroof".
6 - Front Roof Reinforcement
- For vehicles without a sunroof
- Installing. Refer to → Chapter "Roof Reinforcement, Attaching to Body, Sedan without Sunroof".
7 - Roof Reinforcement
- For vehicles with sunroof
- Installing. Refer to → Chapter "Roof Reinforcement, Attaching to Body, Sedan without Sunroof".
Component Location Overview - Roof Trim Panel, Avant

1 - Mount
- For the screen separator wall
- Overview. Refer to → Chapter "Overview - Screen Separator".
2 - Roof Grab Handle
- Removing and installing. Refer to → Chapter "Roof Grab Handle, Removing and Installing".
3 - Interior/Front Reading Lamp
- Removing and installing. Refer to → Electrical Equipment; Rep. Gr.96; Controls; Front Interior Lamp/Reading Lamp, Removing and Installing.
4 - Sun Visor
- Overview. Refer to → Chapter "Overview - Sun Visors".
5 - Roof Reinforcement
- For vehicles without a sunroof
- Installing. Refer to → Chapter "Roof Reinforcement, Attaching to Body, Avant without Sunroof".
6 - Headliner
Vehicles with:
- Without a sunroof
- With sunroof
- Overview. Refer to → Chapter "Overview - Headliner, Avant".
Caution
- The headliner bends easily.
- Replace the headliner if it is bent.
7 - Roof Panel Trim
- Overview. Refer to → Chapter "Overview - Roof End Strip".

