Audi A6 Typ 4G: Driver and Front Passenger Door Ambient Lighting Bulb -L164-/-L165-, Removing and Installing
Removing
- Remove the front door trim panel. Refer to → Body Interior; Rep. Gr.70; Front Door Trim Panels; Front Door Trim Panel, Removing and Installing.
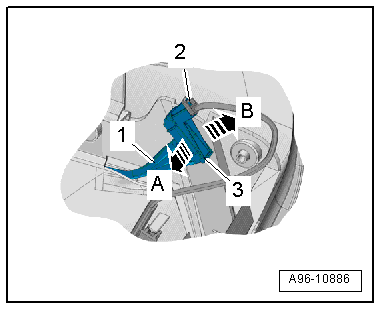
- Remove the bulb -3- from the door trim panel in direction of -arrow A- and from the lighting strip -1- at the same time in direction of -arrow B-.
- Disconnect the connector -2-.
Installing
Install in reverse order of removal. Note the following:
 Note
Note
The entire ambient lighting must be replaced if one of the LEDs is faulty.
Driver and Front Passenger Door Storage Compartment Illumination Bulb -L160-/-L161-, Removing and Installing
Removing
- Remove the front door trim panel. Refer to → Body Interior; Rep. Gr.70; Front Door Trim Panels; Front Door Trim Panel, Removing and Installing.
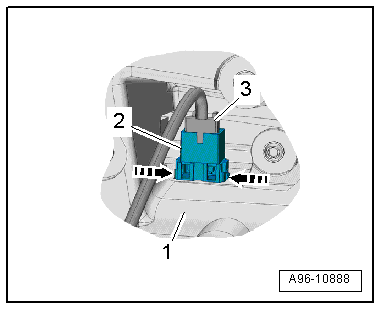
- Release the retaining clips -arrows-.
- Remove the door storage compartment illumination bulb -2- from the door trim panel -1-.
- Disconnect the connector -3-.
Installing
Install in reverse order of removal. Note the following:
Note
If one of the LEDs is faulty, then the complete door storage compartment illumination bulb must be replaced.
Left and Right Ambient Lighting Bulb for Rear Doors -L166-/-L167-, Removing and Installing
Removing
- Remove the rear door trim panel. Refer to → Body Interior; Rep. Gr.70; Rear Door Trim Panels; Rear Door Trim Panel, Removing and Installing.
- Remove the bulb -3- from the door trim panel in direction of -arrow A- and from the lighting strip -1- at the same time in direction of -arrow B-.
- Disconnect the connector -2-.
Installing
Install in reverse order of removal. Note the following:
Note
The entire ambient lighting must be replaced if one of the LEDs is faulty.
Left and Right Rear Door Storage Compartment Illumination Bulb -L170-/-L171-, Removing and Installing
Removing
- Remove the rear door trim panel. Refer to → Body Interior; Rep. Gr.70; Rear Door Trim Panels; Rear Door Trim Panel, Removing and Installing.
- Release the retaining clips -arrows-.
- Remove the door storage compartment illumination bulb -2- from the door trim panel -1-.
- Disconnect the connector -3-.
Installing
Install in reverse order of removal. Note the following:
Note
If one of the LEDs is faulty, then the complete door storage compartment illumination bulb must be replaced.
Selector Lever Transmission Range Position Display Unit -Y26-, Removing and Installing
Removing
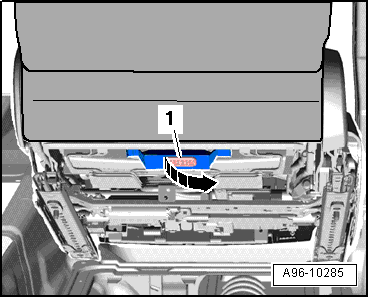
- Remove the multimedia system control head. Refer to → Communication; Rep. Gr.91; Infotainment System; Multimedia System Control Head E380, Removing and Installing.
- Release the tabs with a narrow screwdriver in direction of -arrows-.
- Remove the selector lever transmission range position display unit -1- from the control head.
Installing
Install in reverse order of removal.
Center Armrest Illumination Bulb -L157-, Removing and Installing
Removing
- Remove the center console. Refer to → Body Interior; Rep. Gr.68; Center Console; Center Console, Removing and Installing.
- Remove the bulb -3- from the center console in direction of -arrow A- and from the lighting strip -1- at the same time in direction of -arrow B-.
- Disconnect the connector -2-.
Installing
Install in reverse order of removal. Note the following:
Note
If one of the LEDs is faulty, then the center armrest illumination bulb must be replaced.
Rear Center Console Ambient Lighting Bulb 1/Bulb 2 - L197-/-L198-, Removing and Installing
Removing
- Remove the armrest lower section. Refer to → Body Interior; Rep. Gr.72; Rear Seats; Overview - Center Armrest.
- Remove the padding from the center armrest. Refer to → Body Interior; Rep. Gr.72; Rear Seats; Overview - Center Armrest.
- Open the retaining clips -1 and 3- to free up the connector -2-.
- Remove the bulb -4- from the center armrest padding -5- in direction of -arrow A- and, at the same time, release it from the lighting strip -6- in the direction of -arrow B-.
Installing
Install in reverse order of removal. Note the following:
Note
The entire ambient lighting must be replaced if one of the LEDs is faulty.

Left/Right Rear Footwell Lamp -W45-/-W46-, Removing and Installing
Removing
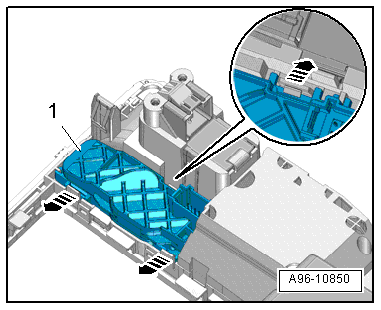
- Carefully pry out the bulb -1- using a flat-blade screwdriver in direction of -arrow-.
- Disconnect the connector.
Installing
Install in reverse order of removal. Note the following:
Note
The entire footwell lamp must be replaced if an LED is faulty.
- Insert the footwell lamp into the opening and engage on the opposite side.