Audi A6 Typ 4G: Final Drive
Overview - Final Drive
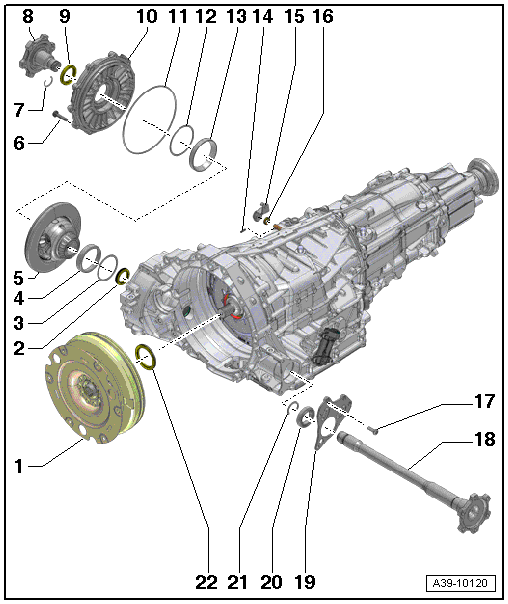
1 - Flywheel
- Removing and installing. Refer to → Chapter "Flywheel, Removing and Installing".
2 - Shaft Seal
- For the left flange shaft
- Between the final drive and the transmission housing
- Replacing. Refer to → Chapter "Left Seal, Replacing".
3 - Shim
- Behind the taper roller bearing outer race
4 - Taper Roller Bearing Outer Race
5 - Differential
6 - Bolt
- Quantity 10
- Tightening specification and sequence. Refer to → Fig. "Tightening Specification and Sequence, Front Final Drive Cover"
7 - Locking Ring
- Replacing
8 - Right Flange Shaft
- Removing and installing. Refer to → Chapter "Right Flange Shaft, Removing and Installing".
9 - Shaft Seal
- For the right flange shaft
- Replacing. Refer to → Chapter "Right Seal, Replacing".
10 - Front Final Drive Cover
- Removing and installing. Refer to → Chapter "Left Seal, Replacing".
11 - O-Ring
- On the front final drive cover
- Replacing
12 - Shim
- Behind the taper roller bearing outer race
13 - Taper Roller Bearing Outer Race
14 - Spring Pin
15 - Gearshift Lever
16 - Shaft Seal
- For the selector shaft
- Replacing. Refer to → S tronic Transmission; Rep. Gr.34; Selector Mechanism; Selector Shaft Seal, Replacing
17 - Bolt
- 10 Nm + 45º
- Quantity: 3
18 - Left Flange Shaft
- Removing and installing. Refer to → Chapter "Left Flange Shaft, Removing and Installing".
19 - Bracket
- Attached to the left flange shaft with the ball bearing -20- and the circlip -21-
- Check for traces of wear on the bearing bracket and check the pre-tension on the ball bearing for the left flange shaft. Refer to → Chapter "Left Flange Shaft Ball Bearing Pre-Tension, Checking and Adjusting"
20 - Ball Bearing
- For the left flange shaft
- Left Flange Shaft Ball Bearing Pre-Tension, Checking. Refer to → Chapter "Left Flange Shaft Ball Bearing Pre-Tension, Checking and Adjusting"
- Replacing. Refer to → Chapter "Left Flange Shaft Ball Bearing Mounting Bracket, Removing and Installing".
21 - Locking Ring
- For the left flange shaft bearing
- Replacing
22 - Shaft Seal
- For the input shaft
- Replacing. Refer to → Chapter "Input Shaft Seal, Replacing".
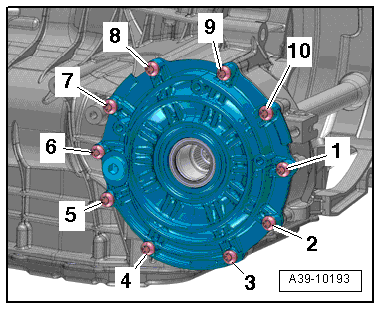
Tightening Specification and Sequence, Front Final Drive Cover
 Note
Note
Replace any bolts that were tightened with an additional turn.
- Tighten the bolts in three steps in the sequence shown:
.png)

