Audi A6 Typ 4G: Multimedia System Control Head -E380-, Removing and Installing
Multimedia System Control Head -E380-, Removing and Installing, QW1
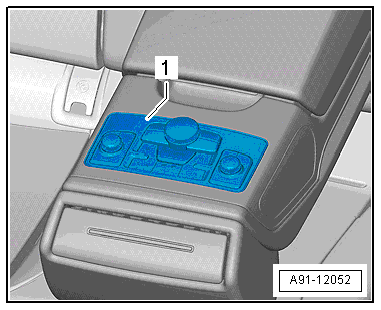
The Multimedia System Control Head -E380- (QW1) is located in the center console at the front.
Removing
- Turn off the ignition and all electrical consumers and remove the ignition key.
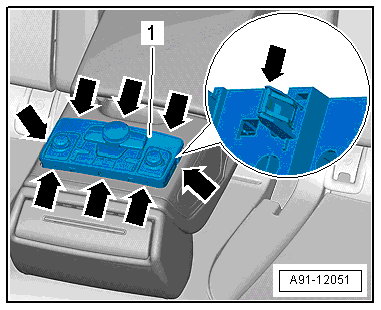
Four spring tabs hold the Multimedia System Control Head -E380- in the center console.
 Caution
The surfaces can get scratched very easily.
Carefully mask all surfaces and parts!
Vehicles with Automatic Transmission
- Remove the selector lever handle. Refer to → Rep. Gr.37; Selector Mechanism; Selector Lever Handle, Removing and Installing/ → Rep. Gr.34; Selector Mechanism; Selector Lever Handle, Removing and Installing.
Vehicles with Manual Transmission
- Remove the gearshift knob with the shift lever boot. Refer to → Rep. Gr.34; Selector Mechanism; Gearshift Knob, Removing and Installing.
Continuation for All Vehicles
- With both hands, reach into the opening and remove the Multimedia System Control Head -E380--1- with a jerk upward -arrows- from the center console -2-.
Caution
Pay attention to the different wire lengths to the connectors!
- Release and disconnect the connector from the back of the Multimedia System Control Head -E380-.
- Remove the installed switch. Refer to → Electrical Equipment; Rep. Gr.96; Controls; Overview - Center Console Controls.
Installing
- Install in reverse order of removal.

Multimedia Control Head 2 -E499-, Removing and Installing
Special tools and workshop equipment required
- Trim Removal Wedge -3409-
The Multimedia Control Head 2 -E499--1- is located inside the rear center armrest.
Removing
- Turn off the ignition and all electrical consumers and remove the ignition key.
- Fold the center armrest down and back.
Caution
The surfaces can get scratched very easily.
Carefully mask all surfaces and parts!
Spring clips attach the -1- the Multimedia Control Head 2 -E499--2- to the rear center armrest.

- Starting at the back -arrow-, press the Multimedia Control Head 2 -E499--1- out of the rear center armrest using the Trim Removal Wedge -3409-.
- make sure that the spring clip -arrow- is tightly secured.
Caution
The surfaces can get scratched very easily.
Carefully mask all surfaces and parts!
- Unlock and disconnect the connector on the back of the Multimedia Control Head 2 -E499--1-.
Installing
- Install in reverse order of removal.
Caution
The surfaces can get scratched very easily.
Carefully mask all surfaces and parts!
Touchpad Control Module -J929-, Removing and Installing, UJ1
The Touchpad Control Module -J929- (UJ1) is located on the bottom of the Multimedia System Control Head -E380-. It cannot be replaced alone.
If faulty, then the Multimedia System Control Head -E380- must be replaced. Refer to → Chapter "Multimedia System Control Head -E380-, Removing and Installing, QW1".

