Audi A6 Typ 4G: Overview - Center Console Lamps
Overview - Center Console Lamps
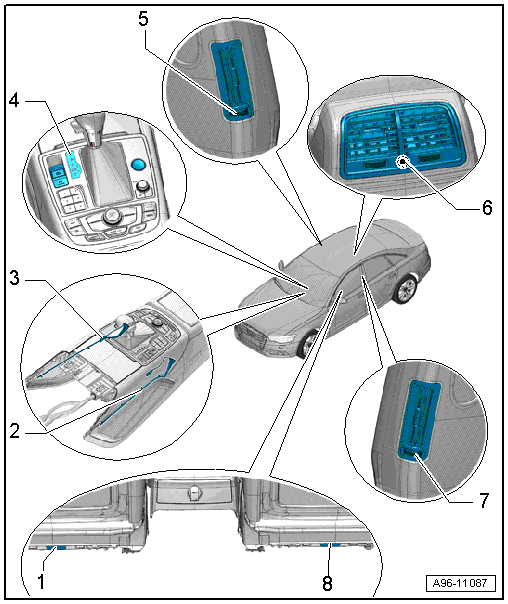
1 - Left Rear Footwell Lamp -W45-
- Removing and installing. Refer to → Chapter "Left/Right Rear Footwell Lamp -W45-/-W46-, Removing and Installing".
2 - Right Center Armrest Illumination Bulb -L157- Left
- Removing and installing. Refer to → Chapter "Center Armrest Illumination Bulb -L157-, Removing and Installing".
3 - Right Center Armrest Illumination Bulb -L157- Right
- Removing and installing. Refer to → Chapter "Center Armrest Illumination Bulb -L157-, Removing and Installing".
4 - Selector Lever Transmission Range Position Display Unit -Y26-
- Removing and installing. Refer to → Chapter "Selector Lever Transmission Range Position Display Unit -Y26-, Removing and Installing".
5 - Right B-Pillar Vent
- Vehicles with Right Rear Air Vent Illumination Bulb -L89-
- Cannot be replaced separately if faulty.
- Replacing. Refer to → Body Interior; Rep. Gr.70; Passenger Compartment Trim; Overview - B-Pillar Trim Panel.
6 - Rear Center Air Vent Illumination Bulb -L87-
- Equipment level
- Cannot be replaced separately if faulty.
- Replacing. Refer to → Body Interior; Rep. Gr.68; Center Console; Overview - Center Console.
7 - Left B-Pillar Vent
- Vehicles with Left Rear Air Vent Illumination Bulb -L88-
- Cannot be replaced separately if faulty.
- Replacing. Refer to → Body Interior; Rep. Gr.70; Passenger Compartment Trim; Overview - B-Pillar Trim Panel.
8 - Right Rear Footwell Lamp -W46-
- Removing and installing. Refer to → Chapter "Left/Right Rear Footwell Lamp -W45-/-W46-, Removing and Installing".
Overview - Center Console Lamps, Market-Specific
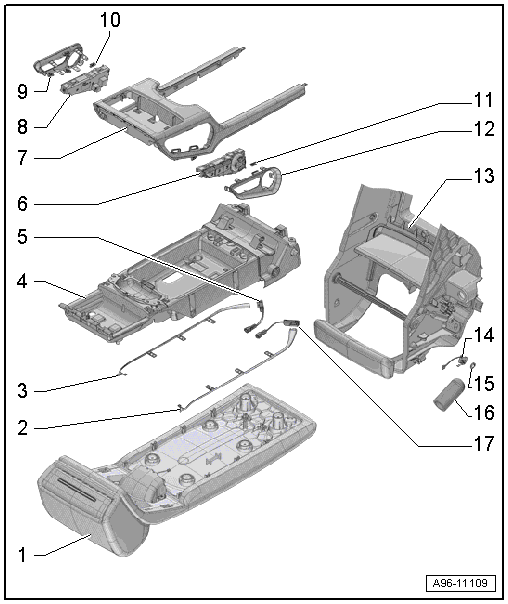
1 - Center Armrest Cushion
2 - Left Fiber Optic Cable
- For ambient lighting
3 - Right Fiber Optic Cable
- For ambient lighting
4 - Armrest-Lower Section
5 - Right Rear Center Console Ambient Lighting Bulb 2 -L198-
- Removing and installing. Refer to → Chapter "Rear Center Console Ambient Lighting Bulb 1/Bulb 2 - L197-/-L198-, Removing and Installing".
6 - Left Rear Seat Massage Button -E409-
7 - Trim
- For the center armrest
8 - Right Rear Seat Massage Button -E410-
9 - Right Trim
- For the rear seat massage button
10 - Clamp
- Quantity: 3
11 - Clamp
- Quantity: 3
12 - Left Trim
- For the rear seat massage button
13 - Center Armrest
14 - Rear Center Console Ambient Lighting Contact Switch -F501-
15 - Clamp
- Quantity: 2
16 - Grommet
17 - Left Rear Center Console Ambient Lighting Bulb 1 -L197-
- Removing and installing. Refer to → Chapter "Rear Center Console Ambient Lighting Bulb 1/Bulb 2 - L197-/-L198-, Removing and Installing".
Overview - Luggage Compartment Lamps
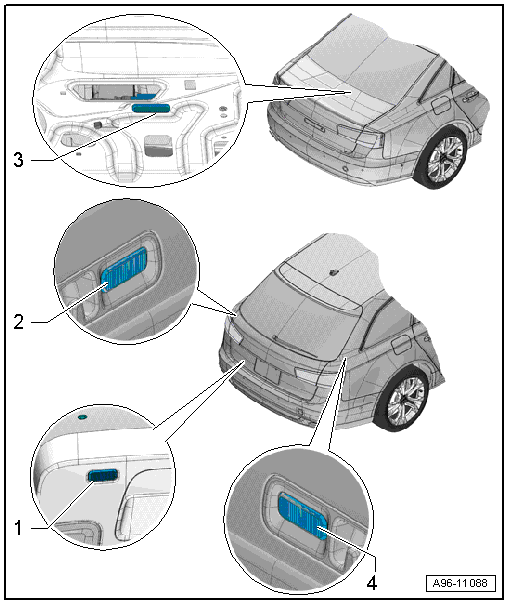
1 - Luggage Compartment Lamp -W3- - Avant
- In rear lid
- Removing and installing. Refer to → Chapter "Luggage Compartment Lamp -W3-, Removing and Installing, Avant".
2 - Luggage Compartment Lamp -W3- - Avant
- In the left luggage compartment trim panel
- 12 V, 5 W
- Removing and installing. Refer to → Chapter "Luggage Compartment Lamp -W3-, Removing and Installing, Avant".
3 - Luggage Compartment Lamp -W3- - Sedan
- Inside the top of the luggage compartment trim panel
- 12 V, 5 W
- Removing and installing. Refer to → Chapter "Luggage Compartment Lamp -W3-, Removing and Installing".
4 - Luggage Compartment Lamp -W3- - Avant
- In the right luggage compartment trim panel
- 12 V, 5 W
- Removing and installing. Refer to → Chapter "Luggage Compartment Lamp -W3-, Removing and Installing, Avant".
Overview - Roof Trim Panel Lamps
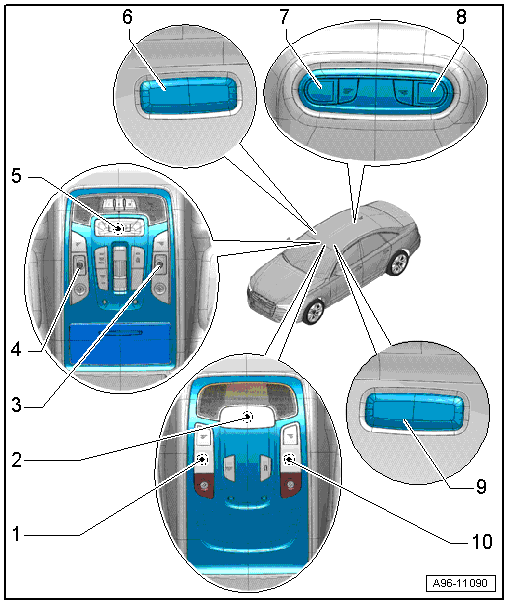
1 - Driver Reading Lamp -W19-
- "Basis"
- Replacing. Refer to → Chapter "Front Passenger/Driver Reading Lamp -W13-/-W19-, Replacing".
2 - Front Interior Lamp -W1-
- "Basis"
- Replacing. Refer to → Chapter "Front Interior Lamp -W1-/Front Passenger Reading Lamp -W13-/Driver Reading Lamp -W19-, Replacing".
3 - Right Front Reading Lamp -W66-
- "Comfort"
- If the LED is faulty, then the interior lamp/reading lamp must be replaced.
4 - Left Front Reading Lamp -W65-
- "Comfort"
- If the LED is faulty, then the interior lamp/reading lamp must be replaced.
5 - Front Interior Lamp -W1-
- "Comfort"
- If the LED is faulty, then the interior lamp/reading lamp must be replaced.
6 - Front Passenger Vanity Mirror Lamp -W14-
- Removing and installing. Refer to → Chapter "Driver/Front Passenger Vanity Mirror Lamp -W20-/-W14-, Removing and Installing".
7 - Left Rear Interior Lamp -W47-
"Basis"
- Replacing. Refer to → Chapter "Left/Right Rear Interior Lamp -W47-/-W48-, Replacing".
"Comfort"
- The rear interior lamp must be replaced if one of the LEDs is faulty
8 - Right Rear Interior Lamp -W48-
"Basis"
- Replacing. Refer to → Chapter "Left/Right Rear Interior Lamp -W47-/-W48-, Replacing".
"Comfort"
- The rear interior lamp must be replaced if one of the LEDs is faulty
9 - Driver Vanity Mirror Lamp -W20-
- Removing and installing. Refer to → Chapter "Driver/Front Passenger Vanity Mirror Lamp -W20-/-W14-, Removing and Installing".
10 - Front Passenger Reading Lamp -W13-
- "Basis"
- Replacing. Refer to → Chapter "Front Passenger/Driver Reading Lamp -W13-/-W19-, Replacing".

