Audi A6 Typ 4G (2011–2018) Workshop Manual / Body / Body Interior / Seat Upholstery, Covers / Overview - Front Seat Pan Cover and Cushion
Audi A6 Typ 4G: Overview - Front Seat Pan Cover and Cushion
Overview - Seat Pan Cover and Cushion, Standard Seat
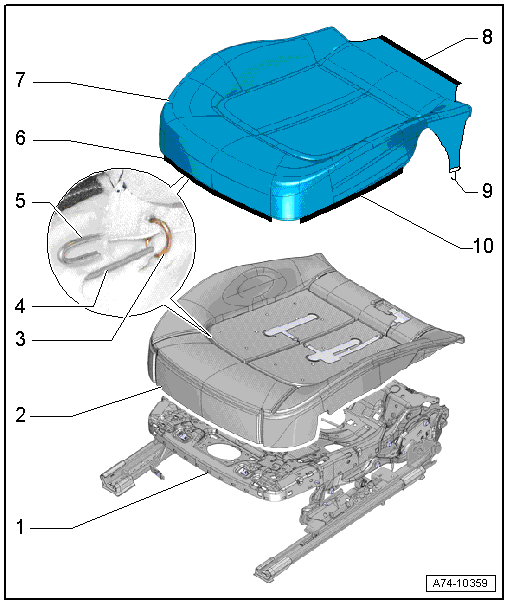
1 - Seat Pan
2 - Seat Cushion
- Seat cover and cushion, removing and installing. Refer to → Chapter "Lower Seat Frame Cover and Cushion, Removing and Installing, Standard Seat".
- Seat cover and cushion, removing and installing. Refer to → Chapter "Seat Pan Cover and Cushion, Separating".
- Allocation. Refer to the Parts Catalog.
3 - Cushion Clip
- For attachment of seat cover to seat cushion
- Replace
- Install at the same location with Upholstery Clip Pliers -VAG1634-.
4 - Wire
- Embedded in the foam of the seat cushion
- For attachment of seat cover to seat cushion
5 - Contour Wire
- Inserted in the pocket of the seat cover
- For attachment of seat cover to seat cushion
6 - Molding
- Sewn into seat cover
- For engaging seat cover on seat pan upper frame
- Make sure it fits correctly in the upper seat frame
7 - Seat Cover
- Seat cover and cushion, removing and installing. Refer to → Chapter "Lower Seat Frame Cover and Cushion, Removing and Installing, Standard Seat".
- Seat cover and cushion, removing and installing. Refer to → Chapter "Seat Pan Cover and Cushion, Separating".
- Allocation. Refer to the Parts Catalog.
- Make sure there are no folds after installing
8 - Molding
- Sewn into seat cover
- For engaging seat cover on seat pan upper frame
- Make sure it fits correctly in the upper seat frame
9 - Tab
- With hooks
- For engaging seat cover on seat pan upper frame
10 - Molding
- Sewn into seat cover
- For engaging seat cover on seat pan upper frame
- Make sure it fits correctly in the upper seat frame
Overview - Seat Pan Cover and Cushion, Sport Seat/Super Sport Seat
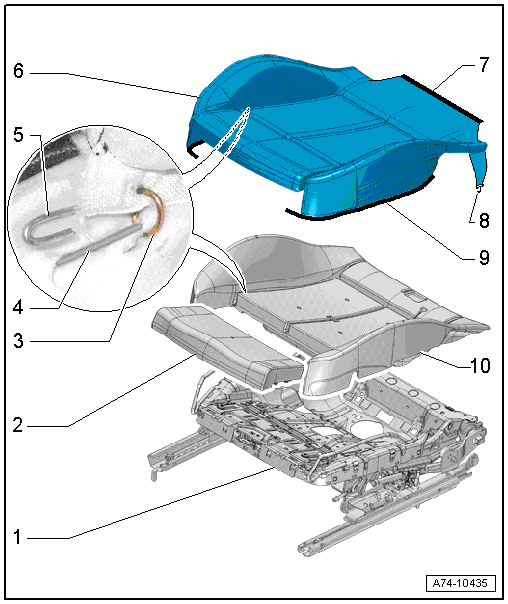
1 - Seat Pan
2 - Seat Cushion
- For seat depth adjustment
- Seat cover and cushion, removing and installing. Refer to → Chapter "Seat Pan Cover and Cushion, Removing and Installing, Sport Seat/Super-Sport Seat".
- Seat cover and cushion, removing and installing. Refer to → Chapter "Seat Pan Cover and Cushion, Separating".
- Allocation. Refer to the Parts Catalog.
3 - Cushion Clip
- For attachment of seat cover to seat cushion
- Replace
- Install at the same location with Upholstery Clip Pliers -VAG1634-.
4 - Wire
- Embedded in the foam of the seat cushion
- For attachment of seat cover to seat cushion
5 - Contour Wire
- Inserted in the pocket of the seat cover
- For attachment of seat cover to seat cushion
6 - Seat Cover
- Seat cover and cushion, removing and installing. Refer to → Chapter "Seat Pan Cover and Cushion, Removing and Installing, Sport Seat/Super-Sport Seat".
- Seat cover and cushion, removing and installing. Refer to → Chapter "Seat Pan Cover and Cushion, Separating".
- Allocation. Refer to the Parts Catalog.
- Make sure there are no folds after installing
7 - Molding
- Sewn into seat cover
- For engaging seat cover on seat pan upper frame
- Make sure it fits correctly in the upper seat frame
8 - Tab
- With hooks
- For engaging seat cover on seat pan upper frame
9 - Molding
- Sewn into seat cover
- For engaging seat cover on seat pan upper frame
- Make sure it fits correctly in the upper seat frame
10 - Seat Cushion
- Seat cover and cushion, removing and installing. Refer to → Chapter "Seat Pan Cover and Cushion, Removing and Installing, Sport Seat/Super-Sport Seat".
- Seat cover and cushion, removing and installing. Refer to → Chapter "Seat Pan Cover and Cushion, Separating".
- Allocation. Refer to the Parts Catalog.
Overview - Seat Pan Cover and Cushion, Multi-contour Seat
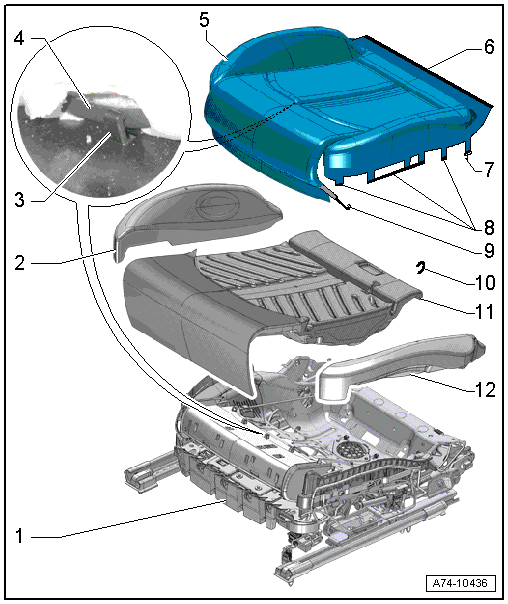
1 - Seat Pan
- With a seat depth adjuster
2 - Seat Bolster Cushion
- Removing and installing. Refer to → Chapter "Seat Pan Seat Bolster Cushion, Removing and Installing, Multi-contour Seat".
3 - Retaining Hook
- On the seat depth adjuster cover
- Quantity: 4
4 - Clamping Strip
- Sewn into seat cover
- For attaching the seat cover and seat cushion to seat depth adjuster cover
5 - Seat Cover
- Seat cover and cushion, removing and installing. Refer to → Chapter "Seat Pan Cover and Cushion, Removing and Installing, Multi-contour Seat".
- Seat cover and cushion, removing and installing. Refer to → Chapter "Seat Pan Cover and Cushion, Separating, Multi-contour Seat".
- Allocation. Refer to the Parts Catalog.
- Make sure there are no folds after installing
6 - Molding
- Sewn into seat cover
- For attaching the rear seat cover to the seat pan upper frame
- Make sure it fits correctly in the upper seat frame
7 - Tab
- With hooks
- Sewn into seat cover
- For engaging seat cover on the lower seat frame
8 - Molding
- Sewn into seat cover
- For attaching the seat cover on the side of the upper seat frame
- Make sure it fits correctly in the upper seat frame
9 - Rubber Strap
- Quantity: 2
- Inserted in the pocket of the seat cover
- For engaging on the seat pan upper frame
10 - Cushion Clip
- For attachment of seat cover to seat cushion
- Replace
- Install at the same location with Upholstery Clip Pliers -VAG1634-.
11 - Seat Cushion
- Seat cover and cushion, removing and installing. Refer to → Chapter "Seat Pan Cover and Cushion, Removing and Installing, Multi-contour Seat".
- Seat cover and cushion, removing and installing. Refer to → Chapter "Seat Pan Cover and Cushion, Separating, Multi-contour Seat".
- Allocation. Refer to the Parts Catalog.
12 - Seat Bolster Cushion
- Removing and installing. Refer to → Chapter "Seat Pan Seat Bolster Cushion, Removing and Installing, Multi-contour Seat".

