Audi A6 Typ 4G: Overview - Locking Mechanism
Overview - Locking Mechanism, Sedan
 Note
Note
The overview shows the locking mechanism on the left 1/3 section of the rear seat backrest. The locking mechanism on the right 2/3 section of the rear seat backrest is identical.
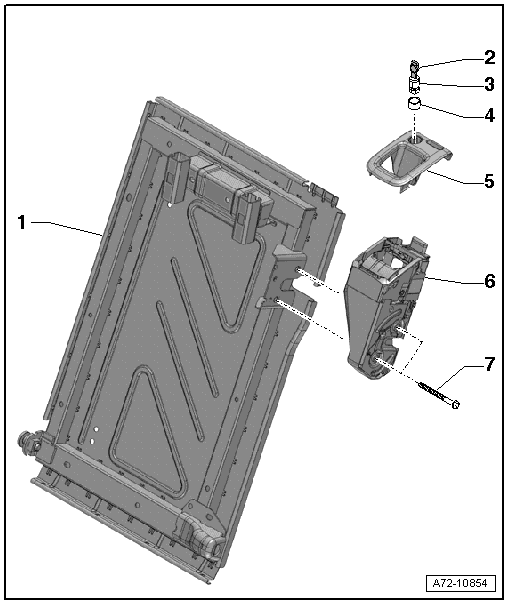
1 - Rear Seat Backrest Frame
2 - Key
3 - Install Lock Cylinder
- Removing and installing. Refer to → Chapter "Rear Seat Backrest Lock Cylinder, Removing and Installing".
 Caution
- Only remove and install the lock cylinder with the key inserted correctly. If that is not done, the tumblers and compression springs can fall out and the lock cylinder will be ruined.
- Check the installation position when installing the lock cylinder. It is not possible to lock the rear seat backrest correctly if the installation position is not correct.
4 - Protective Cap
- For lock cylinder
- Remove before installing the lock cylinder
Caution
The key must be inserted in the lock cylinder correctly before the protective cap is removed. If that is not done, the tumblers and compression springs can fall out and the lock will be ruined.
5 - Trim
- For locking and lock cylinder
- Removing and installing. Refer to → Chapter "Locking Mechanism Trim, Removing and Installing".
- Press on until it engages audibly
6 - Locking Mechanism
- For the rear seat backrest
- Removing and installing. Refer to → Chapter "Rear Seat Backrest Locking Mechanism, Removing and Installing".
7 - Bolt
- 25 Nm
- Quantity: 2
Overview - Locking Mechanism, Avant
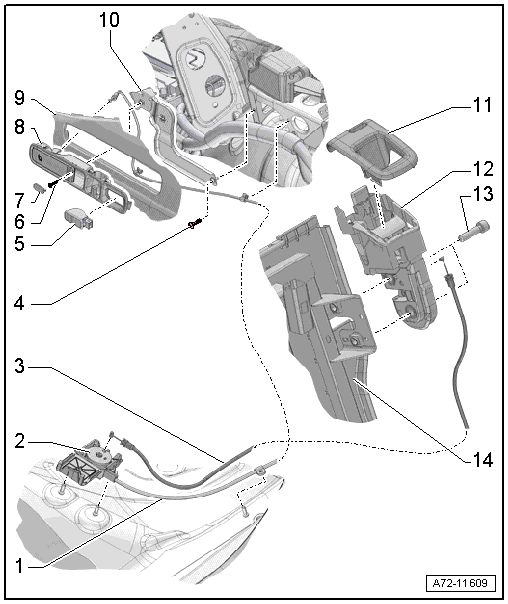
1 - Release Cable
- For backrest release
- Removing and installing. Refer to → Chapter "Rear Seat Backrest Release Cable/Connector Station, Removing and Installing".
2 - Connector Station
- For the release
- Removing and installing. Refer to → Chapter "Rear Seat Backrest Release Cable/Connector Station, Removing and Installing".
- Clip on the vehicle underbody
3 - Release Cable
- For locking
- Removing and installing. Refer to → Chapter "Rear Seat Backrest Locking Mechanism, Removing and Installing".
4 - Bolt
- 5.2 Nm
- Quantity: 2
5 - Luggage Compartment Lamp
- Removing and installing. Refer to → Electrical Equipment; Rep. Gr.96; Lamps; Luggage Compartment Lamp W3, Removing and Installing.
6 - Bolt
- 2.5 Nm
7 - Cap
- Press on until it engages audibly
8 - Release
- For backrest release
- Removing and installing. Refer to → Chapter "Rear Seat Backrest Release, Removing and Installing".
- Press on until it engages audibly
9 - Luggage Compartment Side Trim Panel
- Removing and installing. Refer to → Chapter "Luggage Compartment Side Trim Panel, Removing and Installing, Avant".
10 - Bracket
- For release for the backrest release
- Removing and installing. Refer to → Chapter "Backrest Release Bracket, Removing and Installing".
11 - Trim
- For locking
- Removing and installing. Refer to → Chapter "Locking Mechanism Trim, Removing and Installing".
- Press on until it engages audibly
12 - Locking Mechanism
- For the rear seat backrest
- Removing and installing. Refer to → Chapter "Rear Seat Backrest Locking Mechanism, Removing and Installing".
13 - Bolt
- 25 Nm
- Quantity: 2
14 - Rear Seat Backrest

