Audi A6 Typ 4G (2011–2018) Workshop Manual / Electrical System / Electrical Equipment / Windshield Wiper/Washer System / Overview - Windshield Washer System
Audi A6 Typ 4G: Overview - Windshield Washer System
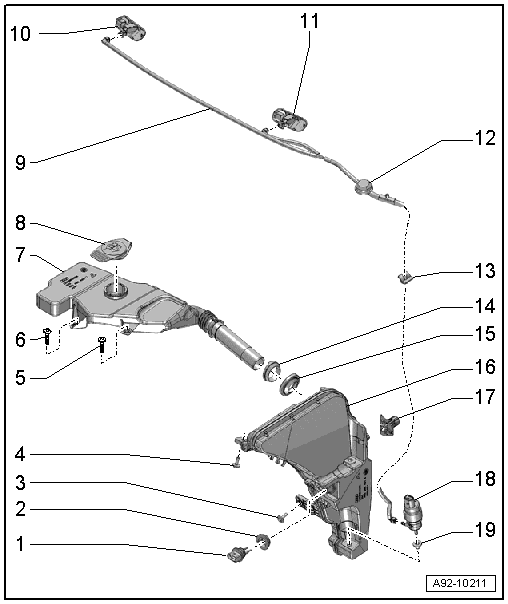
1 - Windshield Washer Fluid Level Sensor -G33-
- Removing and installing. Refer to → Chapter "Windshield Washer Fluid Level Sensor, Removing and Installing".
2 - Grommet
- Replace if damaged.
3 - Screw
- Tightening sequence. Refer to → Fig. "Washer Fluid Reservoir - Tightening Specification and Sequence".
4 - Screw
- Tightening sequence. Refer to → Fig. "Washer Fluid Reservoir - Tightening Specification and Sequence".
5 - Screw
- 8 Nm
6 - Screw
- 8 Nm
7 - Filler Tube
- For the windshield washer fluid reservoir
- Removing and installing. Refer to → Chapter "Washer Fluid Reservoir Filler Tube, Removing and Installing".
8 - Cap
- For the filler neck
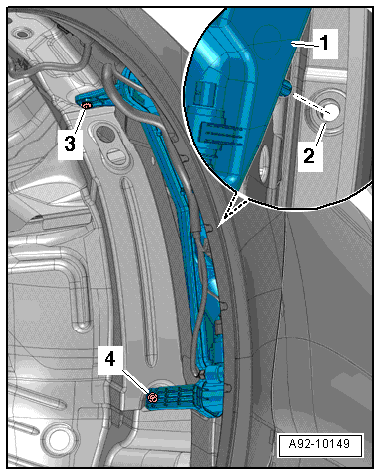
9 - Water Hose
- For the windshield washer system
10 - Right Spray Nozzle
- Vehicle equipment version with Right Washer Nozzle Heater -Z21-
- Removing and installing. Refer to → Chapter "Spray Nozzles, Removing and Installing".
- Adjusting. Refer to → Chapter "Spray Nozzles, Adjusting".
11 - Left Spray Nozzle
- Vehicle equipment version with Left Washer Nozzle Heater -Z20-
- Removing and installing. Refer to → Chapter "Spray Nozzles, Removing and Installing".
- Adjusting. Refer to → Chapter "Spray Nozzles, Adjusting".
12 - Grommet
- For the windshield washer fluid hose inside the hood
13 - Grommet
- For the windshield washer fluid hose on the fender
14 - Grommet
- Replace if damaged.
15 - O-Ring
- Replace if damaged.
16 - Windshield Washer Fluid Reservoir
- Removing and installing. Refer to → Chapter "Windshield Washer Fluid Reservoir, Removing and Installing".
17 - Securing Tab
- For the mount inside the fender end plate
18 - Windshield Washer Pump -V5-
- Removing and installing. Refer to → Chapter "Windshield Washer Pump, Removing and Installing".
19 - Grommet
- Replace if damaged.
Washer Fluid Reservoir - Tightening Specification and Sequence
- Tighten the washer fluid bolts in the sequence specified:
1. Tighten the bolt -3- to 7 Nm.
2. Tighten the bolt -4- to 7 Nm.