Audi A6 Typ 4G: Rear Window Washer System
Overview - Rear Window Washer System
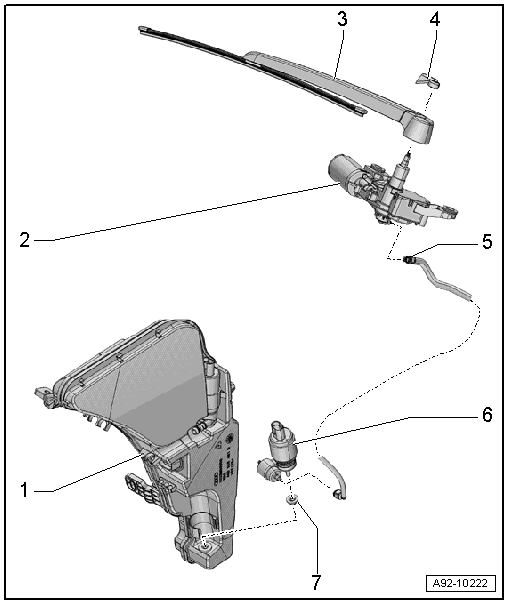
1 - Windshield Washer Fluid Reservoir
- Removing and installing. Refer to → Chapter "Windshield Washer Fluid Reservoir, Removing and Installing".
2 - Rear Window Wiper Motor -V12-
3 - Wiper Arm
4 - Spray Nozzle
- Removing and installing. Refer to → Chapter "Spray Nozzle, Removing and Installing".
- Adjusting. Refer to → Chapter "Spray Nozzle, Adjusting".
5 - Water Hose
- For the rear window washer system
6 - Windshield Washer Pump -V5-
- Removing and installing. Refer to → Chapter "Windshield Washer Pump, Removing and Installing".
7 - Grommet
- Replace if damaged.
Windshield Washer Fluid Reservoir, Removing and Installing
 Note
Note
The combined washer fluid reservoir for the front and back windshield washer systems is located in the front left wheel housing.
- Washer fluid reservoir, removing and installing. Refer to → Chapter "Windshield Washer Fluid Reservoir, Removing and Installing".
Rear Window Washer Pump, Removing and Installing
Note
The washer pump for the windshield and the rear window washer system is located inside the windshield washer fluid reservoir in the left front wheel housing.
- Rear Window Washer Pump, Removing and Installing: Refer to
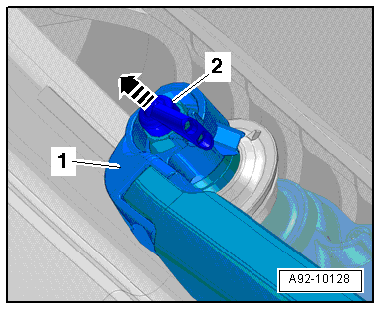
Spray Nozzle, Removing and Installing
Removing
- Carefully expand the cap in direction of -arrows- and remove.

- Carefully remove the spray nozzle -2- from the connecting tube -arrow-.
Installing
Install in reverse order of removal. Note the following:
- Insert the spray nozzle so the spray opening faces the opening in the wiper arm -1-.
Spray Nozzle, Adjusting
- Adjust the rear window washer system spray nozzles. Refer to →.
- If the spray field does not correspond to the specifications, clean dirty spray jet.
Cleaning the Nozzle:
 Caution
Risk of damage.
Do not use any objects to clean the spray nozzles!
- Remove the spray nozzle. Refer to → Chapter "Spray Nozzle, Removing and Installing".
- Rinse the spray nozzle with clean water opposite the spray direction.
- To remove any remaining impurities, the nozzle must only be blown out opposite to spray direction using compressed air.
- If the spray field still does not correspond to the specifications, replace the spray nozzle.

