Audi A6 Typ 4G: Rear Mid-Bass Speakers, Removing and Installing
Left/Right Rear Mid-Bass Speaker -R159-/-R160-, Removing and Installing
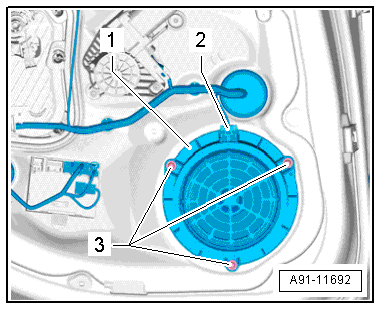
The Left Rear Mid-Bass Speaker -R159-/Right Rear Mid-Bass Speaker -R160--2- are located at the bottom of the rear doors.
Removing and installing is identical.
Removing
- Turn off the ignition and all electrical consumers and remove the ignition key.
- Remove the rear door trim panel. Refer to → Body Interior; Rep. Gr.70; Rear Door Trim Panels; Rear Door Trim Panel, Removing and Installing.

- Release and disconnect the connector -2- from the Left Rear Mid-Bass Speaker -R159--1-.
- Remove the screws -3-.
- Remove the Left Rear Mid-Bass Speaker -R159--1-.
Installing
- Install in reverse order of removal.
Left/Right Rear Mid-Bass Speaker -R159-/-R160-, Removing and Installing, Bang & Olufsen
The Left Rear Mid-Bass Speaker -R159-/Right Rear Mid-Bass Speaker -R160--2- are located at the bottom of the rear doors.
Removing and installing is identical.
Removing
- Turn off the ignition and all electrical consumers and remove the ignition key.
- Remove the rear door trim panel. Refer to → Body Interior; Rep. Gr.70; Rear Door Trim Panels; Rear Door Trim Panel, Removing and Installing.
- Release and disconnect the connector -2- from the Left Rear Mid-Bass Speaker -R159--1-.
- Remove the screws -3-.
- Remove the Left Rear Mid-Bass Speaker -R159--1-.
Installing
- Install in reverse order of removal.

Rear Bass Speakers, Removing and Installing
Left/Right Rear Bass Speaker -R15-/-R17-, Removing and Installing
The Left Rear Bass Speaker -R15-/Right Rear Bass Speaker -R17--2- are located at the bottom of the rear doors.
Removing and installing is identical.
Removing
- Turn off the ignition and all electrical consumers and remove the ignition key.
- Remove the rear door trim panel. Refer to → Body Interior; Rep. Gr.70; Rear Door Trim Panels; Rear Door Trim Panel, Removing and Installing.
- Release and disconnect the connector -2- from the Left Rear Bass Speaker -R15--1-.
- Remove the screws -3-.
- Remove the Left Rear Bass Speaker -R15--1-.
Installing
- Install in reverse order of removal.
Left/Right Rear Bass Speaker -R15-/-R17-, Removing and Installing, Bang & Olufsen
The Left Rear Bass Speaker -R15-/Right Rear Bass Speaker -R17--2- are located at the bottom of the rear doors.
Removing and installing is identical.
Removing
- Turn off the ignition and all electrical consumers and remove the ignition key.
- Remove the rear door trim panel. Refer to → Body Interior; Rep. Gr.70; Rear Door Trim Panels; Rear Door Trim Panel, Removing and Installing.
- Release and disconnect the connector -2- from the Left Rear Bass Speaker -R15--1-.
- Remove the screws -3-.
- Remove the Left Rear Bass Speaker -R15--1-.
Installing
- Install in reverse order of removal.
Front Bass and Bass/Midrange Speakers, Removing and Installing
Left/Right Front Bass Speaker -R21-/-R23-, Removing and Installing, Standard
The Left Front Bass Speaker -R21-/Right Front Bass Speaker -R23--2- are located at the bottom of the front doors.
Removing and installing is identical.
Removing
- Turn off the ignition and all electrical consumers and remove the ignition key.
- Remove the front door trim panel. Refer to → Body Interior; Rep. Gr.70; Front Door Trim Panels; Front Door Trim Panel, Removing and Installing.

- Release and disconnect the connector -2- from the Left Front Bass Speaker -R21--1-.
- Remove the screws -3-.
- Remove the Left Front Bass Speaker -R21--1-.
Installing
- Install in reverse order of removal.

Left/Right Front Bass Speaker -R21-/-R23-, Removing and Installing, BOSE
The Left Front Bass Speaker -R21-/Right Front Bass Speaker -R23--2- are located at the bottom of the front doors.
Removing and installing is identical.
Removing
- Turn off the ignition and all electrical consumers and remove the ignition key.
- Remove the front door trim panel. Refer to → Body Interior; Rep. Gr.70; Front Door Trim Panels; Front Door Trim Panel, Removing and Installing.
- Release and disconnect the connector -3- from the Left Front Bass Speaker -R21--2-.
- Remove the 10 screws -1-.
- Remove the Left Front Bass Speaker -R21--2-.
Installing
- Install in reverse order of removal.

Front Bass Speakers -R21-/-R103-/-R23-/-R104-, Removing and Installing, Bang & Olufsen
The Left Front Bass Speaker -R21-/Right Front Bass Speaker - R23-/Left Front Midrange Speaker -R103-/Right Front Midrange Speaker -R104--2- are located at the bottom of the front doors.
The Left Front Bass Speaker -R21-/Left Front Midrange Speaker -R103- and Right Front Bass Speaker -R23-/Right Front Midrange Speaker -R104- are installed in a single housing and cannot be replaced separately.
The following removing/installing procedure is for the Left Front Bass Speaker -R21-.
Removing
- Turn off the ignition and all electrical consumers and remove the ignition key.
- Remove the front door trim panel. Refer to → Body Interior; Rep. Gr.70; Front Door Trim Panels; Front Door Trim Panel, Removing and Installing.
- Release and disconnect the connector -3- from the Left Front Bass Speaker -R21--1-.
- Remove the bolts and nuts -2-. (quantity: 12)
- Remove the Left Front Bass Speaker -R21--1-.
Installing
- Install in reverse order of removal.


