Audi A6 Typ 4G: Speaker Trim, Removing and Installing
Center Speaker Trim, Removing and Installing
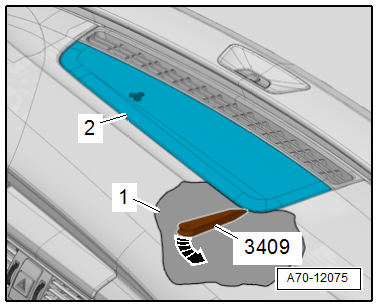
Special tools and workshop equipment required
- Trim Removal Wedge -3409-
Removing
 Note
Note
- Be very careful when removing and installing the speaker trim because the speaker trim clips can easily break.
- To avoid accidentally also prying out the defroster vent in the center located under the speaker trim, position the Trim Removal Wedge -3409- so that it is very flat.
- Protect the instrument panel from damage with a cloth -1-.
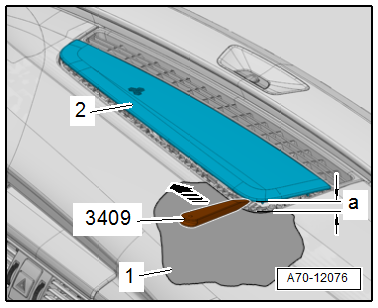
- Begin to carefully unclip the speaker trim -2- using the Trim Removal Wedge -3409- at the right rear rounded section in direction of -arrow-.
- Continue unclipping the trim by moving toward the left front in direction of -arrow-. Do not lift the speaker trim more than -a- = 30 mm when doing this.
- When the back of the speaker trim is completely release, lift it slightly, pull it toward the rear and remove it upward.
Installing
Install in reverse order of removal. Note the following:
Installation notes, for example tightening specifications, replacing components. Refer to → Chapter "Overview - Instrument Panel".
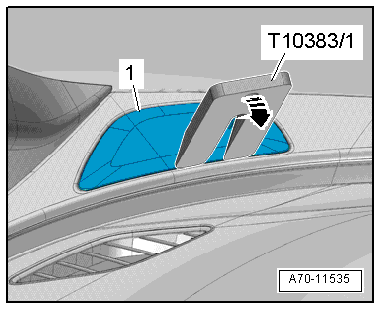
Side Speaker Trim, Removing and Installing
Special tools and workshop equipment required
- Wedge Set -T10383-
Removing
Note
Proceed very carefully when removing and installing because it is relatively easy to damage the speaker trim.
- Carefully pry out the speaker trim -1- using the Wedge Set -T10383/1--arrow-.
- Fold the speaker trim upward and remove it toward the rear.
Installing
Install in reverse order of removal. Note the following:
Installation notes, for example tightening specifications, replacing components. Refer to → Chapter "Overview - Instrument Panel".