Audi A6 Typ 4G: Front Wheel Housing Liner, Removing and Installing
Front Wheel Housing Liner, Removing and Installing
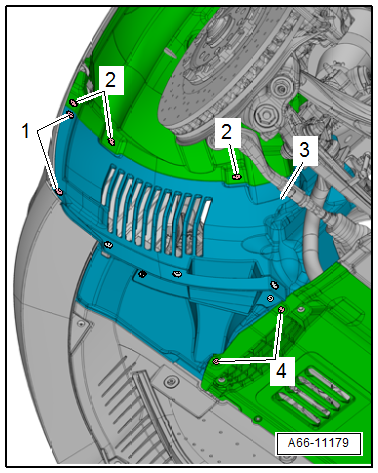
Removing
- Remove the driveshaft cover. Refer to → Chapter "Driveshaft Cover, Removing and Installing".
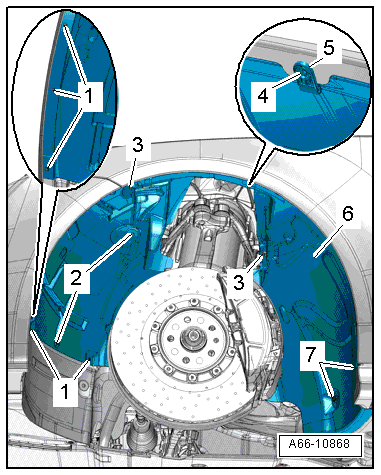
- Remove expanding rivets -2-.
- Remove the nuts -3- and bolts -1-.
- Remove the bolt -4- and then disengage the bracket -5- on the fender.
- Remove the clip -7- from the wheel housing liner -6-.
- To remove the clips -3-, unlock the release lever -2- with needle nose pliers in direction of -arrow A- and push it off the pin -1- in -direction of arrow B-.
- The Locking Pliers -VAS 6199- may also be alternatively used to release the clips.
- Remove the wheel housing liner.
Installing
Install in reverse order of removal. Note the following:
- Make sure the clip is secure after installing it.

Front Wheel Housing Liner, Removing and Installing, Audi RS 6
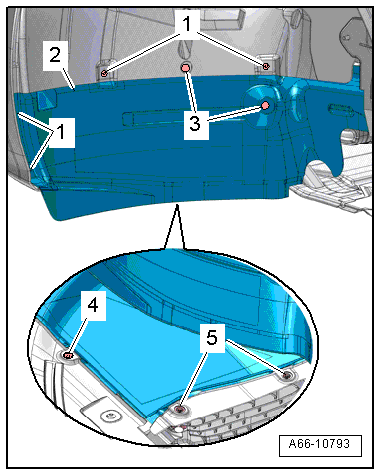
Removing
- Remove the driveshaft cover. Refer to → Chapter "Driveshaft Cover, Removing and Installing".
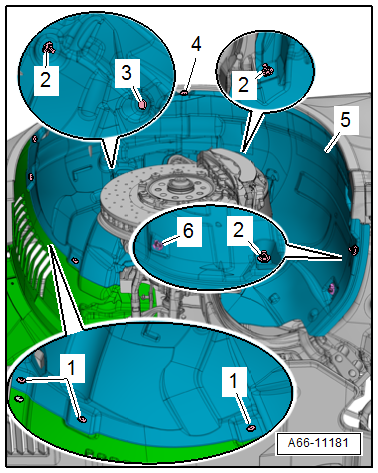
- Remove the expanding rivet -3-.
- Remove the nuts -2- and bolts -1-.
- Remove the bolt -4- and then disengage the bracket on the fender.
- Remove the clip -6- from the wheel housing liner -5-.
- To remove the clips -6-, unlock the release lever -2- with needle nose pliers in direction of -arrow A- and push it off the pin -1- in -direction of arrow B-.
- The Locking Pliers -VAS 6199- may also be alternatively used to release the clips.
- Remove the wheel housing liner.
Installing
Install in reverse order of removal. Note the following:
- Make sure the clip is secure after installing it.
Driveshaft Cover, Removing and Installing
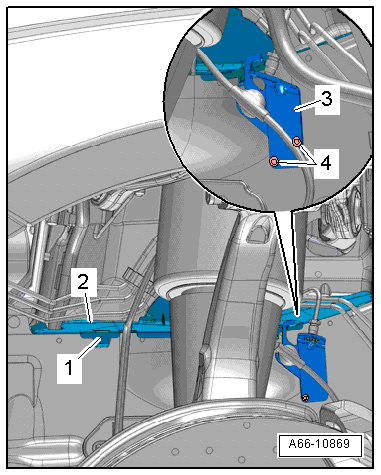
Removing
- Push the front wheel to the left.
- Remove the nut -2-.
- Left side of the vehicle: free up the electric wire -1--arrow-.
- Push the front wheel to the right.
- Remove the nut -3-.
- Pull the driveshaft cover -4- off the threaded pins and remove it.
Installing
Install in reverse order of removal.
Cover, Removing and Installing, Longitudinal Member
Removing
- Remove the front wheel housing liner. Refer to → Chapter "Front Wheel Housing Liner, Removing and Installing".
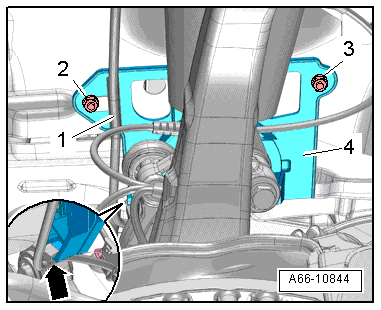
- Drill out the rivets -4- and remove the bracket -3- for the brake hose.
- Lift the cover -2- and remove it.
Installing
Install in reverse order of removal. Note the following:
- The clamp -1- must be mount on the cover as illustrated.
- Install the brake hose bracket. Refer to → Brake System; Rep. Gr.46 - Overview - Front Brakes.
Front Wheel Spoiler, Removing and Installing
Removing
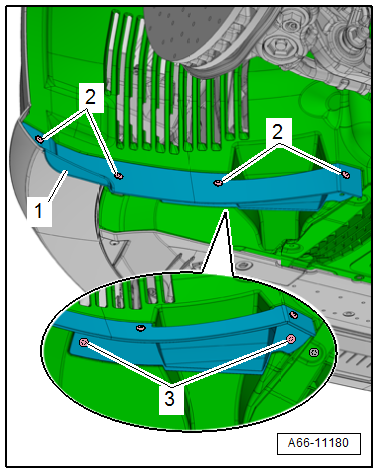
- Remove expanding rivets -3-.
- Remove the bolts -1 and 4-.
- Remove the driveshaft cover. Refer to → Chapter "Driveshaft Cover, Removing and Installing".
- Open the quick release -5- and remove the wheel spoiler -2-.
Installing
Install in reverse order of removal.
Front Wheel Spoiler, Removing and Installing, Audi RS 6
Removing
- Remove the bolts -1 and 2-.
- Remove the driveshaft cover. Refer to → Chapter "Driveshaft Cover, Removing and Installing".
- Open the quick release -4- and remove the wheel spoiler -3-.
Installing
Install in reverse order of removal.
Spoiler Lip, Removing and Installing, Audi RS 6
Removing
- Remove the bolts -2 and 3-.
- Remove the spoiler lip -1-.
Installing
Install in reverse order of removal.