Audi A6 Typ 4G: Wheel Bearing Unit, Servicing
Special tools and workshop equipment required
- Press Plate -VW401-
- Press Plate -VW402-
- Press Piece - Multiple Use -VW412-
- Hydraulic Press - Bushing Assembly Tool Kit -T10230-
- Puller - Kukko Separating Tool - Diameter 25-155mm with Puller - Kukko Quick Action Separating Tool - 25-155mm -15/3 with 17/3-
Wheel Hub, Removing from Wheel Bearing
- Remove the wheel bearing unit. Refer to → Chapter "Wheel Bearing Unit, AWD, Removing and Installing".
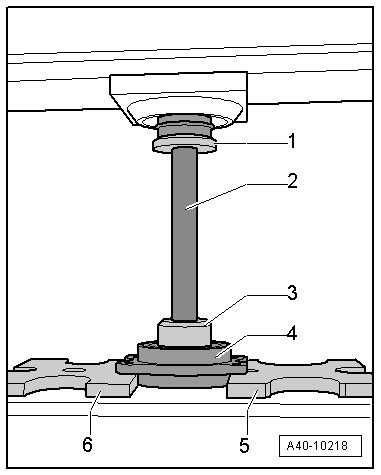
- Install special tools as shown in illustration.
1 - Press Piece - Multiple Use -VW412-
2 - Sleeve T10230/3 from the Hydraulic Press - Bushing Assembly Tool Kit -T10230-
3 - Thrust piece T10230/8 from the Hydraulic Press - Bushing Assembly Tool Kit -T10230-
4 - Wheel bearing unit
5 - Press Plate -VW402-
6 - Press Plate -VW401-
- Press the wheel hub out of the wheel bearing.
Removing the Bearing Inner Race from the Hub
- Insert the separating tool between the bearing inner race -1- and the wheel hub -2- and pretension with the spindle.
 Note
Note
Use a commercially available separating tool such as the Puller - Kukko Separating Tool - Diameter 25-155mm with Puller - Kukko Quick Action Separating Tool - 25-155mm -15/3 with 17/3-.

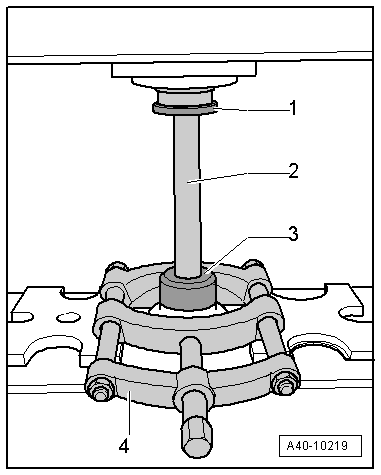
- Install special tools as shown in illustration.
1 - Press Piece - Multiple Use -VW412-
2 - from the Hydraulic Press - Bushing Assembly Tool Kit -T10230-
3 - Thrust Piece -T10230/3-from the Hydraulic Press - Bushing Assembly Tool Kit -T10230-
4 - Wheel hub
5 - Bearing inner race
6 - Puller - Kukko Separating Tool - Diameter 25-155mm with Puller - Kukko Quick Action Separating Tool - 25-155mm -15/3 with 17/3-
- Press the bearing inner race from the hub.
Pressing Wheel Hub Into Wheel Bearing
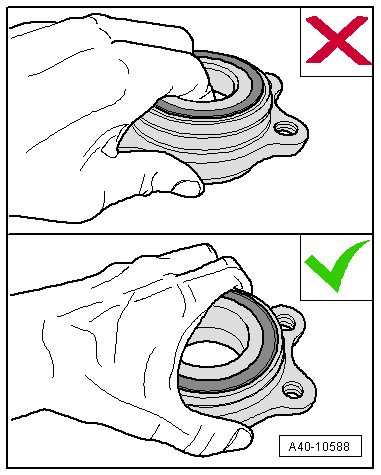
 Caution
Avoid contaminating with dirt and damaging the seal when lifting, setting down/storing.
- The wheel bearing -1- must always face up.
- Always set the wheel bearing unit down on the wheel hub -2-.
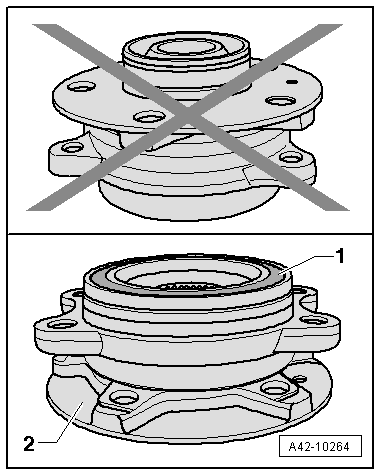
- Never reach into the inside when lifting the wheel bearing.
- Hold the wheel bearing only on the outside.
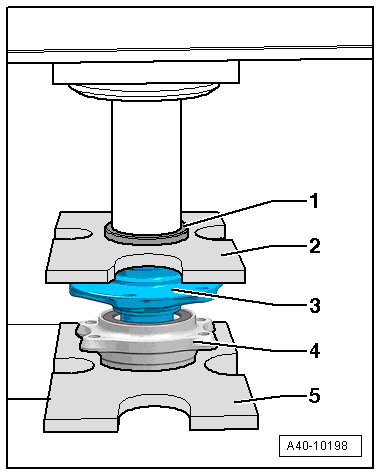
- Install special tools as shown in illustration.
1 - Press Piece - Multiple Use -VW412-
2 - Press Plate -VW402-
3 - Wheel hub
4 - Ball Bearing
5 - Press Plate -VW401-
Note
The reworked surface on the wheel bearing outer race faces down.
Caution
When setting down or pressing in, make sure there is no dirt or contaminants between the Press Plate -VW401--5- and the ball bearing -4-.
- Press the wheel hub into the wheel bearing.
- Install the wheel bearing unit. Refer to → Chapter "Wheel Bearing Unit, AWD, Removing and Installing".