Audi A6 Typ 4G: ATF
Gear Oil Drain and Inspection Plugs Overview
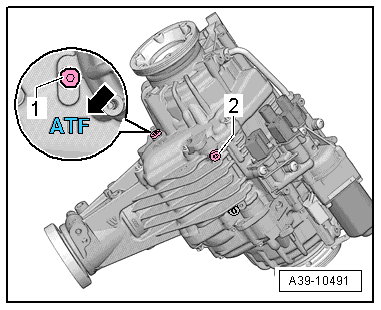
Gear Oil Drain and Inspection Plugs Overview, 0BF
1- ATF check plug
- Identification "ATF" on the housing -arrow-
- Tightening Specification -item 13-.
- Always replace.
2 - ATF drain plug
- Tightening Specification -item 16-.
- Always replace.
ATF Level, Checking
ATF Level, Checking, 0BE, 0BF
Test requirement
- ATF temperature: 10 ºC to 60 ºC (50º to 140 ºF)
- The rear final drive must be in the installed position.
- The vehicle must be level.
Special tools and workshop equipment required
- Drip Tray
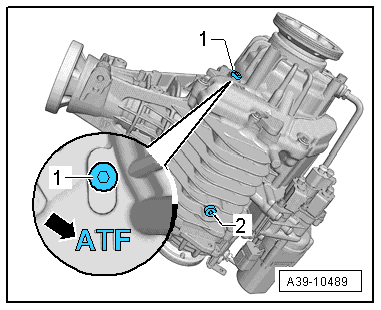
- Remove the ATF check plug -1- to check the ATF level.
 Caution
- The ATF check plug -1- is located on the left side of the rear final drive. Identification "ATF" on the final drive housing -arrow-
- ATF plug overview → Chapter "Gear Oil Drain and Inspection Plugs Overview".
- The ATF level is correct when the rear final drive is filled to the lower edge of the fill hole.
If the ATF is correct:
- Install the new ATF check plug and fasten. Tightening specification. Refer to -item 13-.
If the ATF is not correct:
- Fill the ATF. Refer to → Chapter "ATF, Filling, 0BE, 0BF".
ATF, Draining and Filling
ATF, Draining, 0BF
Special tools and workshop equipment required
- Drip Tray
- ATF plug overview. Refer to → Chapter "Gear Oil Drain and Inspection Plugs Overview, 0BF".
- Remove the ATF check plug -arrow- so that the ATF drains faster.
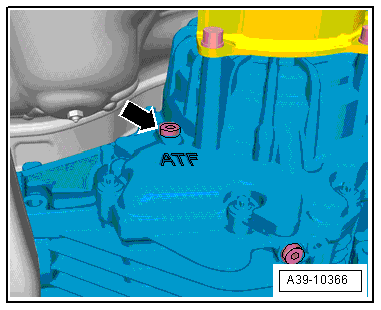
- Remove the ATF drain plug -arrow- and drain the ATF.
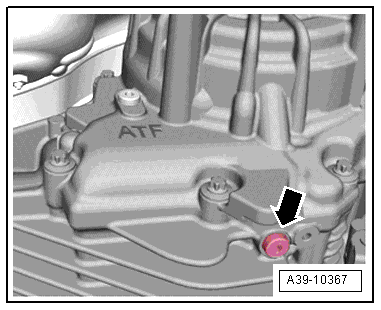
- Install the new ATF drain plug -arrow- and tighten. Tightening specification. Refer to -item 16-.
- Fill the ATF in the rear final drive. Refer to → Chapter "ATF, Filling, 0BE, 0BF".
ATF, Filling, 0BE, 0BF
Special tools and workshop equipment required
- Vehicle Diagnostic Tester
- Charging Device For Haldex Coupling 2 -VAS6291- or Charging Device For Haldex Coupling 2 -VAS6291A-
- Charging Device For Haldex Coupling 2 - Adapter 3 -VAS6291/3-
- Drip Tray
Test Conditions:
- The rear final drive must be in the installed position.
- The vehicle must be level.
- The ATF drain plug is installed and tightened. Tightening specification. Refer to -item 16-.
Caution
There is a risk of damaging the rear final drive.
- Only use ATF available as a replacement part. Refer to the Parts Catalog.
- Using other fluids can cause malfunctions or final drive failure.
- Note the allocation. Refer to the Parts Catalog
- The ATF filler tool must be clean and the ATF must not be mixed with any other oils.
- Use the Charging Device For Haldex Coupling 2 -VAS6291A- to fill.
- Lift the vehicle.
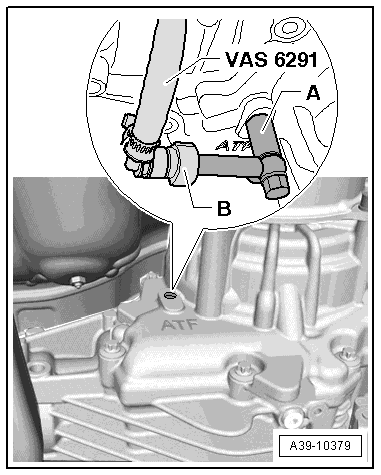
- Remove the ATF check plug -1-.
Caution
The ATF check plug -1- is located on the left side of the rear final drive. Identification "ATF" on the final drive housing -arrow-
- Disconnect the adapter -A- and elbow -B-.
- Install in the adapter -A- all the way.
- Attach the elbow -B- to the adapter -A-.
- Route the hose over the left drive axle.
- The hose must not sag. It must be routed over the left rear wheel on the vehicle.
- Lower the vehicle.
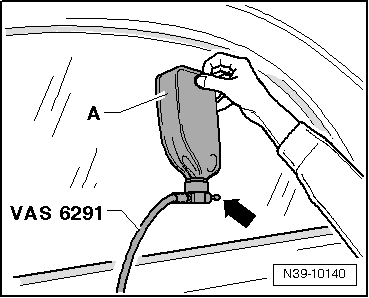
- Make sure that the valve -arrow- is closed.
- Install the oil container -A- on the Charging Device For Haldex Coupling 2 -VAS6291-.
- Open the valve -arrow- and hold the oil container as shown.
The hydraulic control unit and the left and right chambers in the rear final drive are now filled.
- When the correct filling of the rear final drive hydraulic control module ATF drips from the adapter -A-
If there still is no ATF in the adapter -A-:
- Continue filling until the level is correct.
When ATF starts to leak out of the adapter -A-:
- Lift the vehicle.
- Place the oil container for example on a tool box.
A portion of the excess oil runs back into the oil container.
- If no more ATF runs back, remove the Charging Device For Haldex Coupling 2 -VAS6291A-.
- The oil level is correct when the rear final drive is filled up to the lower edge of the oil fill hole.
- Install the ATF check plug -arrow- hand-tight.
- Connect the Vehicle Diagnostic Tester and turn on the ignition.
- Select the function 22 - All Wheel Drive (AWD) Electronics in the Vehicle Diagnostic Tester under Guided Functions in the directory 22- ATF Filling.
- Follow all the instructions given by the Vehicle Diagnostic Tester exactly.
The system is filled and bled using the Vehicle Diagnostic Tester.
 Note
Note
Repeat the filling process if the system detects there is still air inside the system after performing the 22 - ATF Filling function.
- Remove the ATF check plug -arrow- again.
Test Condition:
- The ATF level is correct when the rear final drive is filled up to the lower edge of the filler hole -arrow-.
- If necessary fill the ATF.
- In the DTC memory there is no entry and no "sporadic malfunction" use the Vehicle Diagnostic Tester.
- Install the new ATF check plug -arrow- and tighten. Tightening specification -item 13-.

