Audi A6 Typ 4G: Fog Lamp
Overview - Fog Lamps
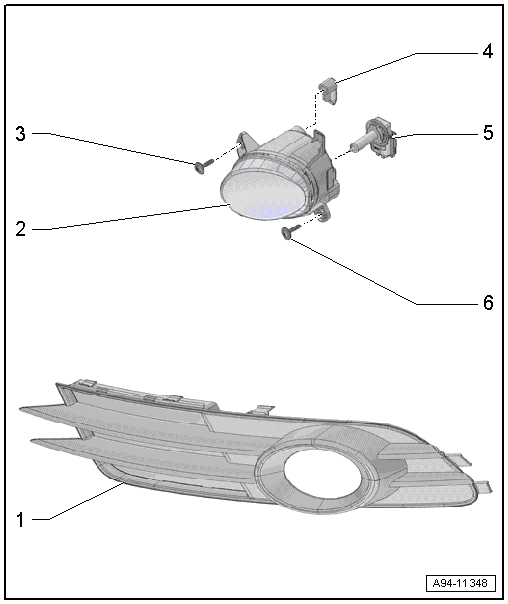
1 - Air Intake Grille
2 - Fog Lamp
- Removing and installing. Refer to → Chapter "Fog Lamp, Removing and Installing".
3 - Screw
- 4.5 Nm
4 - Ventilation
- For fog lamp
5 - Fog Lamp Bulb
- Left Front Fog Lamp Bulb -L22-
- Right Front Fog Lamp Bulb -L23-
- 12 V, 55 W (H11)
- Removing and installing. Refer to → Chapter "Left/Right Front Fog Lamp Bulb -L22-/-L23-, Removing and Installing".
6 - Screw
- 4.5 Nm
Fog Lamp, Removing and Installing
Removing
- Remove the air intake grille. Refer to → Body Exterior; Rep. Gr.63; Front Bumper; Attachments, Removing and Installing.
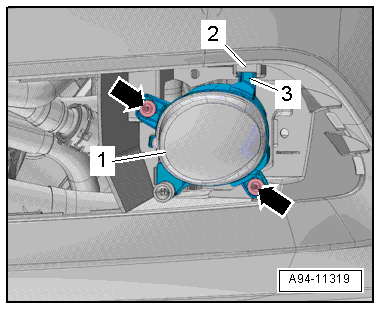
- Remove the bolts -arrows-.
- Remove the guide -3- from the mount -2- to remove the fog lamps -1-.
- Disconnect the connector.
Installing
Install in reverse order of removal. Note the following:
- Adjusting the fog lamps. Refer to → Chapter "Fog Lamp, Adjusting".
Left/Right Front Fog Lamp Bulb -L22-/-L23-, Removing and Installing
Removing
- Remove the fog lamps and disconnect the connector -1-. Refer to → Chapter "Fog Lamp, Removing and Installing".
- Remove the ventilation hose -3- on the left side of the fog lamp.
- Rotate the bulb -2- counterclockwise -arrow- and remove it from the fog lamp housing.
Installing
Install in reverse order of removal. Note the following:
- Insert the new bulb into the housing. Do not touch the glass bulbs with bare hands.
- Rotate the bulb clockwise to secure.
- Mount the ventilation hose on the left side of the fog lamp.
- Install the fog lamp. Refer to → Chapter "Fog Lamp, Removing and Installing".

Fog Lamp, Adjusting
- The following test and adjustment description applies to all countries.
- However, national guidelines or regulations of the country should be observed.
Checking and Adjusting Conditions
- Tire pressure is OK.
- The headlamp lens must be clean and dry.
- The headlamp lens may not be damaged.
- Headlamp-reflector and lamp are OK.
- Roll the vehicle several yards or move it back and forth several times to seat the springs.
- The parking brake must not be engaged so that the vehicle is not under stress.
- The vehicle and headlamp adjusting unit must be on a level surface.
- The headlamp adjusting unit must be aligned to the vehicle. Refer to the Headlamp Adjusting Unit Operating Instructions.
- The inclination dimension is set on the headlamp adjusting unit. Refer to the Headlamp Adjusting Unit Operating Instructions.
- Vehicle load must be created.
Vehicle load on driver's seat in otherwise unloaded vehicle (curb weight).
- One person or 75 kg (165.34 lbs).
Procedure
- The vehicle must be standing on a flat surface.
- Turn the headlamp switch to "low beam" - not "Auto".
- Pull the headlamp switch to "fog lamp".
Headlamp Adjustment
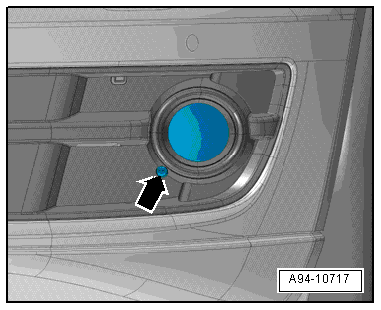
- To adjust headlamp range, turn the adjusting screw -arrow-.
- Angle dimension: 2%
 Note
Note
- The percentage indicator is based on a 10 meter projection distance. At an angle dimension of 2.0%, for example, converts to 20 cm.
- Side adjustment is not intended.