Audi A6 Typ 4G: Headrest, Removing and Installing
Headrest, Removing and Installing, Standard/Sport Seat
Removing
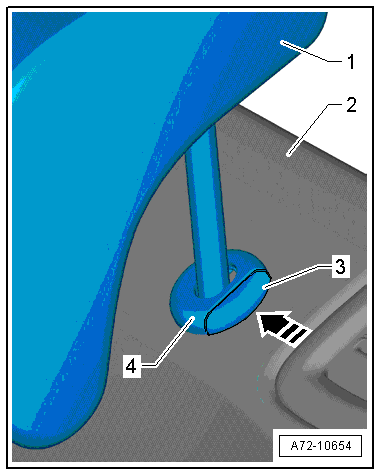
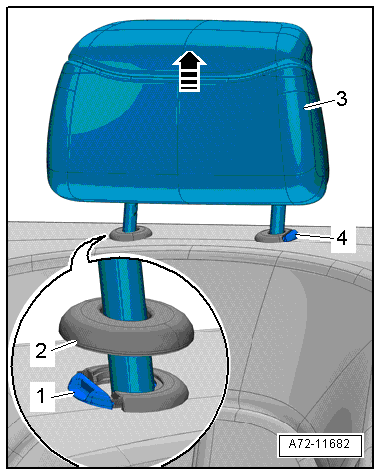
- Press the release button -3- for the head restraint height adjustment -4- in direction of -arrow- and pull the head restraint -1- out of the backrest -2- until it stops.
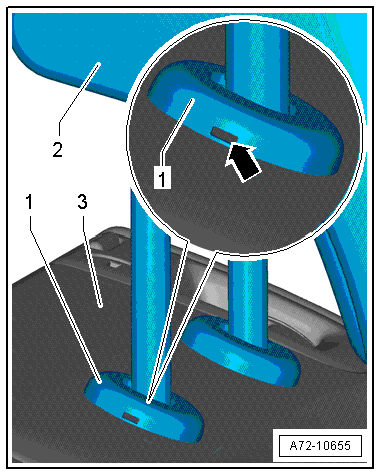
- Using a small flat-head screwdriver, press the locking spring as far as the stop through the opening -arrow- in the headrest guide -1-.
- At the same time, remove the headrest -2- from the rear seat backrest -3-.
Installing
Install in reverse order of removal. Note the following:
Installation notes, for example tightening specifications, replacing components. Refer to → Chapter "Overview - Headrest and Headrest Guide".
Headrest, Removing and Installing, Super Sport Seat
Removing
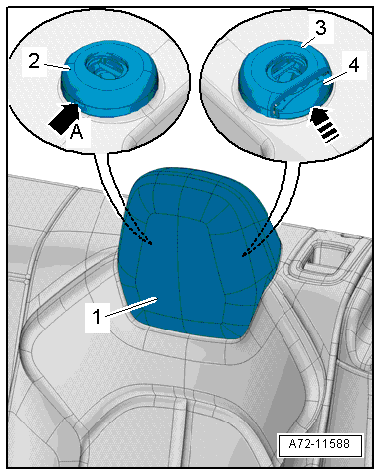
- Insert a small flat blade screwdriver into the opening -arrow A- in the headrest guide -2- and push the spring all the way and at the same time pull the right side of the headrest out of the retainer.
- Be careful so the headrest does not lock again on the loose side.
- Press the release button -4- on the headrest guide -3- in direction of -arrow-.
- At the same time, remove the headrest -1- from the rear seat backrest.
Installing
Install in reverse order of removal. Note the following:
Installation notes, for example tightening specifications, replacing components. Refer to → Chapter "Overview - Headrest and Headrest Guide, Super Sport Seat".
Headrest, Removing and Installing, Multi-contour Seat
Removing
- Remove the Multi-contour seat. Refer to → Chapter "Rear Seat Backrest, Removing and Installing, Multi-contour Seat".
- Unclip cover cap from the headrest guide on the right side of the seat backrest -2-.
- Press the release button -1- for the headrest guide and at the same time, remove the head restraint out of the backrest until it stops.
- Press the release button -4- and simultaneously remove the headrest -3--arrow-.
Installing
Install in reverse order of removal. Note the following:
Installation notes, for example tightening specifications, replacing components. Refer to → Chapter "Overview - Headrest and Headrest Guide, Multi-contour Seat".
Headrest Guide, Removing and Installing
Headrest Guide, Removing and Installing, Standard/Sport Seat/Super Sport Seat
Removing
- Remove the rear headrest. Refer to → Chapter "Headrest, Removing and Installing".
- Loosen the backrest cover with backrest cushion from the rear seat backrest frame:
- Refer to → Chapter "Cover and Cushion, Removing and Installing, Divided Rear Seat Backrest".
- Refer to → Chapter "Cover and Cushion, Removing and Installing, Fixed Rear Seat Backrest".
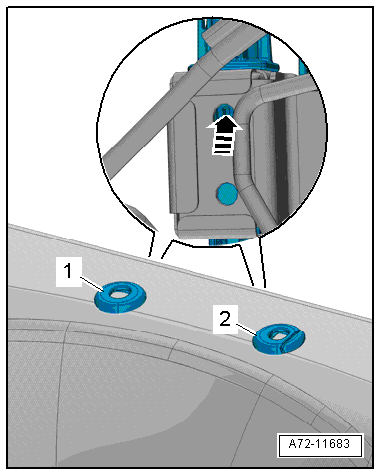
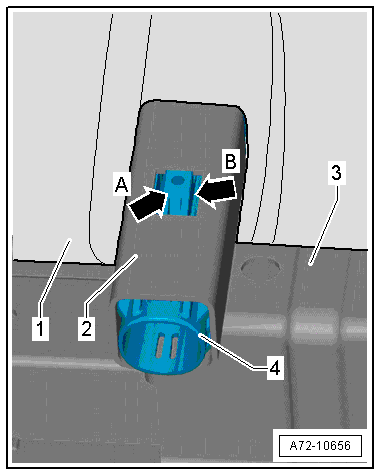
- Move the backrest cover with the backrest cushion -1- as far up as possible until the headrest pipe -2- welded in the rear seat backrest frame -3- and the headrest guide -4- is visible.
- Push the tab -arrow A- down and at the same time pull the headrest guide out of the rear seat backrest.
 Note
Note
Ignore -arrow B-.
Installing
Install in reverse order of removal. Note the following:
- The headrest guide can only be installed in one position on one side of the backrest.
- Guide lug of headrest guide must engage in the cut-out of the mount on the headrest frame.
- Push the headrest guide in until the tab lock into the rear seat backrest -arrow B-.
Installation notes, for example tightening specifications, replacing components. Refer to → Chapter "Overview - Headrest and Headrest Guide".
Headrest Guide, Removing and Installing, Multi-contour Seat
Removing
- Remove the rear headrest. Refer to → Chapter "Headrest, Removing and Installing, Multi-contour Seat".
- Release the headrest guide tabs through the opening with a screwdriver -arrow- and simultaneously remove the headrest guide -1- and -2- from the backrest frames.
Installing
Install in reverse order of removal. Note the following:
- The headrest guide can only be installed in one position on one side of the backrest.
- Guide lug of headrest guide must engage in the cut-out of the mount on the headrest frame.
- Push in headrest guide until the retaining tabs correctly latch to the backrest frame.
Installation notes, for example tightening specifications, replacing components. Refer to → Chapter "Overview - Headrest and Headrest Guide, Multi-contour Seat".