Audi A6 Typ 4G: High-Mounted Brake Lamp
Overview - High-Mounted Brake Lamp
Overview - High-Mounted Brake Lamp, Sedan

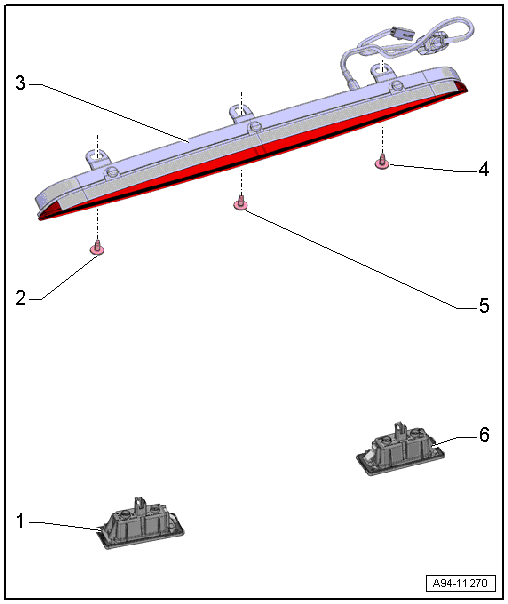
1 - Left License Plate Lamp
- There are different versions. Refer to the Parts Catalog.
- Overview. Refer to → Chapter "Overview - License Plate Lamp".
2 - Left License Plate Lamp -X4-
- Depending on the date of manufacture
3 - High-Mounted Brake Lamp
- With High-Mounted Brake Lamp Bulb -M25-
- Removing and installing. Refer to → Chapter "High-Mounted Brake Lamp Bulb -M25-, Removing and Installing, Sedan".
4 - Right License Plate Lamp -X5-
- Depending on the date of manufacture
5 - Right License Plate Lamp
- There are different versions. Refer to the Parts Catalog.
- Overview. Refer to → Chapter "Overview - License Plate Lamp".
Overview - High-Mounted Brake Lamp, Avant
1 - Left License Plate Lamp -X4-
- Overview. Refer to → Chapter "Overview - License Plate Lamp".
2 - Screw
- 2.5 Nm
3 - High-Mounted Brake Lamp
- With High-Mounted Brake Lamp Bulb -M25-
- Removing and installing. Refer to → Chapter "High-Mounted Brake Lamp Bulb -M25-, Removing and Installing, Avant".
4 - Screw
- 2.5 Nm
5 - Screw
- 2.5 Nm
6 - Right License Plate Lamp -X5-
- Overview. Refer to → Chapter "Overview - License Plate Lamp".
High-Mounted Brake Lamp Bulb, Removing and Installing
High-Mounted Brake Lamp Bulb -M25-, Removing and Installing, Sedan
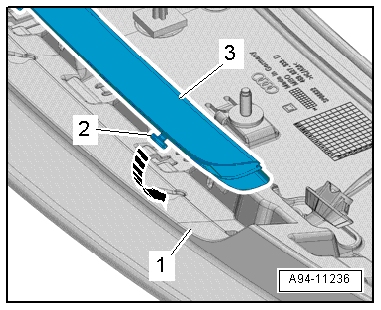
Removing
- Do not press the brake pedal.
- Loosen the headliner from the body near the high-mounted brake lamp. Refer to → Body Interior; Rep. Gr.70; Roof Trim Panels; Headliner, Removing and Installing.
- Pull the high-mounted brake lamp -2- back evenly by the cover in direction of -arrows-.
- Disconnect the connector -1-.

Installing
Install in reverse order of removal. Note the following:
 Note
Note
The entire high-mounted brake lamp must be replaced in the event of faulty LEDs.
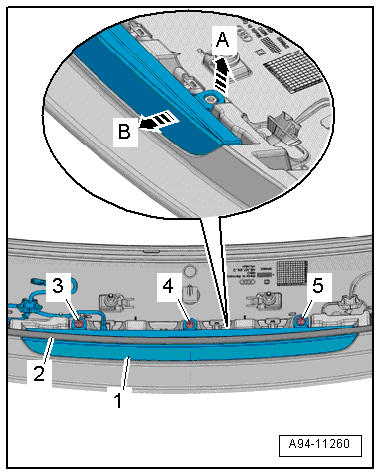
- The mount -2- for the high-mounted brake lamp -3- must engage evenly at the left and right in the guide rails -1-.
- Slide the high-mounted brake lamp evenly forward in the direction of travel without tilting it until it engages audibly -arrows-.

High-Mounted Brake Lamp Bulb -M25-, Removing and Installing, Avant
Removing
- Remove the roof spoiler. Refer to → Body Exterior; Rep. Gr.66; Spoiler; Spoiler, Removing and Installing.
- Remove the bolts -3, 4 and 5-.
- Loosen the seal -2- near the high-mounted brake lamp -1-.
- Lift the tabs -arrow A- and, at the same time, guide the high-mounted brake lamp from out of the roof spoiler -arrow B-.
Installing
Install in reverse order of removal. Note the following:
- Insert the high-mounted brake lamp -3- into the roof spoiler -1-.
- The guide pin -2- must engage into the mount on the roof spoiler -arrow-.
- Press down the seal near the high-mounted brake lamp.