Audi A6 Typ 4G: Lower Rear Lid Trim Panel, Removing and Installing
Lower Rear Lid Trim Panel, Removing and Installing, Sedan
Special tools and workshop equipment required
- Pry Lever -80-200-
- Wedge Set -T10383-
- Omega Clip Tool -T40280-
Removing
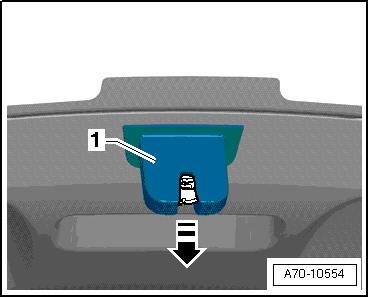
- Unclip the rear lid lock trim panel -1- with the Wedge Set -T10383- in direction of -arrow-.
- Remove spreader clips -1- by carefully pressing the clamping pin in approximately 5 mm until it audibly engages in the spreader clip.
- Use a screwdriver to release the tabs -arrow- in order to open the rear lid hinge retaining straps.
- Press the rear lid hinge trim -2- slightly downward and detach at the top of the rear lid trim panel.
- Pull rear lid hinge trim up and remove it.
- Repeat the process on the opposite side of the rear lid hinge trim.
- Remove the warning triangle bracket. Refer to → Chapter "Emergency Triangle Bracket, Removing and Installing".
- Remove the Rear Lid Lock Button In Luggage Compartment -E406-. Refer to → Electrical Equipment; Rep. Gr.96; Controls; Rear Lid Lock Button in Luggage Compartment E406, Removing and Installing.

Vehicles with An Emergency Release Inside the Luggage Compartment
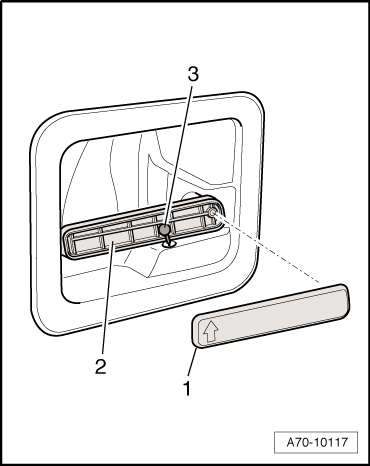
- Unclip cover -1- on the operating lever -2-.
- Detach control cable nipple -3- on the operating lever.
- Remove bolt behind the operating lever.
Continuation for All Vehicles
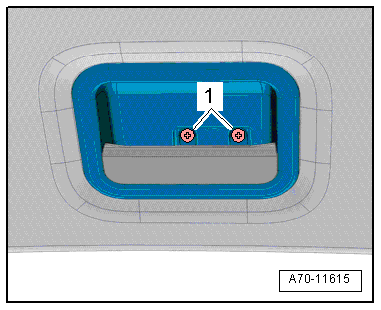
- Use a screwdriver to unclip the cover and remove the bolts -1- behind them.
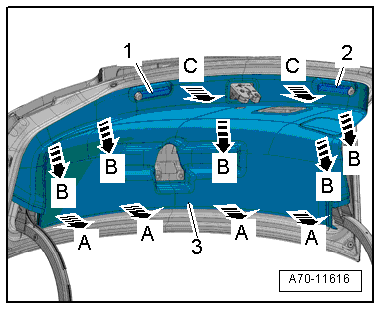
- Use a screwdriver to unclip the stop rails -1- and -2-.
- Lift the rear lid trim panel -3- off using the Pry Lever -80-200--arrows-.
- Unclip the retaining clips in the following sequence: -A, B and C-.
- Remove the rear lid trim panel.
Vehicles with An Emergency Release Inside the Luggage Compartment:
- Detach rear housing on the operating lever handle.
Installing
Install in reverse order of removal. Note the following:
Installation notes, for example tightening specifications, replacing components. Refer to → Chapter "Overview - Lower Rear Lid Trim Panel, Sedan".
Lower Rear Lid Trim Panel, Removing and Installing, Avant
Special tools and workshop equipment required
- Pry Lever -80-200-
- Omega Clip Tool -T40280-
Removing
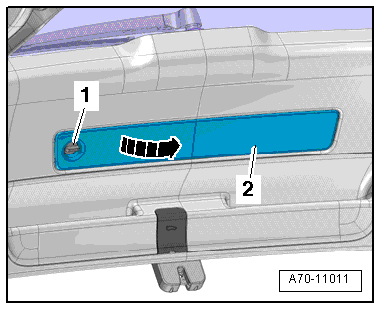
- Turn the quick release -1- 90º counter-clockwise and remove the emergency triangle cover -2- in direction of -arrow-.
- Remove the emergency triangle.
- Disengage the cover on the rear lid lower trim panel and remove it.
- Remove the tail lamp covers. Refer to → Chapter "Tail Lamp Cover, Removing and Installing".
- Remove the luggage compartment lamp. Refer to → Electrical Equipment; Rep. Gr.96; Lamps; Luggage Compartment Lamp W3, Removing and Installing.
- Remove the Rear Lid Lock Button In Luggage Compartment -E406-. Refer to → Electrical Equipment; Rep. Gr.96; Controls; Rear Lid Lock Button in Luggage Compartment E406, Removing and Installing.
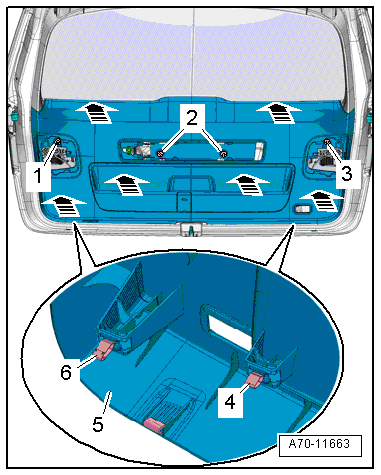
- Remove the bolts -1, 2, and 3-.
- Loosen the clips -6- and the rear lid lower trim panel hooks -5- on the corner with the Pry Lever -80-200- all the way up to the first retainer -outer arrows-.
- Continue with the Pry Lever -80-200- between the trim and the rear lid to unlock the remaining clips -4--inner arrows-.
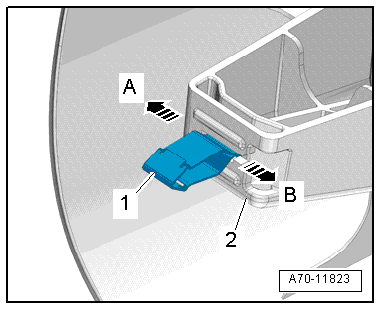
- Press the clips -1- and the trim hooks outward in direction of -arrow A- to disengage them so that the clips slide onto the mount connections -2- and into the trim -arrow B-.
- Remove the rear lid lower trim panel.
Installing
Install in reverse order of removal. Note the following:
Installation notes, for example tightening specifications, replacing components. Refer to → Chapter "Overview - Rear Lid Trim Panel, Avant".
Upper Rear Lid Trim Panel, Removing and Installing
Special tools and workshop equipment required
- Pry Lever -80-200-
- Omega Clip Tool -T40280-
Removing
- Remove the lower rear lid trim panel. Refer to → Chapter "Lower Rear Lid Trim Panel, Removing and Installing, Avant".
- Vehicles equipped with sun shade: remove the sun shade mount. Refer to → Chapter "Sun Shade Mount, Removing and Installing".
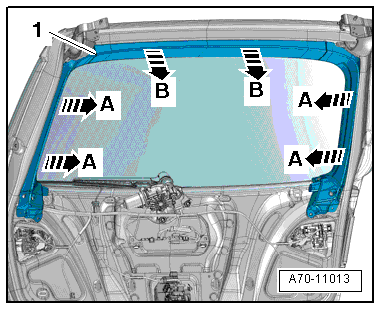
- First unclip the rear lid upper trim panel -1- from the sides of the rear lid in direction of -A arrows- using the Pry Lever -80-200-.
- Unclip the rear lid trim upper panel using the Pry Lever -80-200- from the rear lid in direction of -B arrows- and remove.
Installing
Install in reverse order of removal. Note the following:
- Check if all of the rubber buffers -1- and clips -2- are present in the trim panel.
Installation notes, for example tightening specifications, replacing components. Refer to → Chapter "Overview - Rear Lid Trim Panel, Avant".


