Audi A6 Owners & Service Manuals
Audi A6 Typ 4G (2011–2018) Workshop Manual / Body / Body Exterior / Sunroof / Neutral Position for Slotted Guide Rail, Checking and Adjusting

Audi A6 Typ 4G: Neutral Position for Slotted Guide Rail, Checking and Adjusting

Sedan Neutral Position

Checking

Zero position can only be checked when sunroof panel is installed.

- Boot removed.

- Drive back sunroof panel and close again.

- On vehicles with glass panel, slide sliding headliner completely toward rear.

- Close sunroof.

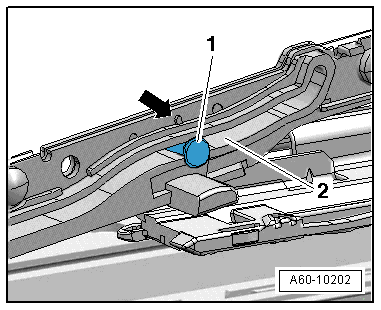
- For a correct zero position, guide pins -1- in center on tilting mechanism must align with marking -arrow- on link guide -2-.

Adjusting

- Sunroof motor removed.

- Remove the sunroof panel from the sunroof.

- Push the slotted guide rail on both sides by hand into the zero position.

- Adjust and install the motor in the zero position.

A60-10202

Avant Neutral Position

- Remove the sunroof panel and the Power Sunroof Control Module -J245-.

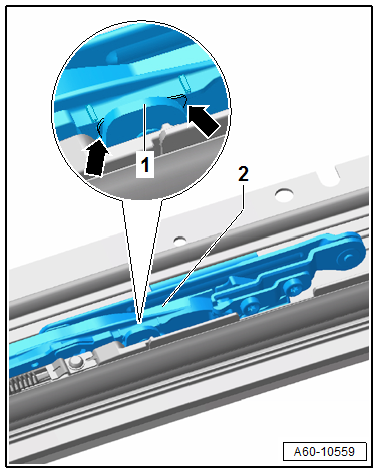
- For a correct adjustment, the tab -1- must be with the guide piece -arrows- the slotted rail -2- between both markings as shown in the illustration cut-out.

- Push the slotted guide rail on both sides by hand into the zero position.

A60-10559

Power Sunroof Control Module -J245-, Removing and Installing

  Caution

After the removal and installation of the sunroof motor, the neutral position of the slotted guide rail must be checked and adjusted if necessary. Refer to → Chapter "Avant Neutral Position".

- Remove the interior lighting cover. Refer to → Electrical Equipment; Rep. Gr.96; Controls; Front Interior Lamp/Reading Lamp, Removing and Installing

- Disconnect the connectors.

- Remove the three screws. Refer to -item 1- and remove the motor through the opening in the headliner.

- After installing, perform an adaptation.

    READ NEXT:

     Sunroof Seals, Removing and Installing

    Sunroof Seals, Removing and Installing, Sedan Procedure - Sunroof panel -3- removed. - Remove panel seal -2- from sunroof panel -3-. - Push new panel seal into sunroof panel -3- start

     Overview - Water Drain Hoses

    Overview - Water Drain Hoses, Sedan 1 - Front Water Drain Hose The front water drain hoses are routed along the " A-pillars" and end at the bottom of the " A-pillar" behind the door. Cl

     Water Drain Hoses, Cleaning

    Front Water Drain Hoses, Cleaning Special tools and workshop equipment required Drain Snake - VAS 6620- The front water drain hoses run through and end in the A-pillar.   Note Use Drain Sna

    SEE MORE:

     Left/Right HID Headlamp Control Module -J343-/-J344-, Removing and Installing

    Left/Right HID Headlamp Control Module -J343-/-J344-, Removing and Installing, through MY 2014   WARNING Danger to life due to high voltage. For work on the yellow high voltage symbol marked areas HID headlamp must be de-energized. Turn off the ignition and all electrical consumers and

     Engine compartment

    Working in the engine compartment Special care is required if you are working in the engine compartment For work in the engine compartment, such as checking and filling fluids, there is a risk of injury, scalding, accidents, and burns. For this reason, follow all the warnings and general safety prec

    © 2011-2025 Copyright www.aa6.tochrfr.com