Audi A6 Typ 4G: Seat Bench/Single Seat, Removing and Installing
Seat Bench/Single Seat, Removing and Installing
Removing
- Move the front seats all the way forward.
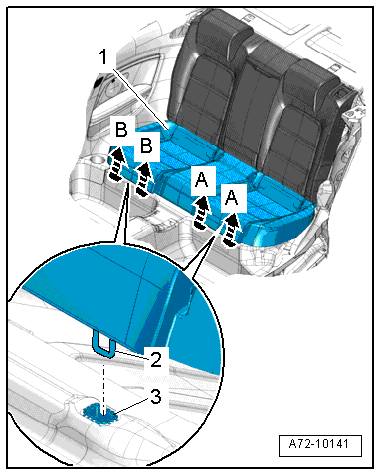
- Unclip from the guides for the child seat anchor (quantity 4) and from the anchorages. Refer to → Chapter "Rear LATCH Child Seat Anchor, Removing and Installing".
- Grasp it with both hands on one side under the seat bench frame.
- Pull the rear seat bench -1- up forcefully with both hands -A arrows- so the wire hooks -2- on the rear seat bench disengage from the mounting grommet -3-.
- Repeat the procedure on the other side of the rear seat bench -B arrows-.
- Vehicles with seat heating: disconnect the seat heating connector
- Vehicles with Multi-contour seat: disconnect the connector for the Multi-contour seat.
- Remove rear seat bench from the vehicle.
Installing
Install in reverse order of removal. Note the following:
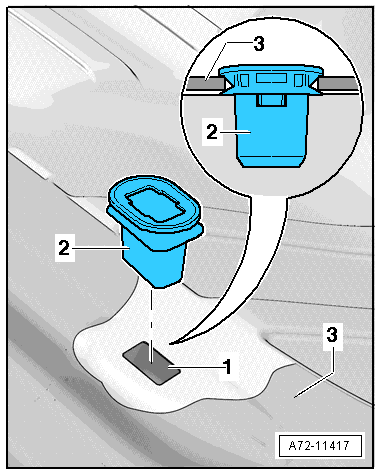
- Lift floor covering -3- and press in new mounting grommets until they engage audibly in body opening -1-.
- Place floor covering around mounting grommet as illustrated.
 Note
Note
- The floor panel, into which the mounting grommets are inserted, and the wire frame of the bench seat must be checked after every disassembly of the rear bench seat and be readjusted in the case of deformation. Refer to → Chapter "Floor Panel for Rear Bench Seat Mounting Grommets and Wire Frame, Checking and Aligning".
- Floor covering -3- must not be on the mounting grommet -2-.
- Make sure the seat heating electrical collections slide on and engage audibly.
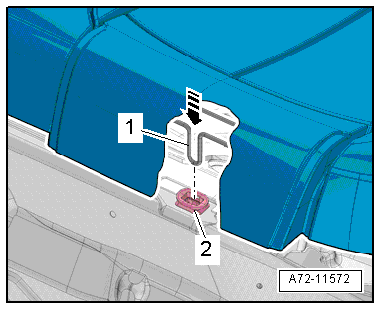
- Install the rear seat bench and push the wire hook -1- forcefully into the grommets -2--arrow-.
- Make sure the wire hooks are engaged correctly in the grommets.
Installation notes, for example tightening specifications, replacing components. Refer to → Chapter "Overview - Seat Bench/Single Seat".
Floor Panel for Rear Bench Seat Mounting Grommets and Wire Frame, Checking and Aligning
Check and Adjust the Floor Panel
- Check body openings -1- for deformations.
- In the case of deformation, readjust the panel with a plastic hammer.
Note
Remaining minor deformation is permissible.
Checking and Adjusting the Rear Bench Seat Wire Frame
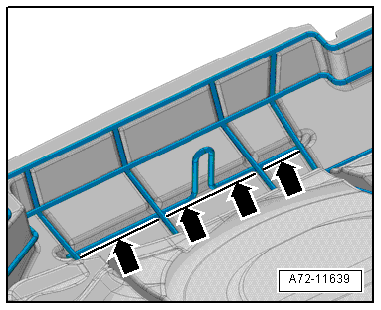
- Check if the wire frame is aligned in the marked area -arrows- before installing the rear bench seat.
- If the wire frame is bent, bend it back far enough until it is realigned -arrow-.
Seat Heating Control Module -J882-, Removing and Installing
Removing
- Remove the rear bench seat. Refer to → Chapter "Seat Bench/Single Seat, Removing and Installing".
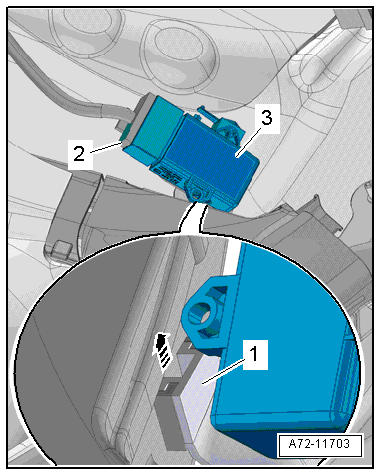
- Slightly lift the sill panel strip above the control module -3- and disengage the control module with the bracket -1- from the wiring guide -arrow-.
Note
In addition, the mount for the control module is bonded to the body with an adhesive pad.
- Disconnect the connector -2- and remove the seat heating control module.
Installing
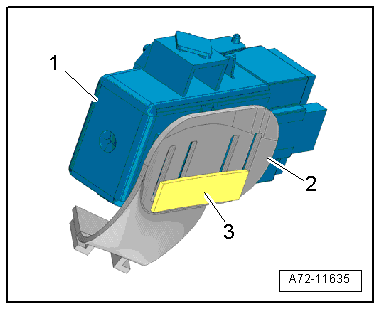
- Install the control module -1- into the bracket -2- and remove the protective backing from the adhesive pad -3-.
- Install the control module with the mount into the wiring guide and press it forcefully to the body.
Installation is performed in reverse order of removal, while noting the following:
Installation notes, for example tightening specifications, replacing components. Refer to → Chapter "Overview - Seat Bench/Single Seat".
Left Rear Seat Blower Fan, Removing and Installing
Special tools and workshop equipment required
- Upholstery Clip Pliers -VAG1634-
Removing
- Remove the rear bench seat. Refer to → Chapter "Seat Bench/Single Seat, Removing and Installing".
- Remove the cover clip to remove the seat cover near the rear seat bench fan. Refer to → Chapter "Cover and Cushion, Removing and Installing, Rear Bench Seat".
- Remove the air guide mat connections -1- from the rear seat bench fan in direction of -arrow-.

- Disconnect the fan connector -2-.
- Release the clips -arrows- and remove the rear seat bench fan-1- with the mount.
Installing
Install in reverse order of removal. Note the following:
Installation notes, for example tightening specifications, replacing components. Refer to → Chapter "Overview - Seat Bench Fan/Single Seat".