Audi A6 Typ 4G: Lock Cylinder, Removing and Installing
Rear Seat Backrest Lock Cylinder, Removing and Installing
Removing
- Remove the trim and the locking mechanism. Refer to → Chapter "Locking Mechanism Trim, Removing and Installing".
- Make sure the indicator is in the top position.
 Caution
Only remove and install the lock cylinder with the key inserted correctly. If that is not done, the tumblers and compression springs can fall out and the lock cylinder will be ruined.
- Release the four catches -arrows on the bottom- and use a key to press the locking cylinder -3--2- out from the trim -1-.
 Note
Note
Disregard the -top arrow-.
Installing
Install in reverse order of removal. Note the following:
Caution
- Only remove and install the lock cylinder with the key inserted correctly. If that is not done, the tumblers and compression springs can fall out and the lock cylinder will be ruined.
- Check the installation position when installing the lock cylinder. It is not possible to lock the rear seat backrest correctly if the installation position is not correct.
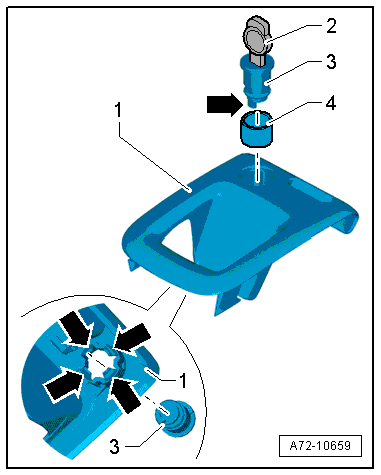
- Slide the lock -2- into the new lock cylinder correctly.
- Remove the protective cap -4- from the new lock cylinder -3-.
- Insert the lock cylinder-3- into the trim -1-, when doing this pay special attention to the position of the tab -top arrow-.
- Trim for the left rear seat seatback 1/3: the pin on the locking cylinder is pointing toward the rear in the direction of travel.
- Trim for the right rear seat seatback 2/3: the pin on the locking cylinder is pointing toward the front in the direction of travel.
- Also, the lock cylinder must fit correctly into the retainers -lower arrows-
Note
The left lock cylinder trim is illustrated.
- Install the trim and locking cylinder in the rear seat backrest. Refer to → Chapter "Locking Mechanism Trim, Removing and Installing".
- Turn the key counterclockwise 90º.
- Lock the backrest.
Pass-Through Door Lock Cylinder, Removing and Installing
Removing
- Flip the center armrest up.
Caution
Only remove and install the lock cylinder with the key inserted correctly. If that is not done, the tumblers and compression springs can fall out and the lock cylinder will be ruined.
- Insert the key -3- into the lock cylinder -2- correctly.
- Turn the key counterclockwise 90º -3-.
- Push the pass-through handle -1- up as far as the stop.
- Release the tabs -arrows- and press the lock cylinder -2- with the key -3- out of the handle.
Installing
Install in reverse order of removal. Note the following:
Caution
- Only remove and install the lock cylinder with the key inserted correctly. If that is not done, the tumblers and compression springs can fall out and the lock cylinder will be ruined.
- Check the installation position when installing the lock cylinder. It is not possible to lock the backrest correctly if the installation position is not correct.
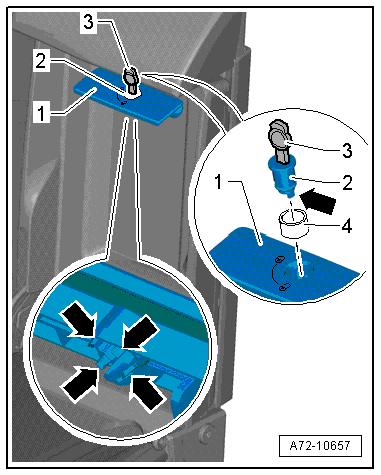
- Slide the lock -3- into the new lock cylinder -2- correctly.
- Remove the cap -4- from the new lock cylinder.
- Insert the lock cylinder into the pass-through door handle -1-. Pay attention to the installed position.
- Turn the key 90º clockwise.
- Installation position of the lock cylinder: the key slot must be vertical and the retaining tab -arrow- must point to the right, opposite the direction of travel.
Installation notes, for example tightening specifications, replacing components. Refer to → Chapter "Overview - Center Armrest, Backrest with Pass-Through".

