Audi A6 Typ 4G: Center Storage Compartment, Removing and Installing
Bench Seat Center Storage Compartment, Removing and Installing
Removing
- Remove the rear bench seat. Refer to → Chapter "Seat Bench/Single Seat, Removing and Installing".
- Remove the bolts -2-.
- Unclip the center support -1- from the seat frame -arrows-.
- Remove the center support from the seat frame.
Installing
Install in reverse order of removal. Note the following:
- When installing, make sure all the tabs slide onto the seat frame and the center storage compartment engages completely.
Installation notes, for example tightening specifications, replacing components. Refer to → Chapter "Overview - Seat Bench/Single Seat".

Rear Seat Backrest Center Storage Compartment, Removing and Installing
Special tools and workshop equipment required
- Trim Removal Wedge -3409-
Removing
- Remove the rear center armrest. Refer to → Chapter "Center Armrest, Removing and Installing".
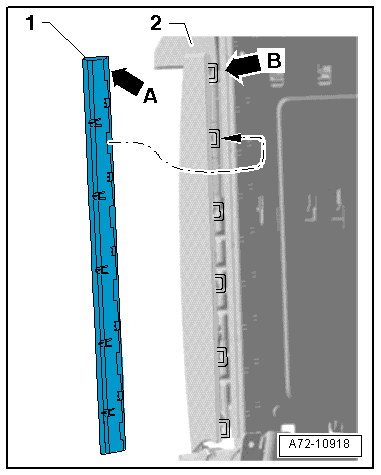
- Pry the cover -1- off of the storage compartment -2- using the Trim Removal Wedge -3409- by unclipping the tabs -arrow B- out of the loops -arrow A-
- Remove the cover from the storage compartment.
- Open the lid -4- on the storage compartment -1-.
- Remove the bolts -2 and 3-.

- Press the tabs -arrows- on the storage compartment in direction of -arrow- until they come out of the trim -1- on the bracket -2-.

- Remove the storage compartment -1- at an angle forward and upward from the center armrest bracket -arrow-.
Installing
Install in reverse order of removal. Note the following:
Installation notes, for example tightening specifications, replacing components. Refer to → Chapter "Overview - Center Armrest, Storage Compartment".
Center Armrest Center Storage Compartment, Removing and Installing, Market-Specific
Special tools and workshop equipment required
- Wedge Set -T10383-
Removing
- Fold down the rear center armrest and open the armrest.
- Unclip the storage tray -1- from the center armrest -arrows- using the Wedge Set -T10383/1-.
- Remove storage tray.

Removing Trim Panel
- Open the tabs -1- and unclip the trim -2- from the center armrest -arrows- using the Wedge Set -T10383/1-.
- Pull the trim upward to remove.
Installing
Install in reverse order of removal. Note the following:
Installation notes, for example tightening specifications, replacing components. Refer to → Chapter "Overview - Center Armrest, Sedan".


