
Audi A6 Typ 4G: Overview - Front Seat Pneumatic System, Backrest
Overview - Valve Block/Module Carrier/Lumbar Support/Fan, Multi-contour Seat through 08/2012
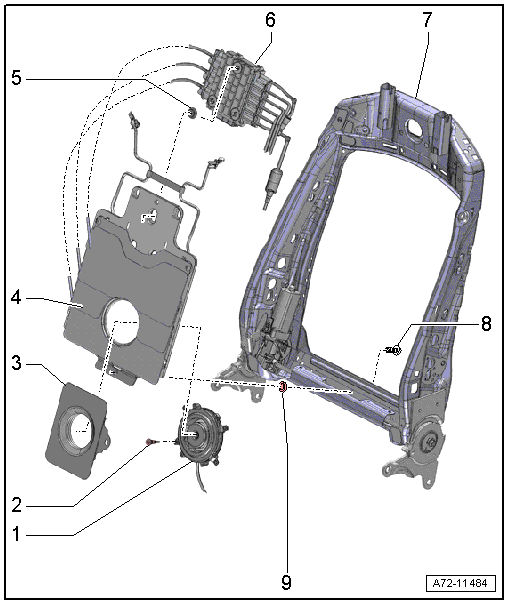
1 - Driver Seat Backrest Blower Fan -V388-
- Front passenger side: Front Passenger Seat Backrest Blower Fan -V389-
- Removing and installing. Refer to → Chapter "Front Backrest Fan, Removing and Installing".
2 - Rubber Bracket
- For blower fan
- Quantity: 4
3 - Boot
- bonded with backrest padding
4 - Module Carrier
- Module carrier with air cushions for lumbar support
- Cannot be disassembled
- Removing and installing. Refer to → Chapter "Module Carrier with Air Cushions for Lumbar Support, Removing and Installing, through 08/2012".
- Connect the pneumatic lines. Refer to → Chapter "Pneumatic Lines, Disconnecting and Connecting"
5 - Rubber Bushing
- For multi-contour seat control module
- Quantity: 3
6 - Driver Multi-contour Seat Control Module -J873-
- Front passenger side: Front Passenger Multi-contour Seat Control Module -J872-
- The connection for the restrictor is deleted on the Original Replacement Part with an integrated check valve and the separate check value must be removed. Refer to the Parts Catalog.
- Removing and installing. Refer to → Chapter "Multi-contour Seat Control Module, Removing and Installing, through 08/2012".
- Connect the pneumatic lines. Refer to → Chapter "Pneumatic Lines, Disconnecting and Connecting"
7 - Backrest Frame
8 - Bolt
- 6.5 Nm
9 - Plastic Washer
- Insert in front of the lumbar support bolting between lumbar support bracket and backrest frame
Overview - Valve Block/Module Carrier/Lumbar Support/Fan, Multi-contour Seat from 09/2012
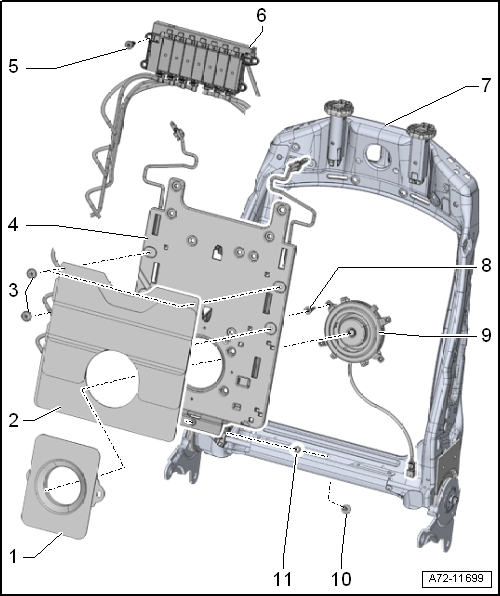
1 - Boot
- Bonded with backrest padding
2 - Air Cushion for Lumbar Support
- Removing and installing. Refer to → Chapter "Module Carrier, Air Cushion for Lumbar Support, Removing and Installing, from 09/2012".
- Connect the pneumatic lines. Refer to → Chapter "Pneumatic Lines, Disconnecting and Connecting"
3 - Expanding Rivet
- Quantity: 4
4 - Module Carrier
- For module carrier with air cushions for lumbar support
- Removing and installing. Refer to → Chapter "Module Carrier, Air Cushion for Lumbar Support, Removing and Installing, from 09/2012".
5 - Rubber Buffer
- Valve block mount
- Quantity: 4
6 - Valve Block 1 in Driver Seat -N475-
- Front passenger side: Valve Block 1 in Front Passenger Seat -N477-
- For lumbar support and side wall adjuster
- Removing and installing. Refer to → Chapter "Valve Block for Air Cushion for Lumbar Support, Seat and Backrest Bolster Adjuster Assembly, Removing and Installing, from 09/2012".
- Connect the pneumatic lines. Refer to → Chapter "Pneumatic Lines, Disconnecting and Connecting"
7 - Backrest Frame
8 - Rubber Bracket
- For blower fan
- Quantity: 4
9 - Driver Seat Backrest Blower Fan -V388-
- Front passenger side: Front Passenger Seat Backrest Blower Fan -V389-
- Removing and installing. Refer to → Chapter "Front Backrest Fan, Removing and Installing".
10 - Bolt
- 6.5 Nm
11 - Plastic Washer
- Insert in front of the lumbar support bolting between lumbar support bracket and backrest frame
Overview - Front Seat Pneumatic System, Massage Mat
Overview - Backrest Cushion Massage Mat, Multi-contour Seat through 08/2012
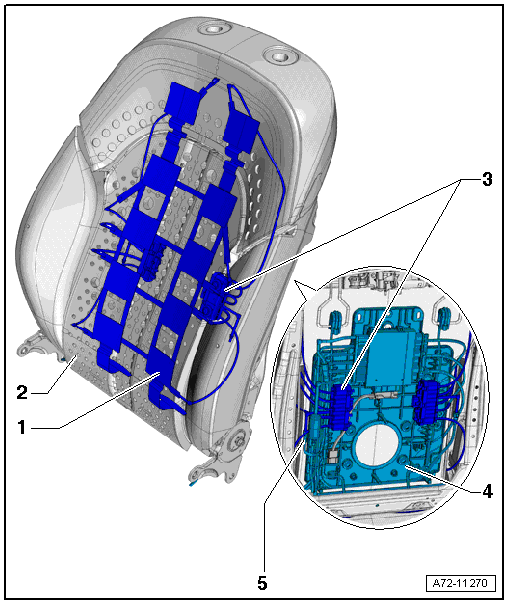
1 - Massage Mat
- Integrated in the backrest cushion; if defective replace backrest cushion. Refer to → Chapter "Backrest Cover and Cushion, Separating".
2 - Backrest Cushion
- Removing and installing. Refer to → Chapter "Backrest Cover and Cushion, Separating".
3 - Valve Block 1 in Driver Seat -N475-/Valve Block 2 in Driver Seat -N476-
- For massage mat
- Front passenger side: Valve Block 1 in Front Passenger Seat -N477-/Valve Block 2 in Front Passenger Seat -N478-
- Removing and installing. Refer to → Chapter "Massage Mat Valve Block, Removing and Installing, through 08/2012".
- Connect the pneumatic lines. Refer to → Chapter "Pneumatic Lines, Disconnecting and Connecting"
4 - Lumbar Support Module Carrier
5 - Connector
- For pneumatic line
- Disconnecting. Refer to → Chapter "Pneumatic Lines, Disconnecting and Connecting".
Overview - Backrest Cushion Massage Mat, Multi-contour Seat from 09/2012
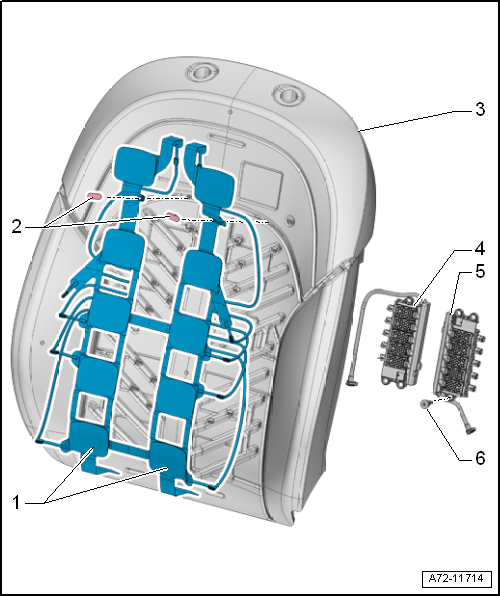
1 - Massage Mat
- Removing and installing. Refer to → Chapter "Massage Mat, Removing and Installing".
- Press in the pneumatic lines until they audibly engage
- Pull to check whether the coupling is locked in correctly
2 - Clip
- Quantity: 2
- Replace
3 - Backrest Cushion
- Removing and installing. Refer to → Chapter "Backrest Cover and Cushion, Separating".
4 - Valve Block 3 in Driver Seat -N523-
- Front passenger side: Valve Block 3 in Front Passenger Seat -N524-
- For massage mat
- Removing and installing. Refer to → Chapter "Massage Mat Valve Block, Removing and Installing, from 09/2012".
- Connect the pneumatic lines. Refer to → Chapter "Pneumatic Lines, Disconnecting and Connecting"
5 - Valve Block 2 in Driver Seat -N476-
- Front passenger side: Valve Block 2 in Front Passenger Seat -N478-
- For massage mat
- Removing and installing. Refer to → Chapter "Massage Mat Valve Block, Removing and Installing, from 09/2012".
- Connect the pneumatic lines. Refer to → Chapter "Pneumatic Lines, Disconnecting and Connecting"
6 - Rubber Buffer
- Valve block mount
- Quantity: 6
Overview - Front Seat Pneumatic System, Seat-/Backrest Bolster Adjuster
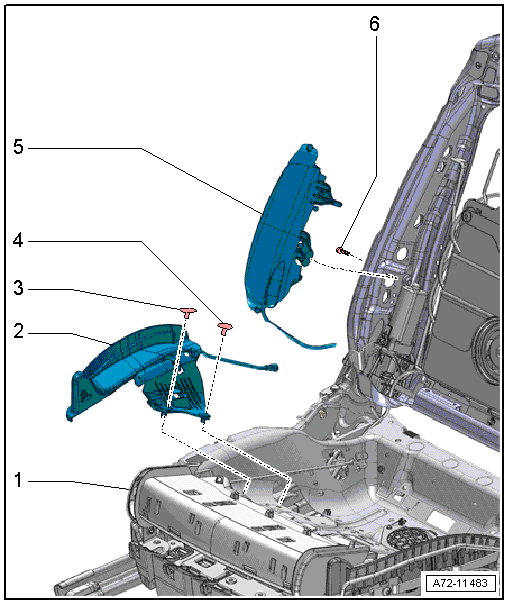
1 - Multi-contour Seat
2 - Seat Bolster Inflation Adjustment
- Quantity: 2
- Removing and installing. Refer to → Chapter "Seat Bolster Adjuster, Removing and Installing".
3 - Expanding Rivet
- Quantity: 2
4 - Expanding Rivet
- Quantity: 2
5 - Backrest Bolster Inflation Adjuster
- Quantity: 2
- Removing and installing. Refer to → Chapter "Backrest Bolster Adjuster, Removing and Installing".
- Connect the pneumatic lines. Refer to → Chapter "Pneumatic Lines, Disconnecting and Connecting"
6 - Bolt
- 1.1 Nm
- Quantity: 2

