Audi A6 Typ 4G: Overview - Instrument Panel Lamps
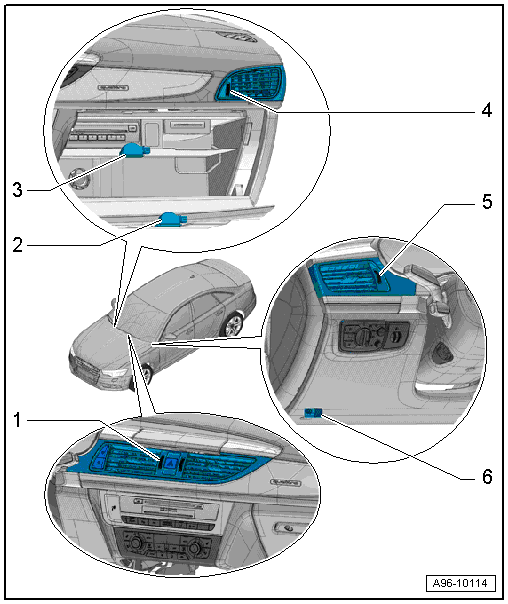
1 - Center Instrument Panel Vent
- Vehicles with left and right Center Instrument Panel Vent Illumination Bulb -L68-
- Cannot be replaced separately if faulty.
- Replacing. Refer to → Body Interior; Rep. Gr.70; Instrument Panel; Instrument Panel Vent, Removing and Installing.
2 - Right Front Footwell Illumination Bulb -L152-
- Removing and installing. Refer to → Chapter "Left/Right Front Footwell Illumination Bulb -L151-/-L152-, Removing and Installing".
3 - Glove Compartment Lamp -W6-
- 12 V, 5 W
- Removing and installing. Refer to → Chapter "Glove Compartment Lamp -W6-, Removing and Installing".
4 - Right Instrument Panel Vent Illumination Bulb -L69-
- Equipment level
- Cannot be replaced separately if faulty.
- Replacing. Refer to → Body Interior; Rep. Gr.70; Instrument Panel; Instrument Panel Vent, Removing and Installing.
5 - Left Instrument Panel Vent Illumination Bulb -L67-
- Equipment level
- Cannot be replaced separately if faulty.
- Replacing. Refer to → Body Interior; Rep. Gr.70; Instrument Panel; Instrument Panel Vent, Removing and Installing.
6 - Left Front Footwell Illumination Bulb -L151-
- Removing and installing. Refer to → Chapter "Left/Right Front Footwell Illumination Bulb -L151-/-L152-, Removing and Installing".
Overview - Front Door Lamps
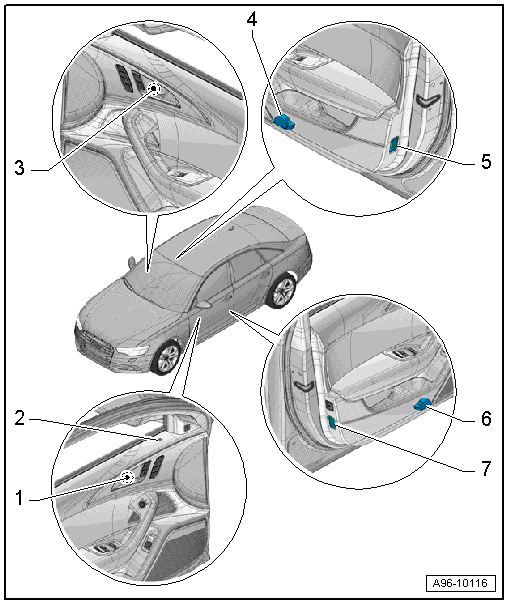
1 - Driver Door Opener Illumination Bulb -L108-
- Removing and installing. Refer to → Chapter "Driver/Front Passenger Door Opener Illumination Bulb -L108-/-L109-, Removing and Installing".
2 - Central Locking -SAFE- Indicator Lamp -K133-
- Removing and installing. Refer to → Chapter "Central Locking -SAFE- Indicator Lamp -K133-, Removing and Installing".
3 - Front Passenger Door Opener Illumination Bulb -L109-
- Removing and installing. Refer to → Chapter "Driver/Front Passenger Door Opener Illumination Bulb -L108-/-L109-, Removing and Installing".
4 - Right Front Entry Lamp -W32-
- Removing and installing. Refer to → Chapter "Left/Right Front Entry Lamp -W31-/-W32-, Removing and Installing".
5 - Front Passenger Door Warning Lamp -W36-
- 12 V, 3 W
- Removing and installing. Refer to → Chapter "Driver/Front Passenger Door Warning Lamp -W30-/-W36-, Removing and Installing".
6 - Left Front Entry Lamp -W31-
- Removing and installing. Refer to → Chapter "Left/Right Front Entry Lamp -W31-/-W32-, Removing and Installing".
7 - Driver Door Warning Lamp -W30-
- 12 V, 3 W
- Removing and installing. Refer to → Chapter "Driver/Front Passenger Door Warning Lamp -W30-/-W36-, Removing and Installing".
Overview - Rear Door Lamps
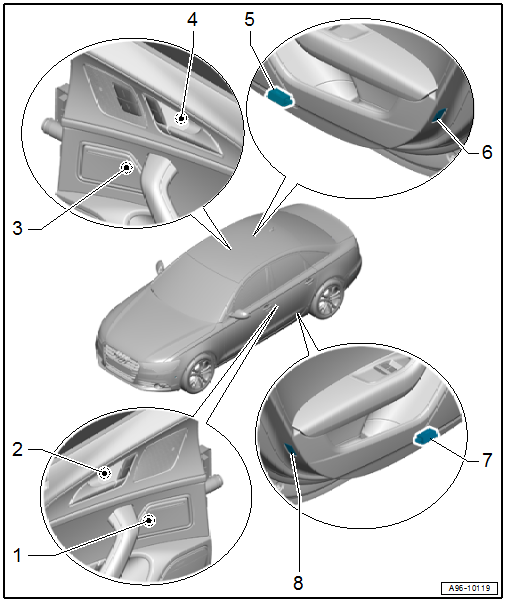
1 - Left Rear Ashtray Illumination Bulb -L48-
- Removing and installing. Refer to → Chapter "Left and Right Rear Ashtray Illumination Bulb -L48-/-L49-, Removing and Installing".
2 - Left Rear Door Opener Illumination Bulb -L110-
- Removing and installing. Refer to → Chapter "Left/Right Rear Door Opener Illumination Bulb -L110-/-L111-, Removing and Installing".
3 - Right Rear Ashtray Illumination Bulb -L49-
- Removing and installing. Refer to → Chapter "Left and Right Rear Ashtray Illumination Bulb -L48-/-L49-, Removing and Installing".
4 - Right Rear Door Opener Illumination Bulb -L111-
- Removing and installing. Refer to → Chapter "Left/Right Rear Door Opener Illumination Bulb -L110-/-L111-, Removing and Installing".
5 - Right Rear Entry Lamp -W34-
- 12 V, 3 W
- Removing and installing. Refer to → Chapter "Left/Right Rear Entry Lamp -W33-/-W34-, Removing and Installing".
6 - Right Rear Door Warning Lamp -W38-
- 12 V, 3 W
- Removing and installing. Refer to → Chapter "Left/Right Rear Door Warning Lamp -W37-/-W38-, Removing and Installing".
7 - Left Rear Entry Lamp -W33-
- 12 V, 3 W
- Removing and installing. Refer to → Chapter "Left/Right Rear Entry Lamp -W33-/-W34-, Removing and Installing".
8 - Left Rear Door Warning Lamp -W37-
- 12 V, 3 W
- Removing and installing. Refer to → Chapter "Left/Right Rear Door Warning Lamp -W37-/-W38-, Removing and Installing".
Overview - Door Ambient Lighting
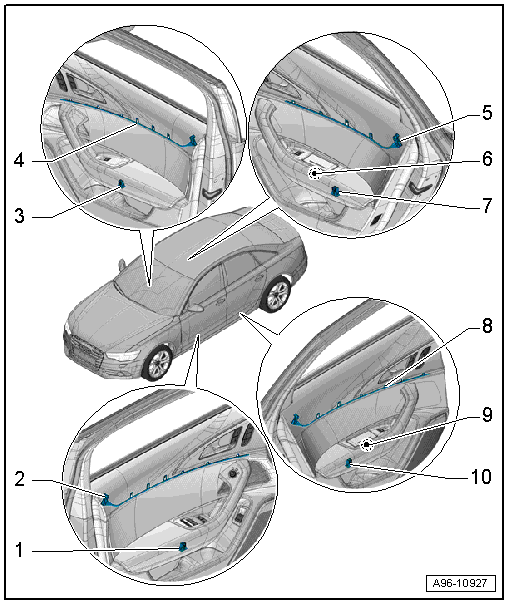
1 - Driver Door Storage Compartment Illumination Bulb -L160-
- Removing and installing. Refer to → Chapter "Driver and Front Passenger Door Storage Compartment Illumination Bulb -L160-/-L161-, Removing and Installing".
2 - Driver Door Ambient Lighting Bulb -L164-
- Removing and installing. Refer to → Chapter "Driver and Front Passenger Door Ambient Lighting Bulb -L164-/-L165-, Removing and Installing".
3 - Front Passenger Door Storage Compartment Illumination Bulb -L161-
- Removing and installing. Refer to → Chapter "Driver and Front Passenger Door Storage Compartment Illumination Bulb -L160-/-L161-, Removing and Installing".
4 - Front Passenger Door Ambient Lighting Bulb -L165-
- Removing and installing. Refer to → Chapter "Driver and Front Passenger Door Ambient Lighting Bulb -L164-/-L165-, Removing and Installing".
5 - Right Rear Door Ambient Lighting Bulb -L167-
- Removing and installing. Refer to → Chapter "Left and Right Ambient Lighting Bulb for Rear Doors -L166-/-L167-, Removing and Installing".
6 - Right Rear Ashtray Illumination Bulb -L49-
- Removing and installing. Refer to → Chapter "Left and Right Rear Ashtray Illumination Bulb -L48-/-L49-, Removing and Installing".
7 - Right Rear Door Storage Compartment Illumination Bulb -L171-
- Removing and installing. Refer to → Chapter "Left and Right Rear Door Storage Compartment Illumination Bulb -L170-/-L171-, Removing and Installing".
8 - Left Rear Door Ambient Lighting Bulb -L166-
- Removing and installing. Refer to → Chapter "Left and Right Ambient Lighting Bulb for Rear Doors -L166-/-L167-, Removing and Installing".
9 - Left Rear Ashtray Illumination Bulb -L48-
- Removing and installing. Refer to → Chapter "Left and Right Rear Ashtray Illumination Bulb -L48-/-L49-, Removing and Installing".
10 - Left Rear Door Storage Compartment Illumination Bulb -L170-
- Removing and installing. Refer to → Chapter "Left and Right Rear Door Storage Compartment Illumination Bulb -L170-/-L171-, Removing and Installing".

