Audi A6 Typ 4G: Overview - Lower Rear Lid Trim Panel
Overview - Lower Rear Lid Trim Panel, Sedan

1 - Plugs
- For the emergency release
- Clipped in the rear shelf trim
2 - Bolt
- 1.8 Nm
3 - Release Lever
- For the emergency release
- Market-specific
4 - Emergency Release
- Market-specific
5 - Rear Lid Lock Button In Luggage Compartment -E406-
- Removing and installing. Refer to → Electrical Equipment; Rep. Gr.96; Controls; Rear Lid Lock Button in Luggage Compartment E406, Removing and Installing.
6 - Trim Panel
- For rear lid lock
- Removing and installing. Refer to → Chapter "Lower Rear Lid Trim Panel, Removing and Installing, Sedan".
- Press on until it engages audibly
7 - Stop Strip
- Quantity: 2
- Clip into rear lid
8 - Rear Lid Hinge
- Quantity: 2
- Removing and installing. Refer to → Chapter "Lower Rear Lid Trim Panel, Removing and Installing, Sedan".
9 - Expanding Clip
- Quantity: 2
10 - Rear Lid
11 - Lock Washer
- Quantity: 8
12 - Clip
- Quantity: 11
- Insert in the trim panel
- Remove any remaining rear lid clips using Omega Clip Tool -T40280- and use them to install the trim.
- Replace damaged or deformed clips
13 - Rear Lid Trim
- Removing and installing. Refer to → Chapter "Lower Rear Lid Trim Panel, Removing and Installing, Sedan".
- Press on until it engages audibly
14 - Pull Handle
- Attached using lock washers on the rear lid trim panel
15 - Bolt
- 1.8 Nm
- Quantity: 2
16 - Bracket
- For the warning triangle
- Removing and installing. Refer to → Chapter "Emergency Triangle Bracket, Removing and Installing".
- Insert and press on it until it audibly latches
17 - Warning Triangle
Overview - Rear Lid Trim Panel, Avant

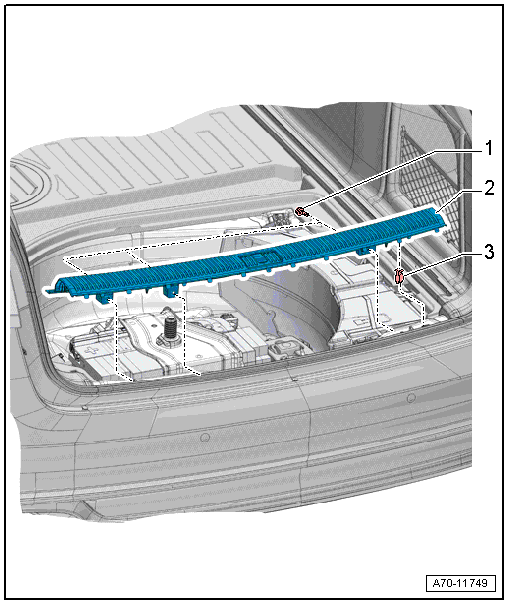
1 - Trim Panel
- For rear lid lock
- Removing and installing. Refer to → Chapter "Rear Lid Lock Trim Panel, Removing and Installing".
- Press on until it engages audibly
2 - Rear Lid Lock Button In Luggage Compartment -E406-
- Removing and installing. Refer to → Electrical Equipment; Rep. Gr.96; Controls; Rear Lid Lock Button in Luggage Compartment E406, Removing and Installing.
3 - Rubber Buffer
- Quantity: 6
- Insert in the trim panel
4 - Clip
- 8 piece without hooks
- 2 pieces with hooks, replacing
- Insert in the trim panel
- Remove any remaining rear lid clips using Omega Clip Tool -T40280- and use them to install the trim.
- Replace damaged or deformed clips
5 - Rear Lid Lower Trim
Vehicles with:
- Without sun shade
- With sun shade
- Removing and installing. Refer to → Chapter "Lower Rear Lid Trim Panel, Removing and Installing, Avant".
- Press on until it engages audibly
6 - Clip
- Quantity: 8
- Insert in the trim panel
- Remove any remaining rear lid clips using Omega Clip Tool -T40280- and use them to install the trim.
- Replace damaged or deformed clips
7 - Rubber Buffer
- Quantity: 8
- Insert in the trim panel
8 - Rear Lid Upper Trim
- Removing and installing. Refer to → Chapter "Upper Rear Lid Trim Panel, Removing and Installing".
- Insert first behind the side window frame in the rear lid
- Press on until it engages audibly
9 - Bolt
- 2 Nm
- Quantity: 4
10 - Cover
- For tail lamps
- Removing and installing. Refer to → Chapter "Tail Lamp Cover, Removing and Installing".
- Clipped in the rear shelf trim
11 - Luggage Compartment Lamp
- Removing and installing. Refer to → Electrical Equipment; Rep. Gr.96; Lamps; Luggage Compartment Lamp W3, Removing and Installing.
12 - Cover
- For the emergency release
- Clipped in the rear shelf trim
13 - Warning Triangle
14 - Cover
- For the warning triangle
- Removing and installing. Refer to → Chapter "Lower Rear Lid Trim Panel, Removing and Installing, Avant".
- Engaged in the rear shelf trim
- Press on until it engages audibly
Overview - Lock Carrier Trim
Overview - Lock Carrier Trim Panel, Sedan
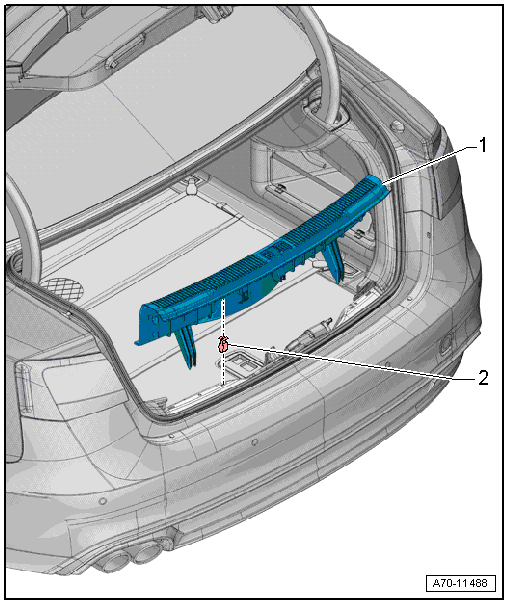
1 - Rear Lid End Trim Panel
- Removing and installing. Refer to → Chapter "Lock Carrier Trim Panel, Removing and Installing, Sedan".
- Press on until it engages audibly
2 - Clip
- Quantity: 5
- Insert in the trim panel
- Remove any remaining clips in the body mounting points using the Omega Clip Tool -T40280-. To install, insert into the trim panel.
- Replace damaged or deformed clips
Overview - Lock Carrier Trim Panel, Avant
1 - Bolt
- 2.5 Nm
- Quantity: 3
2 - Rear Lid End Trim Panel
- Removing and installing. Refer to → Chapter "Lock Carrier Trim Panel, Removing and Installing, Avant".
- Press on until it engages audibly
- Stretch the rear lid seal lip
3 - Clip
- Quantity: 4
- Insert in the trim panel
- Remove any remaining clips in the body mounting points using the Omega Clip Tool -T40280-. To install, insert into the trim panel
- Replace damaged or deformed clips

