Audi A6 Typ 4G (2011–2018) Workshop Manual / Body / Body Exterior / Exterior Equipment / Overview - Trim Molding and Covers
Audi A6 Typ 4G: Overview - Trim Molding and Covers
Overview - Trim Molding and Covers, Sedan
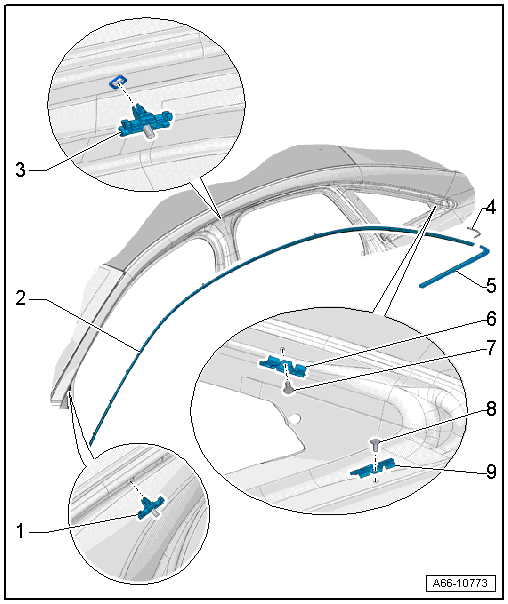
1 - Expanding Clip
2 - Roof Trim Molding
- Removing and installing. Refer to → Chapter "Roof Trim Molding, Removing and Installing".
3 - Expanding Clip
- Quantity: 11
4 - Seal
- For the side window trim molding
- Self-adhesive
5 - Side Window Trim Molding
- Removing and installing. Refer to → Chapter "Side Window Trim Molding, Removing and Installing".
6 - Clip
- Quantity: 3
7 - Blind Rivet
- Quantity: 3
8 - Blind Rivet
- Quantity: 3
9 - Clip
- Quantity: 3
Overview - Trim Molding and Covers, Avant
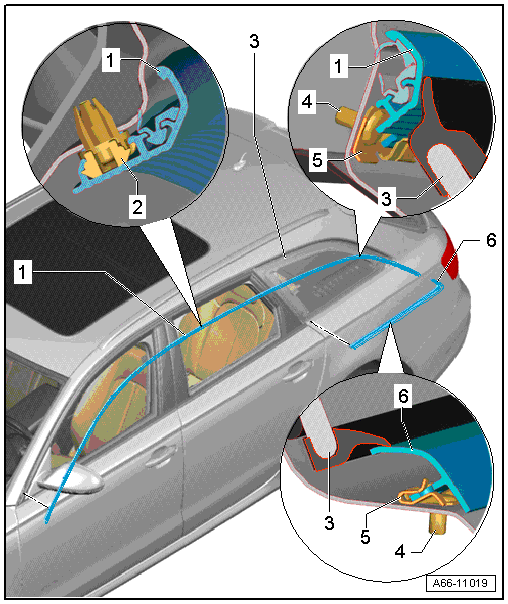
1 - Roof Trim Molding
- Removing and installing. Refer to → Chapter "Roof Trim Molding, Removing and Installing".
2 - Clip
- Quantity: 11
3 - Side Window
4 - Blind Rivet
- Quantity: 11
5 - Clip
- Quantity: 11
6 - Side window trim molding
- Removing and installing is identical to the Sedan model. Refer to → Chapter "Side Window Trim Molding, Removing and Installing".
Overview - Trim Molding and Covers, Door Trim Molding and Side Window Trim Molding
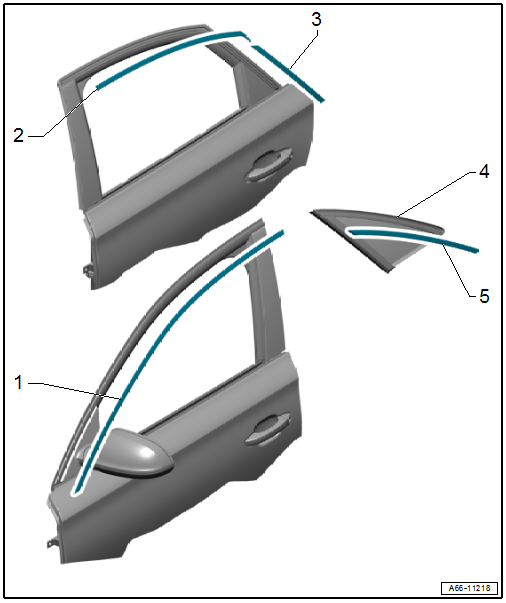
1 - Front Door Trim Molding
- Removing and installing. Refer to → Chapter "Front Door Trim Molding, Removing and Installing, Vehicles from MY 2015".
2 - Rear Door Upper Trim Molding
- Removing and installing. Refer to → Chapter "Rear Door Upper Trim Molding, Removing and Installing, Vehicles from MY 2015".
3 - Rear Door Trim Molding
- Removing and installing. Refer to → Chapter "Rear Door Trim Molding, Removing and Installing, Vehicles from MY 2015".
4 - Side Window
5 - Side Window Trim Molding
- Removing and installing. Refer to → Chapter "Side Window Trim Molding, Removing and Installing, Vehicles from MY 2015".

