Audi A6 Typ 4G: Spoiler, Removing and Installing
Rear Lid Spoiler, Removing and Installing
Special tools and workshop equipment required
- Trim Removal Wedge -3409-
- Wiring Harness Repair Set - Hot Air Blower -VAS1978/14A-
- Cleaning Solution -D 009 401 04-
- Bonded Window Tool Kit -VAG1351-
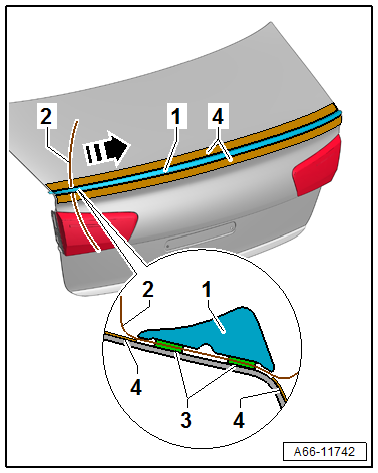
Spoiler, Removing
- Tape off the rear lid in the cutting section with adhesive tape -4-.
- Insert the Cutting Tool for Bonded Windows - Wire -VAS6452/2--2- on one side between the spoiler -1- and the rear lid.
- Insert the ends of the cutting wire in two pull handles from the Bonded Window Tool Kit -VAG1351-.
Cut through the double-sided adhesive tape -3- on the spoiler starting from one side going to the opposite.
- Before reinstallation, completely remove any adhesive residue from the rear lid and spoiler.
- During installation, position the spoiler toward the rear up to the imaginary line -item 5- and centered to the rear lid.
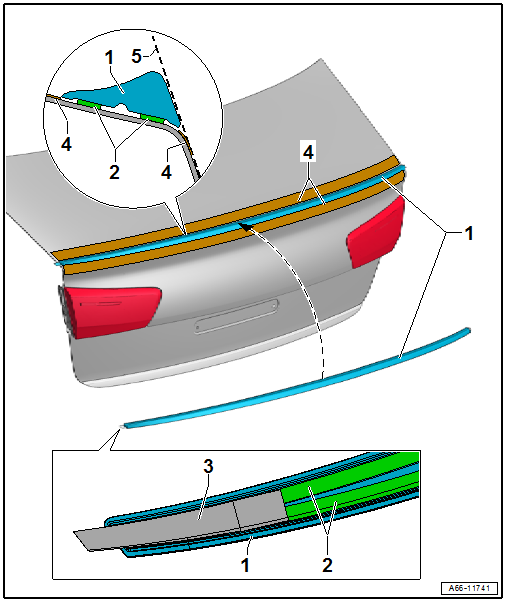
Installing
 Note
Note
The rear lid and spoiler must be at room temperature before installing.
- Remove the adhesive residue on the rear lid and the spoiler and clean using the Cleaning Solution -D 009 401 04-.
- Warm the rear lid in the adhesion area using the Hot Air Blower -VAG1416-.
- Mount the spoiler toward the rear up to the imaginary line -5- on the rear lid with the help of a second technician.
- Gradually remove the protective film between the rear lid and the spoiler up to the opposite side while pressing on the spoiler.
- Press on the spoiler strongly from the center going outward.
Roof Edge Spoiler, Removing and Installing
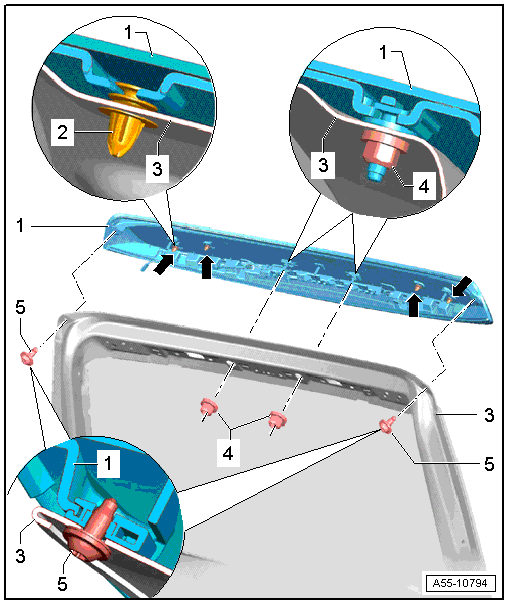
1 - Spoiler on Roof Edge
- Removing
- Remove the rear lid trim
- Remove the nuts -4- and bolts -5-.
- Disconnect the connector from the brake lamp.
- Unclip the clip -2- from the outside one after the other.
- Installing
- Install in reverse order of removal. Push the clips all the way into the rear lid.
2 - Clip
3 - Rear Lid
4 - Nut
- 4 Nm
5 - Screw
- 2.5 Nm
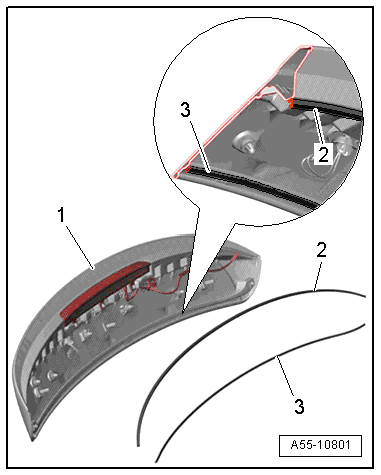
Roof Edge Spoiler Seal, Removing and Installing
Special tools and workshop equipment required
- Cleaning Solution -D 009 401 04-
Removing
- Remove the spoiler on the edge of the roof. Refer to → Chapter "Roof Edge Spoiler, Removing and Installing".
- Pull the seals -2 and 3- off the spoiler on the edge of the roof.
Installing
Install in reverse order of removal and note the following:
- Remove any remaining adhesive, if necessary.
- The adhesive surfaces must be free of dust and grease.
- Clean the adhesive surface of the spoiler using Cleaning Solution -D 009 401 04-.
- Remove the peel-off backing from the seals.
- Position the seals in the center of the spoiler on the edge of the roof and press them on.