Audi A6 Typ 4G: B-Pillar Door Trim, Removing and Installing
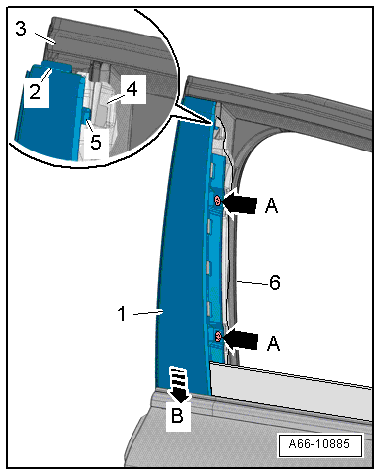
B-Pillar Door Trim, Removing and Installing, Front Door
Removing
- Remove the window frame trim panel. Refer to → Body Interior; Rep. Gr.70; Front Door Trim Panels; Window Frame Trim, Removing and Installing.
- Remove the window guide -1- from the rear guide.
- Remove the bolts -A arrows-.
- Slide the B-pillar trim -item 6- downward -arrow B-. While doing so, the upper tab -5- disengages from the window seal -4- and the tab -2- disengages from the body opening -3-.
- Push the B-pillar trim to the outside until it disengages.
- Remove the B-pillar trim upward and out of the door opening.
Installing
Install in reverse order of removal. Note the following:
- Install the window guide. Refer to → Chapter "Window Guide, Removing and Installing".
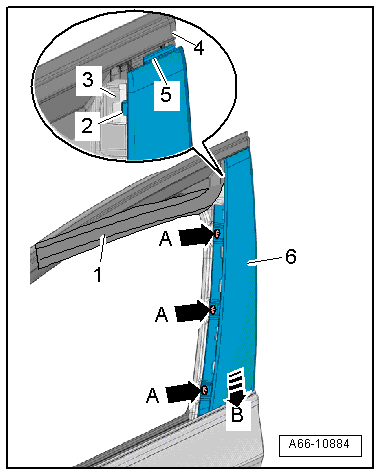
B-Pillar Door Trim, Removing and Installing, Rear Door
Removing
- Remove the window frame trim panel. Refer to → Body Interior; Rep. Gr.70; Rear Door Trim Panels; Window Frame Trim Panel, Removing and Installing.
- Remove the window guide -6- from the guide near the bolts.
- Remove the bolts -A arrows-.
- Push the B-pillar trim -item 1- downward -arrow B-. The upper tab -2- will disengage from the window seal -3- and the tab -5- will disengage from the body -4- when doing this.
- Push the B-pillar trim to the outside until it disengages.
- Remove the B-pillar trim upward and out of the door opening.
Installing
Install in reverse order of removal. Note the following:
- Install the window guide. Refer to → Chapter "Window Guide, Removing and Installing".
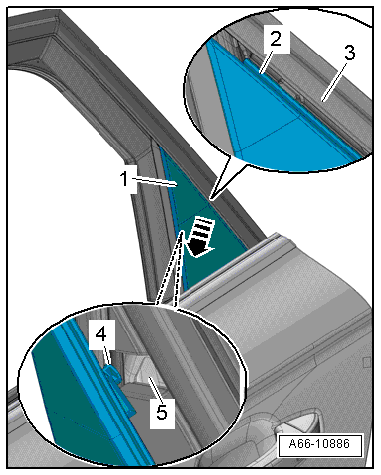
C-Pillar Door Trim, Removing and Installing
Removing
- Remove the window frame trim panel. Refer to → Body Interior; Rep. Gr.70; Rear Door Trim Panels; Window Frame Trim Panel, Removing and Installing.
- Pry out the grommet -1-.
- Remove the bolt -2-.
- Push the C-pillar triangular trim -1- downward -arrow-. While doing this, the tab -2- will disengage from the window seal -3- and the pin -4- will disengage from the body -5-.
- Remove the C-pillar triangle trim upward and out of the door opening.
Installing
Install in reverse order of removal.