Audi A6 Typ 4G: Center Cushion, Removing and Installing, Backrest with Pass-Through
Lower Center Cushion, Removing and Installing
Removing
- Remove the pass-through door. Refer to → Chapter "Pass-Through Cover, Removing and Installing".
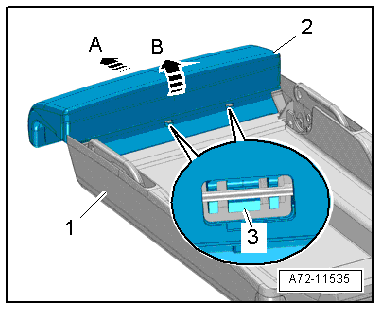
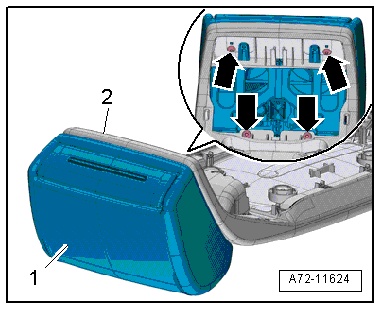
- Release the tabs -3- with a screwdriver and push the center cushion -2- downward at the same time -arrow A-.
- Swivel the center cushion upward -arrow B-, then disengage it from the pass-through door -1- and remove it.
Installing
Installation is performed in reverse order of removal, while noting the following:
Installation notes, for example tightening specifications, replacing components. Refer to → Chapter "Overview - Center Armrest, Backrest with Pass-Through".
Center Armrest Center Cushion, Removing and Installing, Market-Specific
Removing
- Remove the rear center armrest. Refer to → Chapter "Center Armrest, Removing and Installing, Market-Specific".
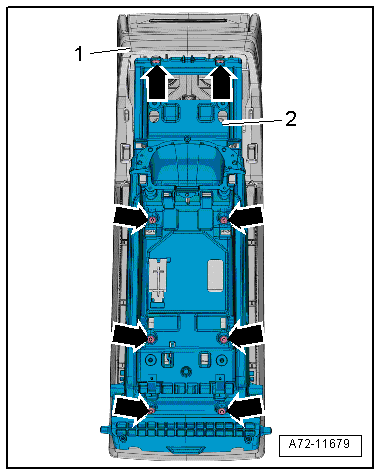
- Remove the bolts -arrows-.
- Remove the center cushion -1- forward from the rear center armrest -2-.
Installing
Install in reverse order of removal. Note the following:
Installation notes, for example tightening specifications, replacing components. Refer to → Chapter "Overview - Center Armrest, Sedan".

Rear Center Armrest Cushion, Removing and Installing
Removing
- Remove the rear armrest. Refer to → Chapter "Center Armrest Arm Cushion, Removing and Installing, Market-Specific".
- Remove the trim from the rear center armrest. Refer to → Chapter "Center Armrest Trim, Removing and Installing, Market-Specific".
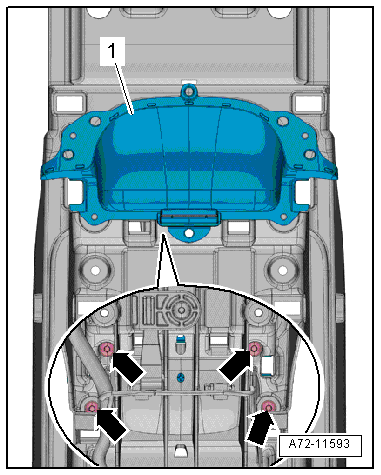
- Remove the bolts -arrows-.
- Remove the cushion -1- from the lower section of the armrest -2-.
- Disconnect the electrical harness connector for ambient lighting.
Removing Grip Recess
- Remove the bolts -arrows-.
- Remove the grip recess -1- upward.
Removing Headrest Cushion
- Remove the bolts -arrows-.
- Remove the cushion -1- from the rear armrest cushion -2-.
Installing
Install in reverse order of removal. Note the following:
Installation notes, for example tightening specifications, replacing components. Refer to → Chapter "Overview - Center Armrest, Sedan".
Cover and Cushion, Separating
Special tools and workshop equipment required
- Upholstery Clip Pliers -VAG1634-
Disconnecting
- Remove cover and cushion. Refer to → Chapter "Cover and Cushion, Removing and Installing".
Rear Bench Seat
- Cut the upholstery clips (refer to → Chapter "Cover and Cushion, Removing and Installing, Rear Bench Seat") all the way around the seat frame with piers.
- Remove the seat cover and seat cushion from the seat frame.
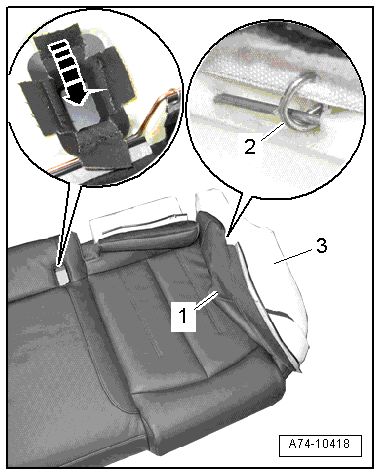
- Vehicles with seat heating: free up the seat heating connector
- Pull off the seat cover -1- from the seat cushion -3- as far as possible and cut the upholstery clips -2- using pliers.
- Remove the seat cover from the opening for the seat belt latch -arrow-.
- Seat cover with heating element: carefully loosen the heating element from the bonding and remove it.
 Note
Note
The illustration shows a 3-person rear seat bench.
Rear Seat Backrest
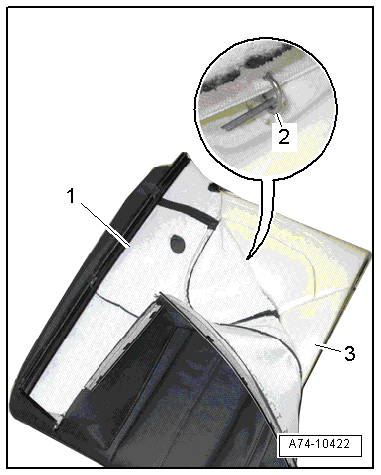
- Pull off the backrest cover -1- from the backrest cushion -3- as far as possible and cut the upholstery clips -2- using pliers.
Multi-contour Seat Rear Seat Backrest
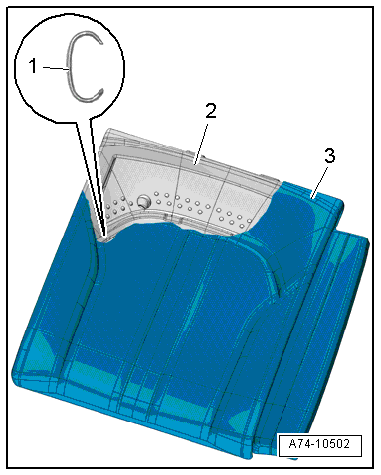
- Pull off the backrest cover -3- from the backrest cushion -2- as far as possible and cut the upholstery clips -1- using pliers.
- Vehicles equipped with backrest cover with heating element sewn in: carefully loosen the heating element from the bonding and remove it.
Installing
Install in reverse order of removal. Note the following:
Installation notes, for example tightening specifications, replacing components. Refer to → Chapter "Overview - Cover and Cushion".
Headrest Cover and Cushion, Removing and Installing
Removing
- Remove the rear headrest. Refer to → Chapter "Headrest, Removing and Installing, Standard/Sport Seat".
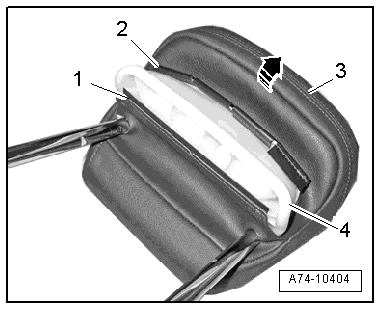
- Open the lock by prying the upper side of the cover with the flat channel -1- loose from the headrest support using a screwdriver and removing it.
- Pry lower cover side with the U-channel -2- loose from the headrest support and remove it.
- Pull off the cover -3- and cushion over the headrest support -4--arrow- and remove headrest support.
- Remove cushion from the cover.
Installing
- Insert cushion with proper fit in the cover.
- Insert headrest support in the cushion with cover.
- Close the closure by first clipping the lower U-channel of the cover into the headrest support.
- Clip the edge of the cover with the lower flat channel on the cover into the U-channel.
- After closing the closure with a needle or pointed object, line up the cover and the channels.
- Make sure the cover lies on the padding without any wrinkles and without seam markings.
Install in reverse order of removal.