Audi A6 Owners & Service Manuals
Audi A6 Typ 4G (2011–2018) Workshop Manual / Body / Body Exterior / Front Doors, Central Locking System / Door, Removing and Installing

Audi A6 Typ 4G: Door, Removing and Installing

Removing

- Disconnect the door connector on the A-pillar. Refer to → Electrical Equipment; Rep. Gr.97; Connectors.

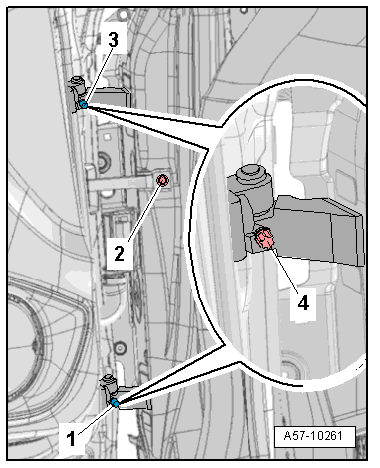
- Remove the door arrester bolt -2-.

- Remove the cover caps -1- and -3- from the stud bolts.

- Remove the stud bolts -4- on the upper and lower door hinge.

  Caution

There is a risk of damaging the paint.

Protect the painted surfaces on the door or on the side panel from damage.

- Carefully remove the door upward out of the door hinges.

Installing

Install in reverse order of removal. Note the following:

  Note

Do not make any adjustments after installing the door.
A57-10261

Door Arrester, Removing and Installing

Removing

  Note

Secure the A-pillar in the area of the door arrester using adhesive tape, so that the paint will not be damaged.

- Move the door window into the "closed" position.

- Remove the door trim panel. Refer to → Body Interior; Rep. Gr.70; Front Door Trim Panels; Front Door Trim Panel, Removing and Installing.

- Remove the lower speaker. Refer to → Communication; Rep. Gr.91; Sound System; Component Location Overview - Sound System.

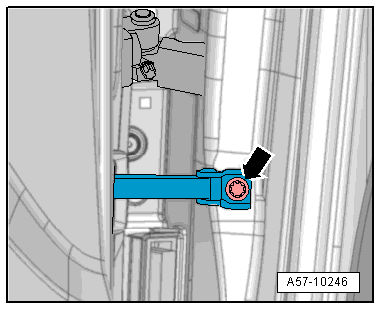
- Remove the door arrester bolt -arrow-.
A57-10246

- Remove the door arrester seal -1- on the door opening.

- Remove the bolt -arrows- and remove the door arrester -2- inward.

A57-10242

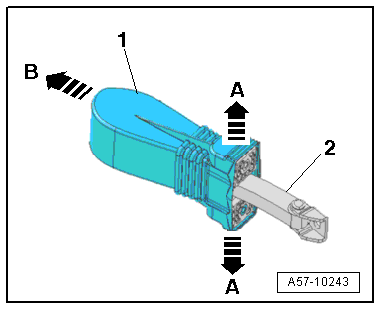
- Pull the rubber grommet -1- on the door arrester to the side slightly -A arrows-.

- Remove the rubber grommet from the door arrester -2--arrow B-.

Installing

Install in reverse order of removal.
A57-10243

    READ NEXT:

     Door, Adjusting

    Special tools and workshop equipment required Gauge - Gap Adjustment -3371- Front and Rear Door Template -T40038 /14- Use the Front and Rear Door Template -T40038 /14- on the front door with the

     Inner Door Seal, ‏Removing and Installing

    Special tools and workshop equipment required Roller -3356- Adhesive Strip Remover -VAS6349- Gauge - Gap Adjustment -3371- Front and Rear Door Template -T40038/8- Inner Door Seal, Removing and

     Overview - Window Regulator

    Overview - Window Regulator 1 - Front Door 2 - Window Regulator   Note Vehicles with tinted glass have a different version. Removing and installing. Refer to → Ch

    SEE MORE:

     Headlamp Washer System

    Overview - Headlamp Washer System 1 - Spray Nozzle for Night Vision System Camera -R212- Removing and installing. Refer to → Chapter "Night Vision System Camera -R212- Spray Nozzle, Removing and Installing". 2 - Screw 2.5 Nm Quantity: 2 3 - Mount

     Overview - Final Drive, Disassembling and Assembling

    Overview - Final Drive 0BE, 0BF, Disassembling and Assembling   Caution Only some components on the rear final drive can be disassembled. Currently both chambers -item 12- and -item 26- cannot be removed from the final drive. It is therefore currently not possible to repair the interio

    © 2011-2025 Copyright www.aa6.tochrfr.com