Audi A6 Typ 4G: Overview - Front Center Armrest
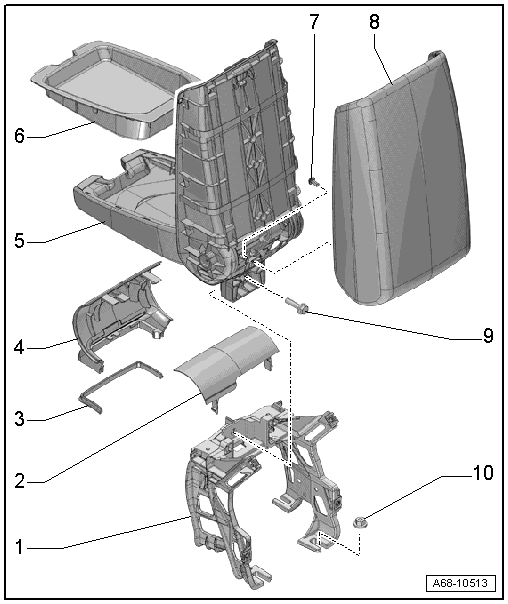
1 - Bracket
- For the center armrest
- Removing and installing. Refer to → Chapter "Center Console Bracket, Removing and Installing".
2 - Rear Trim
- For the center armrest
- Clipped with -4-
- Press on until it engages audibly
3 - Seal
- Install in the trim -4-
4 - Front Trim Panel
- For the center armrest
- Clipped with -2-
- Press on until it engages audibly
5 - Front Center Armrest
- Removing and installing. Refer to → Chapter "Front Center Armrest, Removing and Installing".
6 - Storage Compartment
- Equipment levels
- Removing and installing. Refer to → Chapter "Front Center Armrest Storage Compartment, Removing and Installing".
- Install the storage compartment in the center armrest and press on it until it audibly engages.
7 - Bolt
- 1 Nm
8 - Center Armrest Padding
- Removing and installing. Refer to → Chapter "Center Armrest Upper Section, Removing and Installing".
9 - Bolt
- 20 Nm
10 - Nut
- 20 Nm
- Quantity: 4
Front Center Armrest, Removing and Installing
Front Center Armrest, Removing and Installing
Removing
- Remove the center console rear trim. Refer to → Chapter "Center Console Rear Trim, Removing and Installing".
- Remove the rear vent air duct. Refer to → Heating, Ventilation and Air Conditioning; Rep. Gr.87; Air Guide; Air Distribution Channels, Removing and Installing.
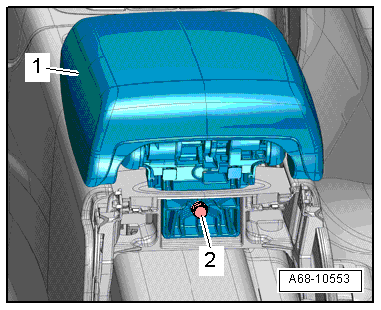
- Remove the bolt -2-.
- Remove the center armrest -1- upward.
Installing
Install in reverse order of removal. Note the following:
Installation notes, for example tightening specifications, replacing components. Refer to → Chapter "Overview - Front Center Armrest".
Front Center Armrest Storage Compartment, Removing and Installing
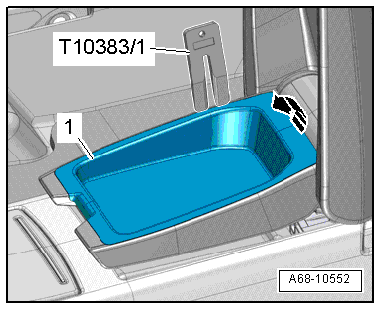
Special tools and workshop equipment required
- Wedge Set -T10383-
Removing
- Unclip the storage compartment -1- from the center armrest starting at the back using the Wedge Set -T10383/1--arrow-.
- Remove the storage compartment from the armrest.
Installing
Install in reverse order of removal. Note the following:
Installation notes, for example tightening specifications, replacing components. Refer to → Chapter "Overview - Front Center Armrest".
Center Armrest Upper Section, Removing and Installing
Removing
- Remove the front center armrest. Refer to → Chapter "Front Center Armrest, Removing and Installing".
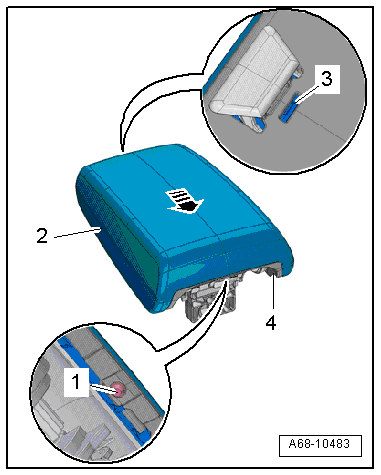
- Remove the bolt -1-.
- Open the center armrest cover and push the locking hook -3- down with a screwdriver.
- Push the center armrest padding -2- out of the mounts -4- in direction of -arrow- at the same time.
- Remove the center armrest padding.
Installing
- Position the center armrest padding -2- on the center armrest -1--arrows- and then press on it until it clicks into place.
Installation is performed in reverse order of removal, while noting the following:
Installation notes, for example tightening specifications, replacing components. Refer to → Chapter "Overview - Front Center Armrest".


