
Audi A6 Typ 4G: Overview - Front Seat Belt Latch
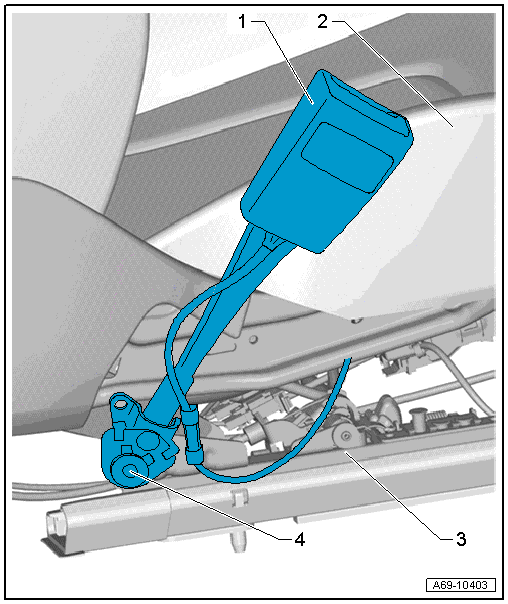
1 - Front Seat Belt Latch
- Driver side: with Driver Seat Belt Switch -E24-
- Front passenger side: with Front Passenger Seat Belt Switch -E25-
- Front passenger side, market-specific: with Front Passenger Seat Belt Switch -E25- and Passenger Occupant Detection System Seat Belt Force Sensor -G453-
- Removing and installing. Refer to → Chapter "Front Seat Belt Latch, Removing and Installing".
- Always replaced if the belt tensioner has deployed with the belt on
2 - Front Seat
3 - Seat Frame
4 - Bolt
- 33 Nm
- If it was removed because of an accident, replace the bolt
- Threaded holes for bolts must be cleaned, for example, with a thread tap
- Install with locking compound. For the correct locking compound. Refer to the Parts Catalog.
Overview - Front Seat Belt Latch, Multi-contour Seat
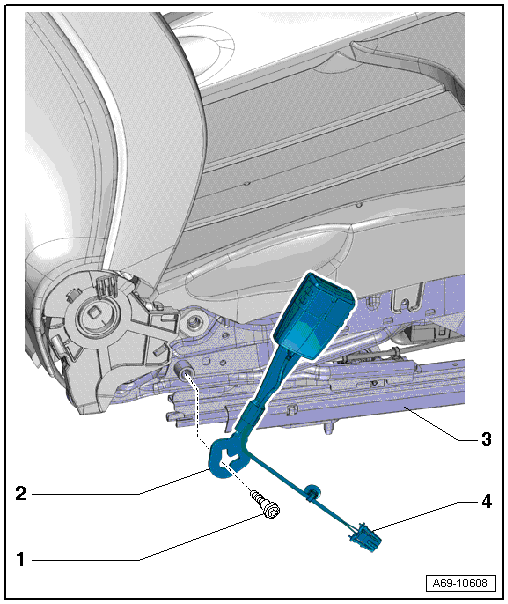
1 - Bolt
- 33 Nm
- If it was removed because of an accident, replace the bolt
2 - Front Seat Belt Latch with Driver Seat Belt Switch -E24-
- Front passenger side front seat belt latch with Front Passenger Seat Belt Switch -E25-
- Front passenger side, market-specific: with Front Passenger Seat Belt Switch -E25- and Passenger Occupant Detection System Seat Belt Force Sensor -G453-
- Removing and installing. Refer to → Chapter "Front Seat Belt Latch, Removing and Installing".
- Always replaced if the belt tensioner has deployed with the belt on
3 - Seat Frame
4 - Connector
- For the seat belt switch
Overview - Rear Seat Belt Latch
Overview - Rear Seat Belt Latch, 2-Person Rear Seat
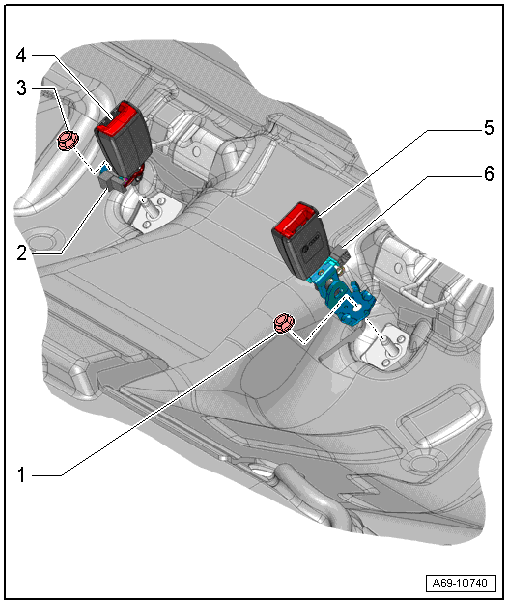
1 - Nut
- 45 Nm
- Replace
2 - Connector
- For Passenger Side Rear Seat Belt Switch -E259-
3 - Nut
- 45 Nm
- Replace
4 - Seat Belt Latch with Passenger Side Rear Seat Belt Switch -E259-
- Removing and installing. Refer to → Chapter "Rear Seat Belt Latch, Removing and Installing".
- Align with the direction of travel when bolting it on
- The tabs on the floor panel must be between the recesses on the bolting surface of the seat belt latch.
- Always replace the seat belt latch if the belt tensioner has deployed with the belt on
5 - Seat Belt Latch with Driver Side Rear Seat Belt Switch -E258-
- Removing and installing. Refer to → Chapter "Rear Seat Belt Latch, Removing and Installing".
- Align with the direction of travel when bolting it on
- The tabs on the floor panel must be between the recesses on the bolting surface of the seat belt latch.
- Always replace the seat belt latch if the belt tensioner has deployed with the belt on
6 - Connector
- For the Driver Side Rear Seat Belt Switch -E258-
Overview - Rear Seat Belt Latch, 3-Person Rear Seat
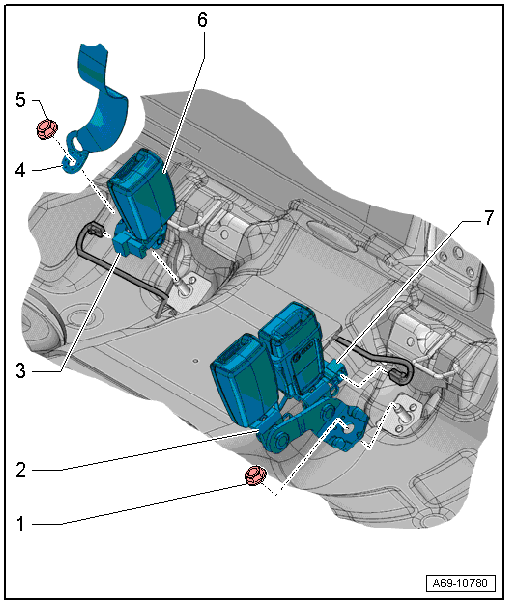
1 - Nut
- 45 Nm
- Replace
2 - Seat Belt Latch
- With Driver Side Rear Seat Belt Switch -E258-
- With Center Rear Seat Belt Switch -E609-
- Removing and installing. Refer to → Chapter "Rear Seat Belt Latch, Removing and Installing".
- Always replaced if the belt tensioner has deployed with the belt on
- Align with the direction of travel when bolting it on
- The tabs on the floor panel must be between the recesses on the bolting surface of the seat belt latch.
3 - Connector
- For Passenger Side Rear Seat Belt Switch -E259-
4 - Center Rear Belt End Fitting
- Removing and installing. Refer to → Chapter "Rear Seat Belt Latch, Removing and Installing".
5 - Nut
- 45 Nm
- Replace
6 - Seat Belt Latch
- With Passenger Side Rear Seat Belt Switch -E259-
- Removing and installing. Refer to → Chapter "Rear Seat Belt Latch, Removing and Installing".
- Always replaced if the belt tensioner has deployed with the belt on
- Align with the direction of travel when bolting it on
- The tabs on the floor panel must be between the recesses on the bolting surface of the seat belt latch.
7 - Connector
- For Driver Side Rear Seat Belt Switch -E258- and Center Rear Seat Belt Switch -E609-.
Overview - Rear Seat Belt Latch, 3-Person Rear Seat, Market-Specific
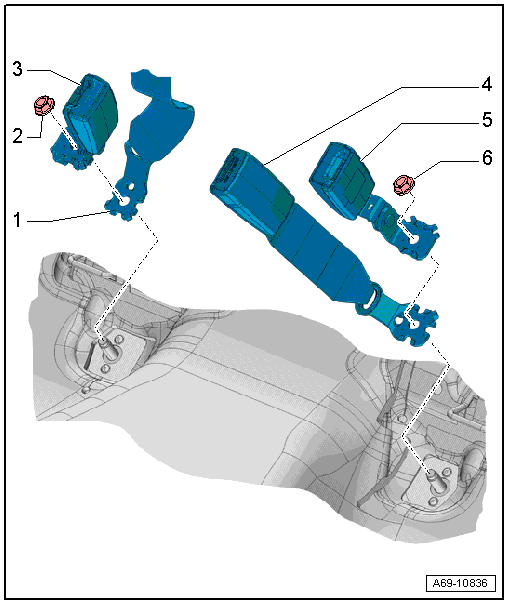
1 - Center Rear Belt End Fitting
- Removing and installing. Refer to → Chapter "Rear Seat Belt Latch, Removing and Installing".
- The tabs on the floor panel must be between the recesses on the bolting surface of the seat belt latch.
2 - Nut
- 45 Nm
- Replace
3 - Seat Belt Latch
- Removing and installing. Refer to → Chapter "Rear Seat Belt Latch, Removing and Installing".
- Always replaced if the belt tensioner has deployed with the belt on
- Align with the direction of travel when bolting it on
- The tabs on the floor panel must be between the recesses on the bolting surface of the seat belt latch.
4 - Rear Center Belt Latch
- Removing and installing. Refer to → Chapter "Rear Seat Belt Latch, Removing and Installing".
- Always replaced if the belt tensioner has deployed with the belt on
- Align with the direction of travel when bolting it on
- The tabs on the floor panel must be between the recesses on the bolting surface of the seat belt latch.
5 - Seat Belt Latch
- Removing and installing. Refer to → Chapter "Rear Seat Belt Latch, Removing and Installing".
- Always replaced if the belt tensioner has deployed with the belt on
- Align with the direction of travel when bolting it on
- The tabs on the floor panel must be between the recesses on the bolting surface of the seat belt latch.
6 - Nut
- 45 Nm
- Replace

