Audi A6 Typ 4G: Overview - Luggage Compartment Floor
Overview - Luggage Compartment Floor, Sedan
 Note
Note
The luggage compartment floor covering for vehicles with fold-down rear seat back is shown.
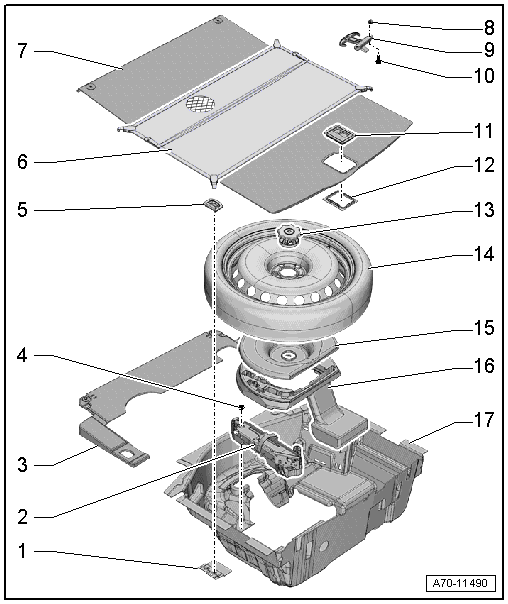
1 - Support
- Quantity: 2
2 - Vehicle Jack/Break-Down Kit
- Equipment levels
3 - Frame
- For rear panel sill
- Removing and installing. Refer to → Chapter "Rear Panel Sill Frame, Removing and Installing".
- Press on until it engages audibly
4 - Nut
- 8 Nm
- Quantity: 2
5 - Tie-Down Eye
- Quantity: 4
- Removing and installing. Refer to → Chapter "Tie Down, Removing and Installing".
6 - Cargo Net
- Attach to the tie downs
7 - Luggage Compartment Floor Covering
- Equipment levels
- Removing and installing. Refer to → Chapter "Luggage Compartment Floor Panel, Removing and Installing".
8 - Metal Clip
- Quantity: 4
- Clip into the body
9 - Retaining Hook
- Quantity: 2
- Equipment levels
- Removing and installing. Refer to → Chapter "Coat Hooks, Removing and Installing".
10 - Bolt
- 1.5 Nm
- Quantity: 4
11 - Handle
- For the luggage compartment floor mat
- Removing and installing. Refer to → Chapter "Rear Luggage Compartment Floor Handle, Removing and Installing".
12 - Frame
- For luggage compartment floor covering handle
- Can be pressed down in one position on luggage compartment floor covering handle.
13 - Nut
- For spare wheel mounting
- Must be audible when tightened into place
14 - Spare Wheel
- Equipment levels
15 - Cover
- For the vehicle tool kit
16 - Vehicle Tool Kit
- Equipment levels
17 - Spare Tire Well Trim
- Removing and installing. Refer to → Chapter "Spare Wheel Well Trim, Removing and Installing, Sedan".
Overview - Luggage Compartment Floor, A6 Hybrid
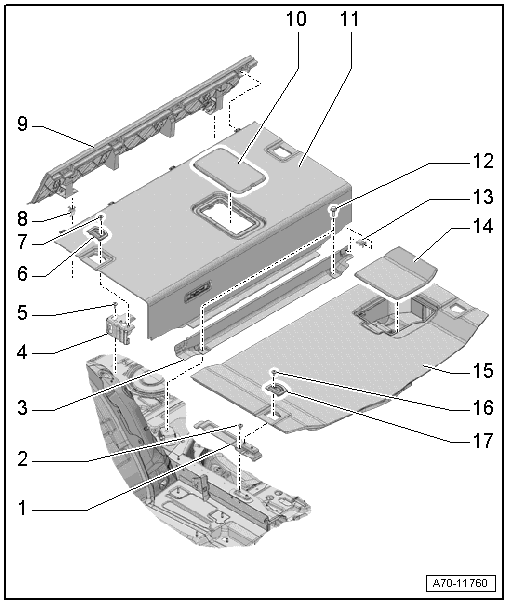
1 - Bracket
- For the luggage compartment floor mat
- Quantity: 2
- Removing and installing. Refer to → Chapter "Luggage Compartment Floor Covering Bracket, Removing and Installing".
2 - Bolt
- 6 Nm
- Quantity: 4
3 - Support
- For the Traction Battery -A2- Cover
- Removing and installing. Refer to → Chapter "Luggage Compartment Floor, Removing and Installing, A6 Hybrid".
4 - Bracket
- For the Traction Battery -A2- Cover
- Quantity: 2
- Removing and installing. Refer to → Chapter "Luggage Compartment Floor Covering Bracket, Removing and Installing".
5 - Bolt
- 6 Nm
- Quantity: 6
6 - Tie-Down Eye
- Quantity: 2
- Removing and installing. Refer to → Chapter "Tie Down, Removing and Installing".
7 - Bolt
- 6 Nm
- Quantity: 4
8 - Clip
- Quantity: 2
- Install in the traction battery cover
9 - Front Cover
- For the Traction Battery -A2-
- Removing and installing. Refer to → Chapter "Luggage Compartment Floor, Removing and Installing, A6 Hybrid".
- Press on until it engages audibly
10 - Cover
- For the High Voltage System Maintenance Connector -TW-
11 - Cover
- For the Traction Battery -A2-
- Removing and installing. Refer to → Chapter "Luggage Compartment Floor, Removing and Installing, A6 Hybrid".
- Press on until it engages audibly
12 - Bolt
- 10 Nm
- Quantity: 2
13 - Clip
- Quantity: 2
- Install in the traction battery cover
- Remove any remaining clips in the body mounting points using the Omega Clip Tool -T40280-. To install, insert into the trim panel.
- Replace damaged or deformed clips
14 - Cover
- For the break-down kit
15 - Luggage Compartment Floor Covering
- Removing and installing. Refer to → Chapter "Luggage Compartment Floor, Removing and Installing, A6 Hybrid".
16 - Bolt
- 6 Nm
- Quantity: 4
17 - Tie-Down Eye
- Quantity: 2
- Removing and installing. Refer to → Chapter "Tie Down, Removing and Installing".
Overview - Luggage Compartment Floor, Avant
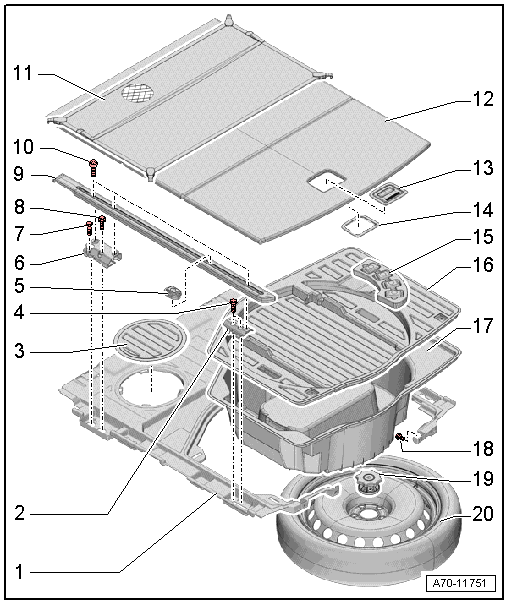
1 - Trim Panel
- For the luggage compartment floor
- Removing and installing. Refer to → Chapter "Spare Wheel Well Trim, Removing and Installing, Avant".
2 - Rear Bracket
- For the rail
- Quantity: 2
- Removing and installing. Refer to → Chapter "Rail, Removing and Installing".
3 - Cover
- For the locking flange
- Clipped in the trim
- Press on until it engages audibly
4 - Bolt
- 10 Nm
- Quantity: 4
5 - Tie-Down Eye
- Quantity: 4
- Insert into the rail, press the release button to adjust
6 - Front Bracket
- For the rail
- Quantity: 2
- Removing and installing. Refer to → Chapter "Rail, Removing and Installing".
7 - Bolt
- 55 Nm
- Quantity: 2
8 - Bolt
- 10 Nm
- Installed depending on the version
- Quantity: 2
9 - Retaining Tracks
- Quantity: 2
- Removing and installing. Refer to → Chapter "Rail, Removing and Installing".
10 - Bolt
- 4 Nm
- Quantity: 6
11 - Cargo Net
- Equipment levels
- Attach to the tie downs
12 - Luggage Compartment Floor Covering
- Removing and installing. Refer to → Chapter "Luggage Compartment Floor Panel, Removing and Installing".
- Install in the front in the luggage compartment floor panel trim
13 - Handle
- For the luggage compartment floor mat
- Removing and installing. Refer to → Chapter "Rear Luggage Compartment Floor Handle, Removing and Installing".
14 - Frame
- For luggage compartment floor covering handle
- Removing and installing. Refer to → Chapter "Rear Luggage Compartment Floor Handle, Removing and Installing".
- Can be pressed down in one position on luggage compartment floor covering handle.
- Press on until it engages audibly
15 - Mounting Box
- For tie downs
16 - Cover
- For the spare wheel well
- Equipment levels
17 - Insert
- For the spare wheel well
- Equipment levels
18 - Bolt
- Quantity: 3
- Tightening specification. Refer to → Chapter "Overview - Lock Carrier Trim Panel, Avant".
19 - Nut
- For spare wheel mounting
- Must be audible when tightened into place
20 - Spare Wheel
- Equipment levels

