Audi A6 Typ 4G (2011–2018) Workshop Manual / Body / Body Interior / Interior Trim / Overview - Luggage Compartment Side Trim Panel
Audi A6 Typ 4G: Overview - Luggage Compartment Side Trim Panel
Overview - Luggage Compartment Side Trim Panel, Sedan
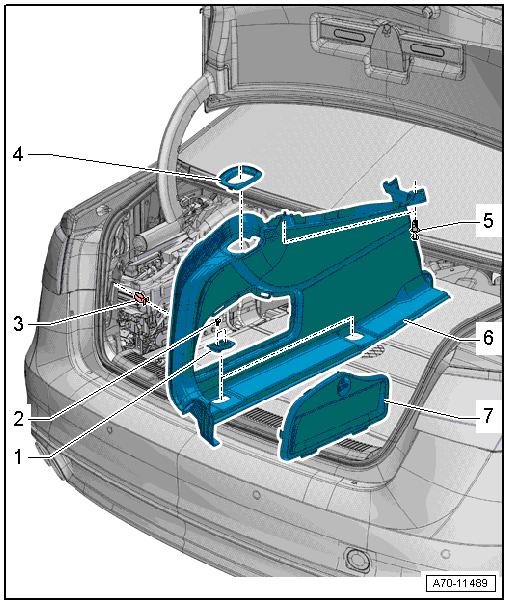
1 - Tie-Down Eye
- Quantity: 2
- Removing and installing. Refer to → Chapter "Tie Down, Removing and Installing".
2 - Bolt
- 6 Nm
- Quantity: 4
3 - Clip
- Quantity: 2
- Insert in the trim panel
- Remove any remaining clips in the body mounting points using the Omega Clip Tool -T40280-. To install, insert into the trim panel.
- Replace damaged or deformed clips
4 - Frame
- For the rear lid hinge
- Removing and installing. Refer to → Chapter "Luggage Compartment Side Trim Panel, Removing and Installing".
5 - Expanding Clip
- Quantity: 2
6 - Luggage Compartment Side Trim Panel
- Removing and installing. Refer to → Chapter "Luggage Compartment Side Trim Panel, Removing and Installing".
- Press on until it engages audibly
7 - Cover
- For the luggage compartment side trim
Overview - Luggage Compartment Side Trim Panel, Market-Specific
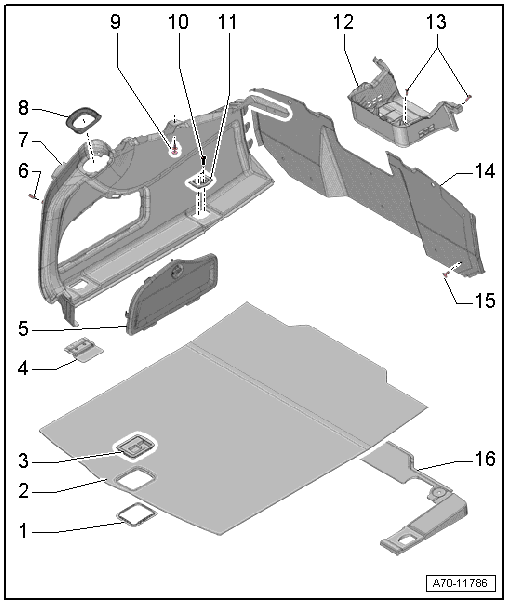
1 - Frame
- For luggage compartment floor covering handle
- Can be pressed down in one position on luggage compartment floor covering handle.
2 - Luggage Compartment Floor Covering
- Equipment levels
- Removing and installing. Refer to → Chapter "Luggage Compartment Floor Panel, Removing and Installing".
3 - Handle
- For the luggage compartment floor mat
- Removing and installing. Refer to → Chapter "Rear Luggage Compartment Floor Handle, Removing and Installing".
4 - Support
- Quantity: 2
5 - Cover
- For the luggage compartment side trim
6 - Clip
- Quantity: 2
- Insert in the trim panel
- Remove any remaining clips in the body mounting points using the Omega Clip Tool -T40280-. To install, insert into the trim panel.
- Replace damaged or deformed clips
7 - Luggage Compartment Side Trim Panel
- Removing and installing. Refer to → Chapter "Luggage Compartment Side Trim Panel, Removing and Installing".
- Press on until it engages audibly
8 - Frame
- For the rear lid hinge
- Removing and installing. Refer to → Chapter "Luggage Compartment Side Trim Panel, Removing and Installing".
9 - Expanding Clip
- Quantity: 3
10 - Bolt
- 6 Nm
- Quantity: 8
11 - Tie-Down Eye
- Quantity: 4
- Removing and installing. Refer to → Chapter "Tie Down, Removing and Installing".
12 - Cover
- For rear seat entertainment
- Removing and installing. Refer to → Chapter "Luggage Compartment Rear Trim Panel, Removing and Installing".
13 - Bolt
- 3.8 Nm
- Quantity: 4
14 - Rear Panel Trim
- Removing and installing. Refer to → Chapter "Luggage Compartment Rear Trim Panel, Removing and Installing".
15 - Clip
- Quantity: 8
16 - Frame
- For rear panel sill
- Removing and installing. Refer to → Chapter "Rear Panel Sill Frame, Removing and Installing".
- Press on until it engages audibly
Overview - Luggage Compartment Side Trim Panel, A6 Hybrid
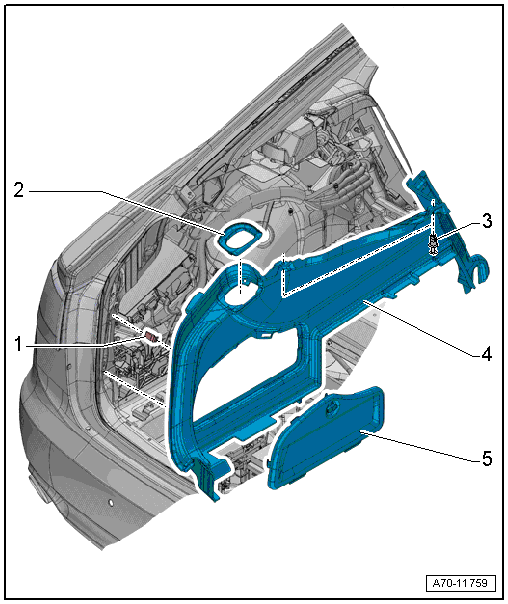
1 - Clip
- Quantity: 2
- Insert in the trim panel
- Remove any remaining clips in the body mounting points using the Omega Clip Tool -T40280-. To install, insert into the trim panel.
- Replace damaged or deformed clips
2 - Frame
- For the rear lid hinge
- Removing and installing. Refer to → Chapter "Luggage Compartment Side Trim Panel, Removing and Installing".
3 - Expanding Clip
- Quantity: 2
4 - Luggage Compartment Side Trim Panel
- Removing and installing. Refer to → Chapter " Luggage Compartment Side Trim Panel, Removing and Installing, A6 Hybrid".
- Press on until it engages audibly
5 - Cover
- For the luggage compartment side trim
Overview - Luggage Compartment Side Trim Panel, Avant
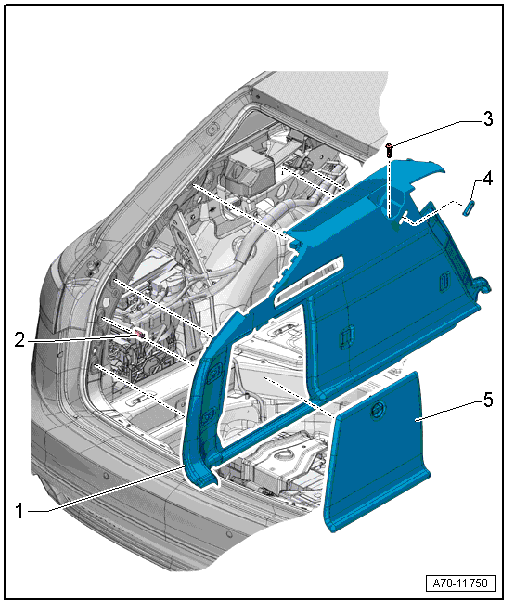
1 - Luggage Compartment Side Trim Panel
- Removing and installing. Refer to → Chapter "Luggage Compartment Side Trim Panel, Removing and Installing, Avant".
- Press on until it engages audibly
- Stretch the rear lid seal lip
2 - Clip
- Quantity: 3
- Insert in the trim panel
- Remove any remaining clips in the body mounting points using the Omega Clip Tool -T40280-. To install, insert into the trim panel.
- Replace damaged or deformed clips
3 - Bolt
- 3.5 Nm
4 - Rubber Grommet
- For the screen separator bracket
- Slide over the bracket and insert into the trim panel
5 - Cover
- For the luggage compartment side trim

