Audi A6 Typ 4G: Overview - Rear Lid Tail Lamps
Overview - Rear Lid Tail Lamps, Sedan
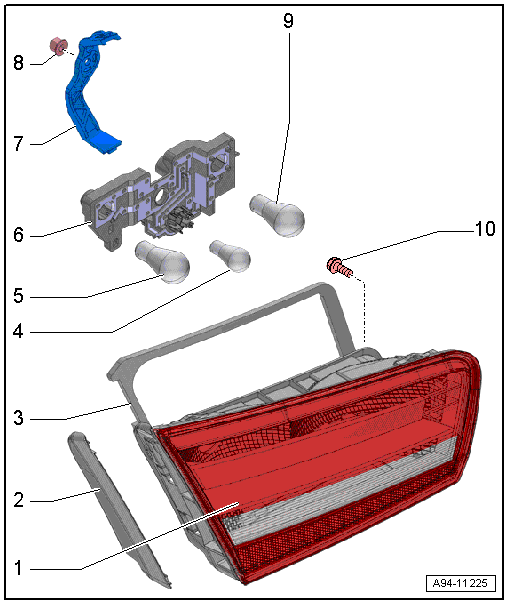
1 - Inner Tail Lamp
- Removing and installing. Refer to → Chapter "Rear Lid Tail Lamp, Removing and Installing, Sedan".
2 - Cover
- For the inner tail lamp
- Removing and installing. Refer to → Chapter "Rear Lid Tail Lamp, Removing and Installing, Sedan".
3 - Seal
- Self-adhesive
- Replace if damaged.
4 - Back-Up Lamp Bulb
- Left Back-Up Lamp Bulb -M16-
- Right Back-Up Lamp Bulb -M17-
- 12 V, 16 W (W16W)
- Bulb, replacing. Refer to → Chapter "Bulb Socket, Removing and Installing, Rear Lid Tail Lamp, Sedan".
5 - Brake and Tail Lamp Bulb
- Left Brake/Tail Lamp Bulb -M21-, Right Brake/Tail Lamp Bulb -M22-
- 12 V, 21 W
- Bulb, replacing. Refer to → Chapter "Bulb Socket, Removing and Installing, Rear Lid Tail Lamp, Sedan".
6 - Bulb Socket
- Removing and installing. Refer to → Chapter "Bulb Socket, Removing and Installing, Rear Lid Tail Lamp, Sedan".
7 - Clamping Bracket
- For securing tail lamp assembly to the rear lid
8 - Nut
- 3.5 Nm
9 - Brake Lamp Bulb/Tail Lamp and Fog Lamp Bulb
- Left Brake Lamp Bulb -M9-, Right Brake Lamp Bulb -M10-
- Left Rear Parking/Fog Lamp Bulb -M41-, Right Rear Parking/Fog Lamp Bulb -M42-
- 12 V, 21 W
- Bulb, replacing. Refer to → Chapter "Bulb Socket, Removing and Installing, Rear Lid Tail Lamp, Sedan".
10 - Screw
- 3.5 Nm
Overview - Rear Lid Tail Lamps, LED Tail Lamps, Sedan through MY 2014
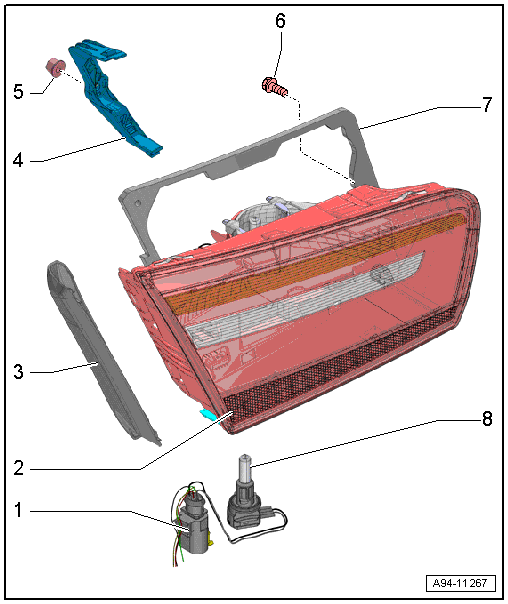
1 - Wiring Harness
- With bulb socket
2 - Inner Tail Lamp
- Removing and installing. Refer to → Chapter "Rear Lid Tail Lamp, Removing and Installing, Sedan".
3 - Cover
- For the inner tail lamp
- Removing and installing. Refer to → Chapter "Rear Lid Tail Lamp, Removing and Installing, Sedan".
4 - Clamping Bracket
- For securing tail lamp assembly to the rear lid
5 - Nut
- 3.5 Nm
6 - Screw
- 3.5 Nm
7 - Seal
- Self-adhesive
- Replace if damaged.
8 - Rear Fog Lamp Bulb
- Left Rear Fog Lamp Bulb -L46-
- Right Rear Fog Lamp Bulb -L47-
- 12 V, 21 W
- Bulb, replacing. Refer to → Chapter "Left/Right Rear Fog Lamp Bulb -L46-/-L47-, Removing and Installing, LED Tail Lamp, Sedan".
Overview - Rear Lid Tail Lamps, Avant
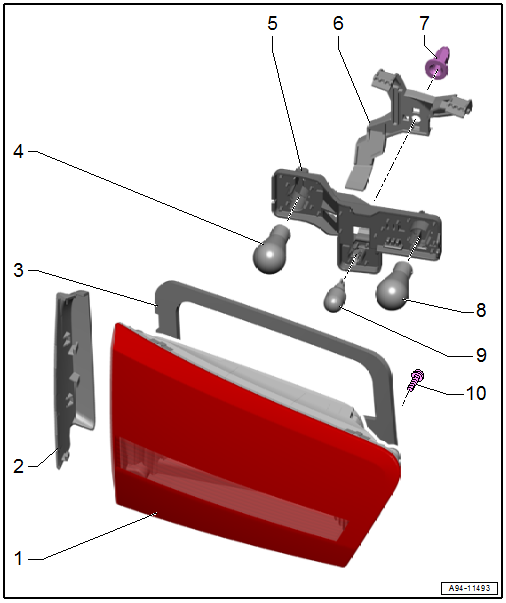
1 - Inner Tail Lamps
- Removing and installing. Refer to → Chapter "Rear Lid Tail Lamps, Removing and Installing, Avant".
2 - Cover
- For the inner tail lamp
3 - Seal
- Self-adhesive
- Replace if damaged.
4 - Brake/Tail Lamp Bulb 2
- Left Brake/Tail Lamp Bulb 2 -M58-, Right Brake/Tail Lamp Bulb 2 -M59-
- 12 V, 21 W
- Bulb, replacing. Refer to → Chapter "Inner Bulb Socket, Removing and Installing, Rear Lid Tail Lamp, Avant".
5 - Bulb Socket
- Removing and installing. Refer to → Chapter "Inner Bulb Socket, Removing and Installing, Rear Lid Tail Lamp, Avant".
6 - Clamping Bracket
- For securing tail lamp assembly to the rear lid
7 - Nut
- 3.5 Nm
8 - Brake Lamp Bulb/Tail Lamp and Fog Lamp Bulb
- Left Brake Lamp Bulb -M9-, Right Brake Lamp Bulb -M10-
- Left Rear Parking/Fog Lamp Bulb -M41-, Right Rear Parking/Fog Lamp Bulb -M42-
- 12 V, 21 W
- Bulb, replacing. Refer to → Chapter "Inner Bulb Socket, Removing and Installing, Rear Lid Tail Lamp, Avant".
9 - Back-Up Lamp Bulb
- Left Back-Up Lamp Bulb -M16-
- Right Back-Up Lamp Bulb -M17-
- 12 V, 16 W (W16W)
- Bulb, replacing. Refer to → Chapter "Inner Bulb Socket, Removing and Installing, Rear Lid Tail Lamp, Avant".
10 - Screw
- 3.5 Nm
Overview - Rear Lid Tail Lamps, LED Tail Lamps, Avant through MY 2014
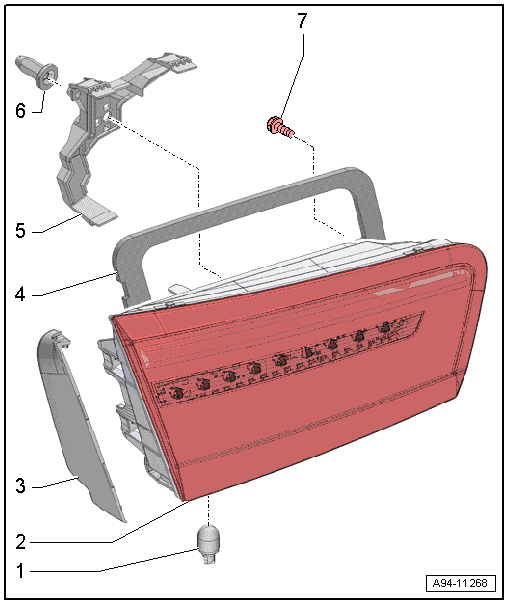
1 - Back-Up Lamp Bulb
- Left Back-Up Lamp Bulb -M16-
- Right Back-Up Lamp Bulb -M17-
- 12 V, 16 W (W16W)
- Bulb, replacing. Refer to → Chapter "Left and Right Back-Up Lamp Bulb -M16-/-M17-, Removing and Installing, LED Tail Lamp, Avant".
2 - Inner Tail Lamps
- Removing and installing. Refer to → Chapter "Rear Lid Tail Lamps, Removing and Installing, Avant".
3 - Cover
- For the inner tail lamp
4 - Seal
- Self-adhesive
- Replace if damaged.
5 - Clamping Bracket
- For securing tail lamp assembly to the rear lid
6 - Nut
- 3.5 Nm
7 - Screw
- 3.5 Nm
Overview - Rear Lid Tail Lamps, LED Tail Lamps from MY 2015
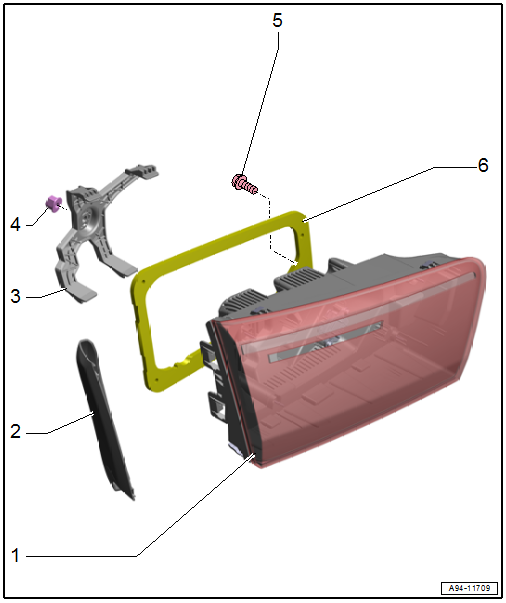
1 - Inner Tail Lamps
- LED tail lamps have LED bulbs and are integrated in the tail lamps. The LEDs cannot be replaced; the entire tail lamp must be replaced.
- Removing and installing. Refer to → Chapter "Rear Lid Tail Lamps, Removing and Installing, Avant".
2 - Cover
- For the inner tail lamp
3 - Clamping Bracket
- For securing tail lamp assembly to the rear lid
4 - Nut
- 3.5 Nm
5 - Screw
- 3.5 Nm
6 - Seal
- Self-adhesive
- Replace if damaged.

