Audi A6 Typ 4G: Rear Lid Seal, Removing and Installing
Rear Lid Seal, Replacing Sedan
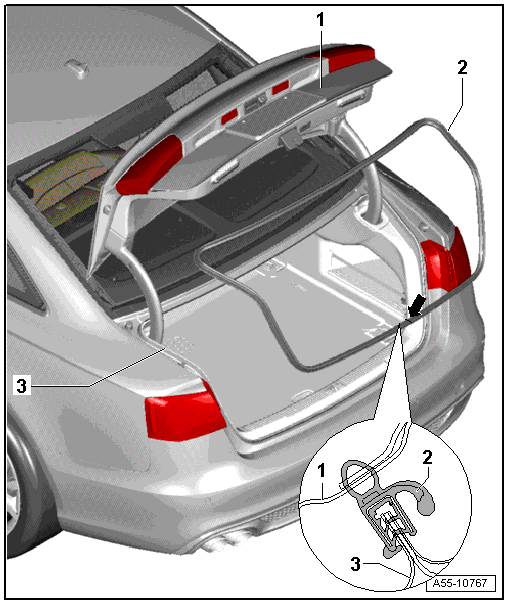
1 - Rear Lid
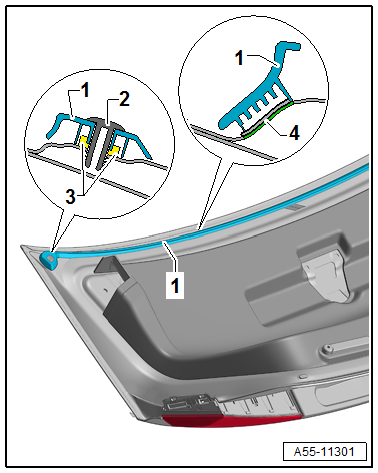
2 - Rear Lid Seal
- To remove, remove seal from body flange.
 Note
Note
Clean the body flange before installing a new seal.
- When installing, align the seal with the joint -arrow- with the marking in the center of the vehicle.
- Beginning at the seam, press the seal all around onto the body flange.
Rear Lid Additional Seal, Replacing
Special tools and workshop equipment required
- Wiring Harness Repair Set - Hot Air Blower -VAS1978/14A-
- Roller -3356-
- Cleaning Solution -D 009 401 04-
- Remove the clip from both sides of the additional seal.
- Warm up the rear lid with a hot air gun in the additional seal area and remove gradually.
- There must not be any adhesive residue on the adhesion area; remove if necessary.
- Clean the adhesive surfaces using Cleaning Solution -D 009 401 04-.
- Apply the additional seal on both sides with seals and slide the clips in.
- Align the contour of the additional seal precisely and gradually remove the protective film at the pulling aids between the additional seal and the rear lid and apply it securely by hand.
Press the additional seal with the Roller -3356- after successfully mounting.
Rear Lid Seal, Replacing, Avant

1 - Rear Lid
2 - Rear Lid Seal
- Removing
- Remove the rear lid end piece trim panel. Refer to → Body Interior; Rep. Gr.70; Luggage Compartment Trim Panels; Lock Carrier Trim Panel, Removing and Installing.
- Secure the rear lid from falling down and disconnect the gas-filled strut on the body side from the left and right ball studs.
- Remove the seal from the flange on the body all the way around.
- Installing
Note
Before installing the lid side must be loosened so that the seal between the front lid (spoiler edge) and the roof can be pushed through.
- Remove the rear lid upper trim panel. Refer to → Body Interior; Rep. Gr.70; Luggage Compartment Trim Panels; Upper Rear Lid Trim Panel, Removing and Installing
- With help hold the hood and on one side of the lid side remove the bolts from the hinge.
- Push the hood upward until the seal can be pushed through.
- Align the hood to its original shape, Re install the bolts and tighten to the tightening specification.
- When installing, align the seal to the upper marking -arrow- and then press it onto the flange all the way around.
3 - Body Flange

