Audi A6 Typ 4G: Overview - Radiator Grille
Overview - Radiator Grille, Audi A6/S6 through MY 2014
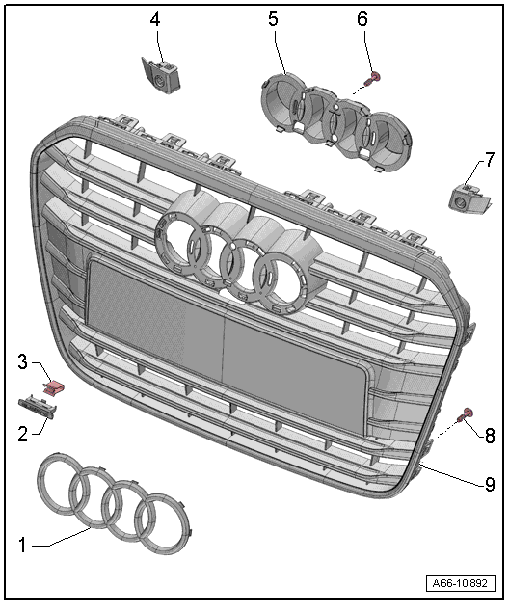
1 - Audi rings
- Removing and installing. Refer to → Chapter "Front Emblem, Removing and Installing, Audi A6/allroad/S6".
2 - quattro Name Badge
- Equipment level
- Removing and installing. Refer to → Chapter "quattro Name Badge, Removing and Installing, Vehicles through MY 2014".
3 - Clamp
- Quantity: 2
4 - Right Mount
- for the parking aid sensor
- Removing and installing. Refer to → Chapter "Front Parking Aid Sensor Mount, Removing and Installing".
5 - Cover
- for the Audi rings
- There are different versions. Refer to the Parts Catalog.
- Removing and installing. Refer to → Chapter "Front Emblem, Removing and Installing, Audi A6/allroad/S6".
6 - Bolt
- 1.5 Nm
- Quantity: 2
7 - Left Mount
- for the parking aid sensor
- Removing and installing. Refer to → Chapter "Front Parking Aid Sensor Mount, Removing and Installing".
8 - Bolt
- 1.5 Nm
- Quantity: 12
9 - Radiator Grille
- Removing and installing. Refer to → Chapter "Radiator Grille, Removing and Installing, Audi A6/allroad/S6 through MY 2014".
Overview - Radiator Grille, Audi allroad
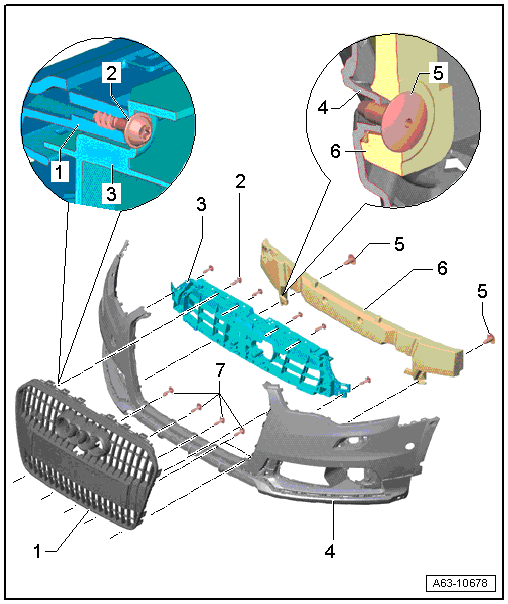
1 - Radiator Grille
- Removing and installing. Refer to → Chapter "Radiator Grille, Removing and Installing, Audi A6/allroad/S6 through MY 2014".
2 - Bolt
- 2.5 Nm
3 - Upper End Plate
- Remove the bolts from the upper end plate.
- Unclip the hose for the headlamp washer system from the upper end plate, if necessary.
- Loosen the clips one after the other and pull the end plate to the rear.
4 - Bumper Cover
- Removed
5 - Clip
6 - Molded Foam Piece
- Remove the clip -5- and then pull the molded foam part under the end plate.
7 - Bolt
- 2 Nm
Overview - Radiator Grille, Audi A6 from MY 2015
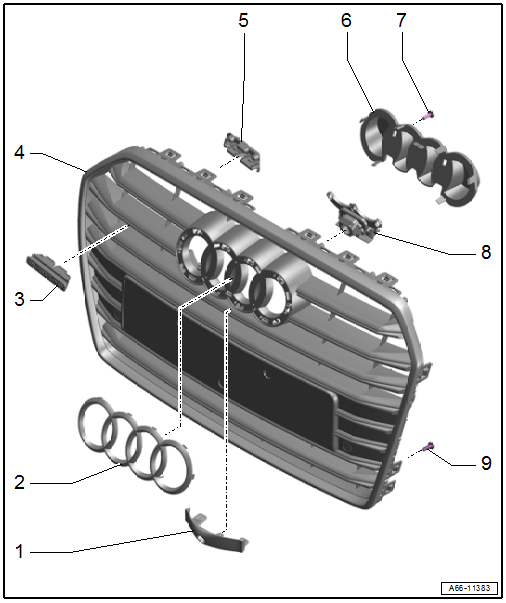
1 - Cover
- For front camera
2 - Audi Rings
- Removing and installing. Refer to → Chapter "Front Emblem, Removing and Installing, Audi A6/allroad/S6".
3 - quattro Name Badge
- Equipment level
- Removing and installing. Refer to → Chapter "quattro Name Badge, Removing and Installing, Vehicles from MY 2015".
4 - Radiator Grille
- Removing and installing. Refer to → Chapter "Radiator Grille, Removing and Installing, Audi A6 from MY 2015".
5 - Retaining Strip
- For Quattro name badge
6 - Cover
- for the Audi rings
- There are different versions. Refer to the Parts Catalog.
- Removing and installing. Refer to → Chapter "Front Emblem, Removing and Installing, Audi A6/allroad/S6".
7 - Bolt
- 1.5 Nm
8 - Mount
- For front camera
- Removing and installing. Refer to → Communication; Rep. Gr.91; Peripheral Camera; Component Location Overview - Peripheral Camera.
9 - Bolt
- 1.5 Nm
- Quantity: 6
Overview - Radiator Grille, Audi RS 6
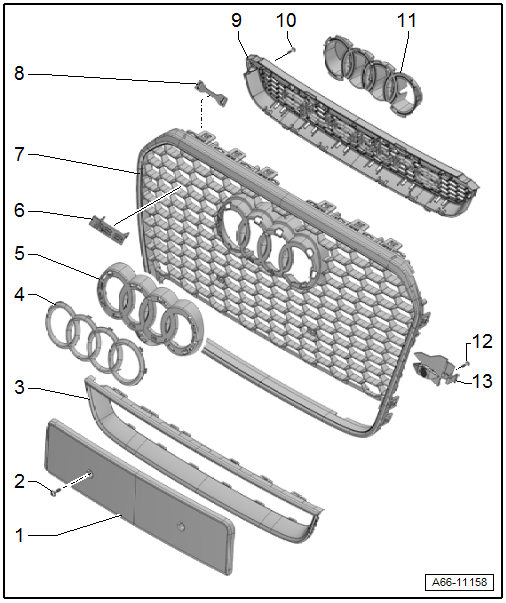
1 - License Plate Bracket
- There are different versions. Refer to the Parts Catalog.
- Removing and installing. Refer to → Chapter "License Plate Bracket, Removing and Installing".
2 - Bolt
- 0.9 Nm
- Quantity: 2
3 - Mount
- For the lower radiator grille
4 - Audi rings
- Removing and installing. Refer to → Chapter "Front Emblem, Removing and Installing, Audi RS 6".
5 - Adapter
- for the Audi rings
6 - RS 6-Name Badge
- Removing and installing. Refer to → Chapter "quattro Name Badge, Removing and Installing, Vehicles through MY 2014".
7 - Radiator Grille
- For vehicles with a Front Peripheral Camera -R243-, a cut-out must be installed first before installation.
- Removing and installing. Refer to → Chapter "Radiator Grille, Removing and Installing, Audi RS 6".
8 - Retaining Strip
9 - Lower Radiator Grille
- Removing and installing. Refer to → Chapter "Lower Radiator Grille, Removing and Installing, Audi RS 6".
10 - Bolt
- 1.5 Nm
- Quantity: 6
11 - Cover
- for the Audi rings
- There are different versions. Refer to the Parts Catalog.
- Removing and installing. Refer to → Chapter "Front Emblem, Removing and Installing, Audi RS 6".
12 - Bolt
- 1.5 Nm
13 - Mount
- For the parking aid sensor
- Removing and installing. Refer to → Chapter "Front Parking Aid Sensor Mount, Removing and Installing, Audi RS 6".
Overview - Radiator Grille, Audi RS 6
1 - License Plate Bracket
- There are different versions. Refer to the Parts Catalog.
- Removing and installing. Refer to → Chapter "License Plate Bracket, Removing and Installing".
2 - Bolt
- 0.9 Nm
- Quantity: 2
3 - Mount
- For the lower radiator grille
4 - Audi rings
- Removing and installing. Refer to → Chapter "Front Emblem, Removing and Installing, Audi RS 6".
5 - Adapter
- for the Audi rings
6 - RS 6-Name Badge
- Removing and installing. Refer to → Chapter "quattro Name Badge, Removing and Installing, Vehicles through MY 2014".
7 - Radiator Grille
- For vehicles with a Front Peripheral Camera -R243-, a cut-out must be installed first before installation.
- Removing and installing. Refer to → Chapter "Radiator Grille, Removing and Installing, Audi RS 6".
8 - Retaining Strip
9 - Lower Radiator Grille
- Removing and installing. Refer to → Chapter "Lower Radiator Grille, Removing and Installing, Audi RS 6".
10 - Bolt
- 1.5 Nm
- Quantity: 6
11 - Cover
- for the Audi rings
- There are different versions. Refer to the Parts Catalog.
- Removing and installing. Refer to → Chapter "Front Emblem, Removing and Installing, Audi RS 6".
12 - Bolt
- 1.5 Nm
13 - Mount
- For the parking aid sensor
- Removing and installing. Refer to → Chapter "Front Parking Aid Sensor Mount, Removing and Installing, Audi RS 6".
Front Peripheral Camera - R243- Cut-Out, Installing
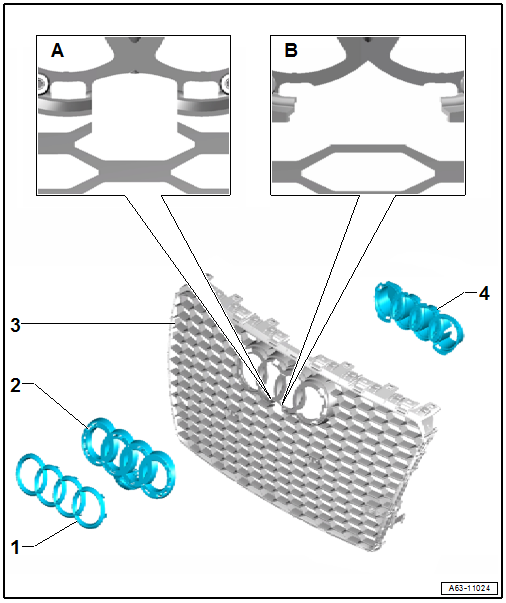
1 - Audi Rings
- Removing and installing. Refer to → Chapter "Front Emblem, Removing and Installing, Audi RS 6".
2 - Adapter
- For the Audi rings
3 - Radiator Grille
- Position the dimensions for RS 6 according to section -B- of the illustration. Refer to → Fig. " Front Peripheral Camera -R243- Cut-Out"
- Removing and installing. Refer to → Chapter "Radiator Grille, Removing and Installing, Audi RS 6".
4 - Cover
- For the Audi rings
- There are different versions. Refer to the Parts Catalog.
- Removing and installing. Refer to → Chapter "Front Emblem, Removing and Installing, Audi RS 6".
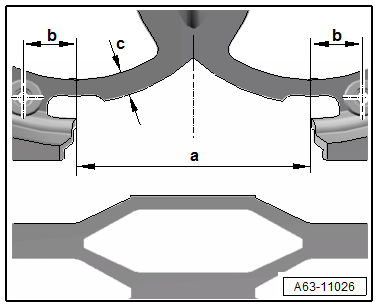
Front Peripheral Camera -R243- Cut-Out
- Position the cut-out as shown with the following dimensions
Dimension -b- is measured from the center of the screw dome for the Front Peripheral Camera -R243- outward.
- Dimension -a- = 50 mm +- 5 mm
- Dimension -b- = 20 mm +- 3 mm
- Dimension -c- = 6 mm +- 1 mm